Monday, June 30, 2014

No Time for Knitting! Well, maybe...

I've barely knitted anything in the past several weeks, what with sewing, etc. And, it's taking its toll on me. So, on Saturday evening, I cast on a pair of just straight vanilla socks but only managed to get an inch of knitting on it, before delving back into sewing because I felt the need to get the mockups done.

However, on Sunday evening, after sewing two pairs of pants, I decided that I needed to just knit and not sew for at least an evening. I knew that I still had several WIPs (not the socks) that were so close to being done.

This project just needed the second thumb gusset of my gloves to be knitted, and it would be done.
IMG_3964

In ten minutes, I was done and had steam blocked it with my iron. It was nice to be able to finish a project quickly.

Sunday, June 29, 2014

SDCC Masquerade Project #6.5 - The 10th Doctor Who Suit - Shoe Score!

Today, I had to go over to Joann's fabric to pick up some fusible interfacing and a 7" inch zipper. There's a Kohl's nearby, so I stopped in on a whim. I knew that they carried the shoes I needed for my costume, and I wanted to see how much they cost.

As luck would have it, they were having a sale on the very shoes. And I had Kohl's cash (essentially you get cash back on a percentage of your previous purchases).

So, I managed to walk away with the shoes for my costume for $17.00 USD! (These are normally $55-59.00 USD.)


Now, I have sand shoes! Happy dance!

Friday, June 27, 2014

SDCC Masquerade Project #6 - The 10th Doctor Who Suit - Finishing the Body

After the front pattern pieces were finished -- adding all of the pockets, interfacing, and padding, it was time to cut out the side pieces and back pieces in order to match the stripes.

Luckily, the side and back pieces required less prepatory work than the front pieces, but it still required some work.

There are two side pieces (Left & Right) that were the easiest to assemble. Each side needed an interface piece, which was easily basted onto the fabric via machine.

The two back pieces (Left & Right) required slightly more work. I had modified the back pieces to include a back vent (per the actual costume worn by the actor).  The original Vogue pattern has side vents, which I debated on removing from the costume, but my Viking pointed out that I, as a woman, have hips, and therefore need a little bit more room than the average male around that area. Plus, keeping the side vents would allow for a little bit more of movement than just a back vent. So, after some consideration, I elected to keep both of vents.

I used some scrap paper to create a back vent for the jacket (which was subsequently just taped onto the original.)


The two back pieces were sewn together and another piece of horsehair canvas needed to be added to the assembled back piece. This piece came from the shoulder seam to just below my shoulder blades.

It was machine basted onto it along the edges, but it did require a minimal amount of padstitching around the neck edges (for about an inch) and around the armscye edges to help keep in place. (The original Vogue instructions don't actually tell you to do this part, but I know from past experience -- as well as double-checking myself on my tailoring books -- that this step helps makes the jacket lay better.)


Once everything was interlined and basted into place, I could start sewing the side/back pieces to the front to form the shell of the coat.

It pleases me to no end when stripes match up.


Here's the completed body (sans sleeves).


Now, onto the hard part...the sleeves....

Thursday, June 26, 2014

SDCC Masquerade Project #5.5 - The 10th Doctor Who Suit: Fabric and Lining

(This post was originally named "Super Seekrit Project" -- which really wasn't a secret, if you're even remotely a fan of this particular show, but for the SDCC Masquerade, I wanted to keep things under wrap as much as possible.)

Over the weekend, I hit up the fabric store as I wanted to get lining for my costume. We only have black lining fabric in the house, which works for about 80% of all of our costuming needs. However, 20% of the time (and this is one of those times) that black fabric is just not aesthetically pleasing to use.

So, I ran down to one of the big box stores with coupon in hand to pick up brown lining fabric (I brought a piece of scrap fashion fabric to match the brown of the costume). I wanted to get either a matching brown or a matching teal color (just as a contrast color). They didn't have the teal, but they had a corresponding brown. And it was 50% off the price. SCORE!

Plus, I had a coupon for 20% of my total purchase price, so even better. I only needed about 4 yards, but I bought the rest of the bolt (at 7 yards), because you never know when you're going to need extra fabric. And I went off my merrily little way.

Here's the fashion fabric, the horsehair canvas, and the lining.


My fashion fabric is from Joann's Fabrics more than 5 years ago. Here are the specs:
  • Fabric Type: 55% linen 45% Rayon
  • Fabric weight: Medium
  • Fabric Color: Chocolate Brown
  • Pinstripes: Turquoise
  • Pinstripe width (in threads & mm): 2 threads - 1mm
  • Pinstripe repeat: 14.5mm
The original fabric is thought to be a lightweight 100% cotton with corn blue pinstripes @ 5 threads - 1mm
and repeat of 11.5mm. You can find more information on this website about the comparison of different fabrics: http://tennantsuit.blogspot.com/2009/04/comparing-fabrics.html

So, it's not a bad match -- certainly not perfect, but darn close enough.

Wednesday, June 25, 2014

SDCC Masquerade Project #5 - The 10th Doctor Who Suit: Front Pockets & Tailoring

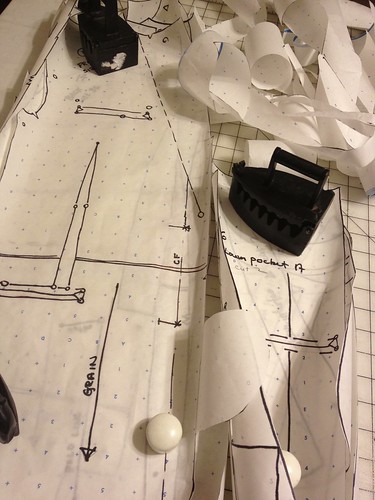
It took nearly a full day to finish the front pattern pieces, as they required the most preparatory work before adding the side pieces. The easy part was to add the simple single darts, but then I had to add all of the pockets, interfacing, etc. And there was a lot of handstitching that had to occur.

First, I worked on the faux pockets, including adding the facing for the pockets. You can see where I did some pattern matching on the inner pocket.


Then created the faux pocket flaps that covered the inner pocket matching (but I know that they are there!) The faux pockets had to be handstitched down in certain locations to keep it from flopping or gaping.


In addition to the faux pockets, the left side had a patch pocket with a box pleat. I tried to match the stripes as best as possible (despite the fact that there's a dart underneath the pocket, while adding the box pleat. There was a lot of pinning and re-pinning.


Once the patch pocket was added, it was matter of lining up stripes on the refashioned pocket flap. 


After the pockets were added, I hand-basted each of the pockets closed so that they wouldn't gape or distort the fronts while I was sewing the rest of the outfit. Then, I could start to add the interfacing and padding.

 For the interfacing, I used standard horsehair canvas (not really made out of horsehair). I prefer horsehair canvas versus fusible interfacing mostly because I tend to find fusible interfacing (while extremely convenient) sometimes makes fabric too stiff and doesn't lay naturally. (I have been told that there is fusible hymo, which I haven't tried yet, but I didn't have time to order some and try them out.)

First, I took the horsehair and quilt stitched the padding (just some wool felt) to it, then basted it to the front along the edges. The padding helps fill out certain "hollows" in the human body, such as the shoulder hollow, so that the jacket lies in a straight line from the shoulder down. Some people require more padding than others. I also cheated and machine quilted the padding to the interfacing, which is an acceptable way of doing it, but most bespoke tailors will hand stitch the padding.


However, I couldn't get away from hand-stitching. I had to padstitch the lapel area to the front fabric piece, which took several hours to complete as it requires carefully catching only one thread of the fashion fabric (so that it doesn't show) and stitch it to the interface. (And there was at least once where I had to rip out all of my work because I had placed the tailor padding in-between the horsehair and fabric and didn't notice...)

Afterwards, I added a twill tape along the lapel roll line after cutting along that faint blue line. I handstitched the twill to either side of the horsehair.


The twill tape acts as a hinge to help the collar fold over and lay correctly; otherwise the horsehair will try to "unfold" the lapel to an open position.

Only after completing all of these steps could I then cut out the side and back pieces.

Tuesday, June 24, 2014

SDCC Masquerade Project #4 - The 10th Doctor Who Suit: Cutting the Fronts

Once the mockups were done, it was time to start cutting out the fabric. As I only have about 6 yards of fabric, I don't have much room to make mistakes, especially since I have to do pattern matching, in order to ensure that all the stripes match equally.


Pattern matching requires that each piece is cut out separately and marked up carefully to ensure that the pieces match. Unfortunately, this also means that you can't cut out all the pattern pieces all at once. You have to work each set of pattern piecesfirst (including all the tailoring) before cutting out the next pattern piece.


 In this case, I cut out both fronts and started all of the tailoring necessary for them (as it does change the shape slightly) before cutting out the side or back pieces.

In addition to the tailoring, I serged all of the edges to stop any fraying. All of this preparation is a pain, but it will make everything look excellent at the end.


Monday, June 23, 2014

SDCC Masquerade Project #3 - The 10th Doctor Who Suit: Mockups

Last weekend, I took the time to create a mockup for half of the costume. I've never made this type of garment before, so making a well-fitting mockup was essential. Plus, I wanted to work out a few of the changes that I knew I needed to make for the outfit.

For example, another costumer was able to get close-ups of some of the outfits worn by said actor, and there were some faux pockets on the suit.  I'm used to doing welt pockets, but this was somewhat of a hybrid and I wanted to make sure I got the right look.

In essence, you start off making a single welt regular pocket with an inner facing.


But instead of adding welts (either single or double welt), you sew a fake pocket flap.

It's surprisingly easy to do...much easier than a double welt pocket. And for an actor who might need to get into a pocket very quickly, this faux pocket flap allows them to do so without fuztzing with an actual pocket flap of a real coat.

My first mockup of the coat turned out surprisingly well in terms of fit. All I had to do was shorten the body and sleeves slightly to make it fit my body.

(Ignore how it fits on the mannequin, as the mannequin isn't my body match.)

And shortening the pattern is really the simplest change I can make. It involves shortening the pattern at the indicated "lengthen or shorten" line.


Tuesday, June 17, 2014

SDCC Masquerade Project #2 - The 10th Doctor Who Suit: Copying out the Pattern

(This post was originally named "Super Seekrit Project" -- which really wasn't a secret, if you're even remotely a fan of this particular show, but for the SDCC Masquerade, I wanted to keep things under wrap as much as possible.)

Although this pattern is extremely close to the final costume that I need to create, there are a bajillion pieces for JUST the jacket.

In general, I tend to copy out the pieces of a given pattern so that I can better make any alterations (as needed) to my copy and keeping the original pristine. It also helps if I need to make another size of a given costume. The cats were very helpful in ensuring that my pattern paper stayed put while I copied out each pattern piece.


Untitled


It took two evenings after work to copy all of the pattern pieces of the jacket as there was a total of 29 pattern pieces, JUST for the jacket. I think this pattern has the most pattern pieces that I've ever had to use for a single piece of clothing. And, as expected with men's tailoring, probably the most complicated (in terms of fiddly) and fitting that I've made.


It's tedious work, but the pattern paper that comes with many commercial patterns is very flimsy, whereas my pattern paper (which I've commented on before) can withstand being modified, cut, and being used many times over. It's worth copying out.

Untitled

It's also survives being sat upon by various cats or folded over without ripping.

Untitled


Now, with all the pattern pieces cut out, it's time to actually start sewing the mockup. I'm hoping that the alterations necessary are minor.

Monday, June 16, 2014

SDCC Masquerade Project #1 - The 10th Doctor Who Suit

(This post was originally named "Super Seekrit Project" -- which really wasn't a secret, if you're even remotely a fan of this particular show, but for the SDCC Masquerade, I wanted to keep things under wrap as much as possible.)

As previously mentioned, the Viking & I are going to ComicCon. Some of our friends are doing the ComicCon masquerade and someone dropped from their skit. They asked if I'd be willing, provided I make my costume for it. After discussing it with the Viking, it was decided that the timeline to do the costume was going to be tight, but do-able. I had the pattern and possibly enough yardage of the appropriate fabric in my Stash. I had never made this type of outfit before, so the Viking would have to give me advice on making it as well as help me do the fitting; I would do all the sewing and construction.

So, we agreed to do the skit. The group would be able to get us tickets to ComicCon from the Masquerade director and our friends offered to split hotel costs, so we were pretty much set.

I can't talk about what we're doing for the ComicCon masquerade (it's TOP SECRET), but I can probably discuss the making of my costume to some extant.

I already had patterns that would work for the costume, with some alterations:

Untitled

And, as mentioned previously, I had the appropriate fabric in my Stash -- about 6 yards worth -- which might be enough to do the full costume with some frugality on my part. I had purchased this fabric years ago with the intention of making this very costume, but I hadn't had the time. Well, now I have no excuse.

Untitled

I wonder if you can guess what costume I am making and who I am cosplaying.

Friday, June 13, 2014

Fanime 2014

Historically, the months of May, June, and July are especially busy for me, and this year is no exception. In fact, this year is proving to be even busier than previous years. Not only did we have our Memorial Day weekend conventions, Valhalla ren faire, and SLO faire, but we're also adding ComicCon to the mix! OY! (More on that later)

However, before I get into that, I need to actually catch-up on the backlog of posts that I've been meaning to write. So, I'll start with the long Memorial Day weekend.

MyViking &; I volunteered at our local (and large) anime convention, which ended up with 40,000 guests. He was the head of the masquerade on Sunday evening, and I was working the photography for that event in addition to putting together some of the audio (music) for various contestants, as well as helping to coordinate between the contestants, judges, and the masquerade crew. Sufficed to say, the weekend was a lot of work, but it was fun.

We arrived on Thursday evening, and set up for photography on Friday. I spent three days taking photos of most of the contestants and of the Masquerade event itself (which was a 12 hour day of work!). And then on Monday, we broke down all the photography gear to be packed and returned home.

I did manage to get out on several days to check out the rest of the convention and wear my own costumes, including my Melinda May cosplay that I had worked on for several weeks. On Saturday evening, we also managed to get to one of the many concerts that were scheduled. (There was also dancing involved). But, even after the convention ended, my real "work" began in getting all the photographs processed for the convention. This process took nearly 1.5 weeks to complete -- mostly in the evenings.

But the results were definitely worth it.


I'll have the photos up on my portfolio website soon enough. I need to work out some logistics with the Fanime convention, and then they can be made available.