Showing posts with label leatherwork. Show all posts

Wednesday, October 15, 2014

Archery Leads to Leatherworking (Part 3)

Once the quiver had been stained appropriately, it was time to turn the flat piece of leather into a tube to hold arrows. Leather stitching is a bit of a tricky animal at times, but one of my go-to books on the subject is very helpful.


I had punched holes into the leather for stitching and lacing prior to making it into a tube. However,  trying to wrangle the leather into a tube was fairly difficult until I managed to get a third of the way. And then it was smooth sailing. (This is when I find myself wishing for several sets of arms to help)


Once I was done, the patterning on the stitching looks like this:

Once the tube was completed, I added the bottom stopper to the quiver, which was a royal pain in the arse to attach to the tube despite having lined up the holes on the quiver and the stopper. It took about 2 hours to finish.


Afterwards, I laced the top of the quiver with a "Single Loop Lacing".


Here's the final quiver.


Now, it's a matter of putting on the appropriate hardware so that it hangs correctly at my side or on my back. (To be continued.... Additional posts about this topic can be found here.)

Monday, October 13, 2014

Archery Leads to Leatherworking (Part 2)

After doing a lot of research -- pouring over some of my design books and looking at the Internet -- I finally decided on a simple, yet (IMNSHO) elegant design of a dragon.

Dragon, you say? A bit cliche, I know, but hey, I'm a geek that loves Sci-Fi / Fantasy, so you'll just have to deal. :-P

I made a test of the design I wanted to use.


I had some issues with it, mostly because I just starting with leather carving. I had to modify the pattern a bit -- enlarge the wings, etc. -- to make it easier for me to carve it on the final piece.

Once I traced the final pattern onto the leather, I started cutting and beveling. When you carve leather, you have to get it wet (called "casing"). Carving is a bit tedious and slow going, and I had to stop and rest, but I really liked the end result.
("Casing" the leather)

Because you have to get the leather wet in order to carve it, the leather gets dry. An application of neetsfeet oil removes the dryness and darkens it a little bit.


Then it was a matter of applying the leather stains (black & brown) to the leather, painting the dragon, then applying a clear finishing coat to protect the paint and stain. This process requires a bit of time (several days) for the leather to dry in between coats of stain/paint/finishing.


Unfortunately, I forgot to snap some in-progress photos of the process, but here's one finished photo.


Once the flat quiver was completely dry, it was time to start lacing it into a tube.

To be continued.....

More posts about this topic here.

Sunday, October 12, 2014

Archery Leads to Leathercrafting (1)

Recently, I took up archery, because it's one of those things I've always wanted to do. (Not to mention that Huntress probably influenced me "slightly" as a kid, followed closely by Green Arrow.) Plus, honestly, archery is COOL.

I've been at it for about a month and not doing too badly.


However, the one thing that taking up a new hobby is that it allows me to learn a new crafty skillset! (For The Win!!!)  Archery has a few accessories that have often been made from leather -- quivers and armguards. I already know the rudimentary basics of leatherworking, but, I didn't want a plain quiver, I wanted a design on it, which meant I needed to learn a bit of leather carving.  I felt that leather carving was a complimentary skill set to my rudimentary leathercrafting skills.

First, I did a whole bunch of research on the Internet for quivers, because I needed to figure out what type of quiver I wanted and how to make it.  (For those interested, I have a Pinterest board for leatherworking ideas.) While I researched quiver patterns, I started practicing leather carving.

I stumbled across a Flickr album for a hip quiver class where folks were learning leather carving, which had good enough photos to make my own pattern. They were kind enough to include dimensions for their quiver, which I used as a guideline to make my own pattern.

Hip Quiver Pieces

I used poster board and painters tape to make a mockup of the pattern.


I liked it, so it was time to cut out the leather.


I had some suitable veg-tanned leather lying around (as you do), and got started. I also made a bottom stopper for the quiver, which would fit inside the quiver.


To make the bottom stopper, I cut out the leather, got it wet, then formed it over an appropriate sized plastic container with rubber bands. When it dried, it was the appropriate shape.


Now that I had the leather quiver cut out, it was time to tool (i.e. carve) the leather with a pattern that I picked out.

(Additional progress posts can be found here.)

Thursday, September 25, 2014

Han Solo Costume: Crafting the Blaster Holster

Once the blaster was done, my Viking had to make the new hostler.  This first image is the existing holster. It looks big enough, but it's made for a gun that has a much smaller overall width. This section documents how he created the holster. Unfortunately, there aren't photos of each step, but I hope that it's is enough to show the overall steps of what he did.


So, using paper, he created a pattern using some reference photos that we took during the Star Wars exhibit.
Afterwards, it was a matter of cutting out the leather and crafting it appropriately.
  1. Cutting the leather to the pattern.
  2. Getting the leather wet and molding it around to the appropriate shape. A lot of binder clips and spring clamps were used to help keep it in shape.
  3. Once the leather dried to the correct shape, it was stitched together and conditioned.
  4. The pieces were individually dyed and then put together.


He dye'd the leather match the existing belt color. It looks red in this photo, but it's really a dark dark brown.


Here's the final blaster holster as well as the leg attachment.

Sunday, September 14, 2014

Learning How to Leather Carve

I've always been impressed by many artists who have done some amazing leather tooling (i.e. leather carving). I've done some basic leatherworking over time, but I have never done any leather tooling, so I thought I might rectify that oversight.

The Internet is an amazing resource to look up nearly everything that you want to do. There are a ton of tutorials and videos on leather carving. I spent a little bit of time watching some Youtube videos and reading up on leather carving about some of the basics, basic tools, etc., that I would need.

The Tandy leather store was having a September sale, so I picked up a few things that I didn't have just so I could play with leather carving:
After I got everything in place, I just started practicing with some simple basic designs. Here are two examples:


    Here are a couple of the resources I looked at on the web. There are a lot, so I suggest doing a Google search on leather carving.

    Sample resources:

    Thursday, September 19, 2013

    Learning to Hand-Sew Leather

    Things in my life are somewhat in flux, right now. Members of my family (both human and feline) are having serious medical issues, and the energy I have is being spent primarily on them instead of other things (like crafty goodness).  There are 'other' things eating up my energy, which I won't go into at the moment. However, I do have periods of downtime and keeping busy helps me take my mind off of various things, but I don't have the wherewithall to start anything new.

    So, I took the opportunity to work on some of my UFOs (UN-Finished Objects) that I have lying around. These UFOs are of various crafting projects; some are knitting, crochet, sewing, and some are leather. In this case, I opted to work on a leather project where I had cut out the pieces some time ago, but haven't put together yet.

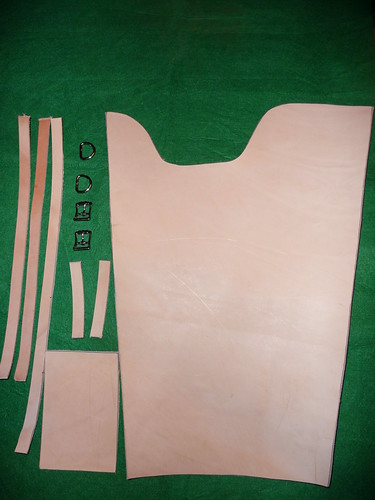
    This project is a messenger bag using some oiled leather that I had left over from a previous project. The pieces are (left-to-right, top-to-bottom): inside pocket piece, front piece (with flap), outside pocket piece, back piece, and the one long piece in the middle is the bottom & sides of the bag.


    Sewing leather is no different from sewing fabric, except it's a bit more labor intensive. You can use a sewing machine that can handle leather (like an industrial sewing machine) or you can hand-sew leather. In this case, I  needed more practice hand-sewing leather. Before I started sewing, I punched the D rings into the long side "strip" of the bag.

    Then, it was a matter of punching holes in all of the leather pieces.


    Afterwards, I threaded two needles with waxed nylon thread and started sewing. I started with a leather sewing awl, but found the tension better if I just used two needles. (Learn more about saddle stitching in this YouTube video.)

    Here's the finished messenger bag from the side.


    And here is a view from the top. I made a few mistakes here and there, including not giving enough of a "seam" allowance by punching the holes too close to the edge. Plus my stitch tension is a bit uneven, so it pulls in certain places. The bag is completely serviceable and will probably be gifted to my Eldest Nephew (as he was very jealous of his sister's messenger bag and wanted one for his own).

    I still need to add the bag straps, but those are fairly easy to make.


    Overall, however, it was a definite learning experience.  In order for me to get better hand sewing leather, I have to make leather projects to get better as it behaves very differently from fabric. I'll be making another bag soon, hopefully.

    And here's your obligatory kitten photo! (They're getting huge and are a constant source of joy in my life)


    Wednesday, August 14, 2013

    Making a Pair of Elvish Gloves for ConVolution

    For ConVolution, I want to have a series of outfits that I can wear throughout the weekend. One is a "generic" elvish outfit. Some time ago, at an outdoor festival, I had seen someone selling very beautiful leather gloves that were Elvish in nature. However, their asking price was a helluva more than I had wanted to spend (a hundred or so dollars).

    Consequently, I opted to make my own, as I thought to make more than one pair. I made some preliminary sketches of what I wanted -- based on what I liked and didn't like at the ones I saw from the festival. Their version was nice, but it had very stiff seams that cut across the palm of the hand, which I didn't like. They also used a very stiff leather, and I felt that a garment weight would work much better for gloves.


    I wanted to build one or more outfits that would work with these gloves, but first, I had to make the gloves.

    In order to start this project, I traced out my hand on some graph paper, and started sketching out the makings of a pattern for both the front and back of the hand based on my drawings. I wanted it to end about the second knuckle of my fingers.


    I added a generous seam allowance on all edges (so I could play with ease & fit), and I also drew in my design marks.

    I made one mockup of the full glove without any design features just so I could get a visceral feel of the finished glove. This first mockup wasn't quite what I wanted, but was in the ball-park. I took those changes and marked them onto my master pattern. I played around with how it would be constructed.

    In fact, I made three separate mockups in muslin; in three separate ways to see which one would get a better fit & look.  I had an "A-HA" moment after making the first one that resulted in an "easier" construction to get the look I wanted. Consequently, I used differing construction techniques to see what would work best for the final product.
    •  #2 has seams that go up both left & right sides 
    • #3 has a "fold" on the left side and seams on the right.


    I also tried some design features on the back of the glove mockups to see if I liked how it looked and felt.


    I finally decided to go with #2 with some minor alterations. Because muslin is a fabric that won't necessarily "stretch" like leather, the mockups I made were slightly a bit too snug on my hands.

    We had some lovely green suede lying around so I started making the final version. I used purple stitching as an offset to the green. (I decided not to add any design features on the back of the hand; opting rather for straight forward functionality.)


    There's still some work that I'd like to do, such as getting silvery leather paint and painting stylistic leaves or something appropriately Elvish or Tolkein on each section, but I'll wait for a bit until I can finalize my other designs.

    I am finding that I do like the design process, and find it pretty fulfilling to bring something from concept design to pattern to completed piece. There are times when it is a pain to make these ideas come to life (in terms of "how the heck do I construct this?!?", but very satisfying when you finally get it right. I find it "easier" to accomplish this effort sewing-wise versus knitting.

    Friday, September 21, 2012

    Cigar Case

     
    My entire house is one large crafting room that just happens to have a kitchen & bedrooms attached to it. A good of mine keeps telling me it's like an atelier's workshop -- at any given moment you can start any given project and have most of the materials at your disposal.
     
    She's got a very romantic way of putting things.
     
    Me? I see a house that needs seriously cleaning up.
     
    The reality is probaby somewhere in between. The house IS a mess and I can start nearly any project I want (within my realm of interest) almost immediately.
     
    Take for instance, this particular project. I have a wonderful humidor (that's for cigars) that very good friends gave to me for my birthday one year. It holds about 3-4 cigars and is just Fricking COOL. It's more portable than my travel humidors, but I needed a carrying case for it for places like the Renaissance Faire. (Yes, I smoke cigars on occasion. It's a guilty pleasure.)
     

    So, one night, I had about 1.5 hours to spare, so I grabbed some scrap pieces of leather that were from my Chinese armor project, my leather awl, and got to work. I used the scrap leather and figured out how much to wrap around to make a tube.

    Carrying Case for the Humidor
     
    Then, it was a matter of making a cover to go over the tube, and making a belt hook. I made some leather cord from more scraps so I can use it as a closure for the belt hook.

    Carrying Case for the Humidor 2
    It's a bit rustic looking, and I can probably make something better, but it's not bad for 1.5 hours worth of work. The longest part was handsewing through the leather with a leather awl.

    Carrying Case for the Humidor
    The finished product kinda looks like a cigar itself, doesn't it?

    Monday, July 30, 2012

    Leather and then Some

    Sometimes, I want to do something a little different from the norm. In my opinion, it's good to have a wide range of skillsets ...especially when the zombie apocalypse should occur. And it's even useful to create things that you need on a daily basis.

    In my case, I wanted a new belt to match my blood red shoes. Luckily, I had some leather and belt findings lying around.

    Belt Blank


    Leather Belt 1

    After some quick use of my hand-dandy leather tools (all conveniently placed in a single toolbox) and using a favorite belt as a generally template, I had a brand new belt to use for tomorrow.

    Finished Leather Belt


    Leather Belt Finished

    In addition, I still had some left over leather from another project, so I created a belt hanger for me to use at various Renaissance Faires. Simply put, a belt hanger hangs from your belt and can hold a variety of things, from small bags to tankards. At Ren Faires, I primarily hang my tankard. These things cost anywhere from $10 - $20.00 a pop. The left over leather cost me nothing, but the lovely Kells Dragon conch only cost me $3.00.

    Belt Hanger

    Belt Holder