Knitting-wise, 2016 has gotten off to a great start. I've finished a bunch of projects this January alone. Of course, I've also had a bit of start-itis, so finishing these projects is a good thing. Surprisingly, all of my knitting has been gift-knitting thus far.
It's an unusual occurrence for me, but my recipients have been pretty happy.
Showing posts with label gloves. Show all posts
Showing posts with label gloves. Show all posts
Tuesday, January 19, 2016


Tuesday, April 7, 2015
FO Round Up for April - March
I just wanted to post some of the finished objects that I've finished in the past 1.5 months. I've been suppressing my start-itis syndrome by going on a finishing jag.

First my completed tiger socks, using Regia. My cat informs me that the toes needed to be white like his toe socks.
In March, I started a quick project so I can try out a new yarn from Yarn on the House (YOTH) that is a merino, nylon, cashmere blend in DK weight. I bought the skein at Stitches West.

So, I made the Honey cowl from it. I made an intermediary size, casting on 180 stitches.

It's a relatively quick knit, and I love the patterning of the slipped stitches.

The yarn is a mottled / heathered green. And after being blocked, it is rather soft and squishy. It also stood up to being ripped several times over. I really love this yarn.

Sometime in early March, I also finished up a pair of fingerless gloves using Stray Cat Yarn's Electric Avenue. I love the self-striping aspect of her yarns. And yes, I did line up the stripes as much as possible.


First my completed tiger socks, using Regia. My cat informs me that the toes needed to be white like his toe socks.
In March, I started a quick project so I can try out a new yarn from Yarn on the House (YOTH) that is a merino, nylon, cashmere blend in DK weight. I bought the skein at Stitches West.

So, I made the Honey cowl from it. I made an intermediary size, casting on 180 stitches.
It's a relatively quick knit, and I love the patterning of the slipped stitches.

The yarn is a mottled / heathered green. And after being blocked, it is rather soft and squishy. It also stood up to being ripped several times over. I really love this yarn.

Sometime in early March, I also finished up a pair of fingerless gloves using Stray Cat Yarn's Electric Avenue. I love the self-striping aspect of her yarns. And yes, I did line up the stripes as much as possible.

Of course, now, that I've finished these projects, I can start a LOT MORE!
Wednesday, February 4, 2015
How to Knit Long Fingerless Gloves
I like to knit a lot of fingerless gloves as I find them extremely useful in a variety of situations. I particularly like long fingerless glvoes (elbow-length), for when I want a little bit of extra warmth when I'm wearing a t-shirt, but don't want to wear coat. (And it's easier to carry around gloves than a jacket.)
I've written up a general recipe for how to knit yourself long fingerless gloves, specifically in relation to my knitting of my Doctor Who Scarf Gloves. However, you must know your knitting gauge and you must have your arm measurements, as shown below.
If you don't want a generic recipe, I've included pattern instructions for *my* size gloves below. I hope this helps you. If you have any questions, please leave a comment below, and I'll answer as best as I can.
Choose from one of the following:

Now for the math part:
I put together a worksheet if you don't want to do the math. Fill in the GOLD boxes.
Consequently, my general pattern is this:
The following illustration should help you get started. Remember to follow the rest of the original scarf pattern.

In order to make it scale correctly for the gloves, I divided the number of rows by 2. For example, if the pattern said, 22 rows of Red, then I would only knit 11 rows instead. (I was also contemplating dividing by 4 so I could incorporate more colors into the gloves, but in the end, I chose to divide by 2.)
I've written up a general recipe for how to knit yourself long fingerless gloves, specifically in relation to my knitting of my Doctor Who Scarf Gloves. However, you must know your knitting gauge and you must have your arm measurements, as shown below.
If you don't want a generic recipe, I've included pattern instructions for *my* size gloves below. I hope this helps you. If you have any questions, please leave a comment below, and I'll answer as best as I can.
Choose from one of the following:
- Generic Recipe for Gloves -- how to take measurements and come up with your own pattern
- Dealing with Thumbs -- thumb gussets? afterthought thumbs?
- Pattern for Small-Medium Gloves -- pattern for my sized gloves
- Stripe Pattern for Doctor Who -- how I did the stripe pattern
Generic Recipe
- Make a gauge swatch.
- Get your stitch count - number of stitches per inch
- Get your row count - number of rows per inch.
- Measure your arm. You are going to need someone to help you with this part:
- A -- the measurement around your wrist
- B -- the measurement around your arm just below your elbow (or wherever you want the gloves to end)
- C -- the distance between A & B. This measurement helps determine how much you need to decrease from your elbow to your wrist.
- D -- the measure around your arm at half the distance of D. For example, if C = 9 inches, then you want to measure your arm at 4.5 inches.
Now for the math part:
- Number of stitches at A = A x stitch gauge
- Number of cast on stitches = B x stitch gauge = ___
- Number of stitches at D = D x stitch gauge = ___
- Number of stitches to decrease (E): = #2 - #1
- How many rows to decrease:
- (C x row gauge) ÷ #4 = Decrease 1 stitch by ____ rows
I put together a worksheet if you don't want to do the math. Fill in the GOLD boxes.
Dealing with the Thumb:
Personally, I like thumb gussets, but you can do any sort of thumb treatment for your gloves. Here's some ways you can deal with the thumb. I've linked some tutorials that I found (but will not vouch for... so caveat emptor). I've tried all three treatments and prefer thumb gussets
- Thumb gussets
- Thumb holes -- where you stop knitting in the round and knit flat for a few rows:
- Afterthought thumbs (originally made popular by Elizabeth Zimmerman)
NOTE: Make sure to use the Jogless Jog method for any stripe color work.
Pattern for Small-Medium Gloves
If you don't want to do the math, or want an example, the following are MY numbers for gloves that fit me.- A: 6 inches
- B: 10 inches
- C: 9 inches
- D: 8 inches
- Gauge:
- Stitch gauge: 8 st/ inch
- Row gauge 9 rows / inch
- At B, cast on 80 stitches = B (10 inches) x stitch gauge (8 stitches/inch)
- At D, I should have about 64 stitches = D (8 inches) x stitch gauge (8 stitches/inch)
- At A, I should have 48 stitches = A (6 inches) x stitch gauge (8 inches)
- For decreases:
- I need to decrease my stitch count between A & B by 32 stitches ===> 80 stitches - 48 stitches = 32 stitches
- I have 81 rows to decrease 32 stitches == C (9 inches) x 9 rows/inch
- So, I have to decrease by 1 stitch every 2.5 rows. The .5 rows is a bit of an annoyance to remember, but I can double the row count (2.5 x 2 = 5): Decrease 2 stitches every 5 rows
81 rows ÷ 32 stitches = 2.5 rows per stitch
Consequently, my general pattern is this:
- Cast on 80 inches and do ribbing for 1.5 inches.
- Switch to Stockinette and decrease 2 stitches every 5 rounds.
- Continue Step 2 until you reach 4.5 inches (C ÷ 2).You should have 64 stitches (or thereabouts)
- Continue Step 2 until until the glove is 9 inches @ 48 stitches.
- Knit rounds until reaching the base of the thumb.
- Work glove and thumb gusset until you have 17 stitches for the thumb. (See thumb gusset tutorials above).
- Place 17 thumb stitches on waste yarn.
- Continue working the rest of the stitches (47) in the round.
- Make 1 stitch to get 48 stitches.
- Continue working in the round until 1.5 inches from desired length.
- Do 1.5 inches of ribbing.
- Cast off
- Thumb:
- Pick up 17 stitches of the thumb + 4 more stitches
- Knit thumb until desired length.
Note: These are general pattern instructions.
Please make any modifications as you need for yours.
Please make any modifications as you need for yours.
Stripe Pattern
For the Dr. Who Stripes, I followed the original scarf pattern as listed on the Doctor Who Scarf webpage. I started the stripes as follow, using either end of the scarf to start a new glove. Although, frankly, you can probably start anywhere in the pattern and get your own unique looking set of gloves.The following illustration should help you get started. Remember to follow the rest of the original scarf pattern.
(Divide row count by 2)
In order to make it scale correctly for the gloves, I divided the number of rows by 2. For example, if the pattern said, 22 rows of Red, then I would only knit 11 rows instead. (I was also contemplating dividing by 4 so I could incorporate more colors into the gloves, but in the end, I chose to divide by 2.)
Monday, February 2, 2015
Knitting Doctor Who Scarf Gloves
Despite having multiple projects on the needles, I got a bug in my ear to add one more project to the list -- a Doctor Who set of fingerless gloves! I had made a full sized scarf on the knitting machine years ago for my Viking, and it's an impractical thing to wear on a regular basis -- except for when cosplaying the Doctor! Fingerless gloves would be a little easier to knit and wear.
However, this new project required the purchase of some yarn, in specific colorways. A trip to my LYS yielded colors that were close to what I wanted. (Some colors were slightly off, but it's what the LYS had in stock and I really wanted to cast on right then and there!)

An initial test swatch told me that the yarn weight was wrong -- the fabric was just too thick for my liking, and the bright yellow was going to bother me. Plus, I had missed one colorway So, I went back to my LYS and scoured their yarn selection. I wanted a thinner fabric, hence, I needed a thinner weight yarn. Consequently, I ended up the Cascade 220 sock weight yarn (Heritage solids).


As a scarf reference I used the "definitive" Doctor Who Scarf website that lists out the color combinations and number of row repeats for each color. Specifically, I used the original scarf pattern, which is called the Acheron Hero Scarf.
I chose spots in the pattern that I felt were representative of the scarf and that looked good and started knitting there. For these, I selected the ends of the scarf and knitted towards the middle.
In order to make it scale correctly for the gloves, I divided the number of rows by 2. For example, if the pattern said, 22 rows of Red, then I would only knit 11 rows instead. (I was also contemplating dividing by 4 so I could incorporate more colors into the gloves, but in the end, I chose to divide by 2.)
NOTE: Make sure to use the Jogless Jog method when switching colors.
They aren't too shabby.

Plus the Cascade 220 Sport superwash is really soft.


However, this new project required the purchase of some yarn, in specific colorways. A trip to my LYS yielded colors that were close to what I wanted. (Some colors were slightly off, but it's what the LYS had in stock and I really wanted to cast on right then and there!)
Cascade 220 Sportweight superwash
An initial test swatch told me that the yarn weight was wrong -- the fabric was just too thick for my liking, and the bright yellow was going to bother me. Plus, I had missed one colorway So, I went back to my LYS and scoured their yarn selection. I wanted a thinner fabric, hence, I needed a thinner weight yarn. Consequently, I ended up the Cascade 220 sock weight yarn (Heritage solids).

(Note: I had PLENTY of left overs from each skein.)
While most of the colors were exact, the brown is slightly too dark and the tan is a little too light, but as a design choice, I decided to go with it. Here are the colorways I selected from Cascade 220 Sockweight:
- 5662 Maroon (maybe too red, but it works)
- 5663 Wine
- 5631 Charcoal (there might have been a better darker grey for this)
- 5639 Brown (slightly too dark)
- 5643 Sunflower
- 5681 Limestone (slightly too light of a beige)
- 5640 Cinnamon

As a scarf reference I used the "definitive" Doctor Who Scarf website that lists out the color combinations and number of row repeats for each color. Specifically, I used the original scarf pattern, which is called the Acheron Hero Scarf.
I chose spots in the pattern that I felt were representative of the scarf and that looked good and started knitting there. For these, I selected the ends of the scarf and knitted towards the middle.
In order to make it scale correctly for the gloves, I divided the number of rows by 2. For example, if the pattern said, 22 rows of Red, then I would only knit 11 rows instead. (I was also contemplating dividing by 4 so I could incorporate more colors into the gloves, but in the end, I chose to divide by 2.)
NOTE: Make sure to use the Jogless Jog method when switching colors.
They aren't too shabby.


I love these. I might make another pair using a different scarf or maybe even Romana's scarf. I still have a ton left from each skein.
I'll be posting the actual pattern for the gloves very soon, so you can make your own.
Wednesday, October 8, 2014
Knitting FO: Stained Glass
It's been a while since I posted any knitting entries, but I'm glad to say that I have a finished object OFF the needles.
In this case, it's a pair of finger-less gloves where I had some simple two-stranded colorwork.

The yarn:

It's a simple and fun knit that looks a little bit more complicated than reality. The black yarn really makes the color pop out, and the vertical stripes are a nice visual element.
In this case, it's a pair of finger-less gloves where I had some simple two-stranded colorwork.
The yarn:
- Cascade Silk Heritage
- Mano del Uruguay sock yarn
The pattern is a "vanilla" set of fingerless gloves (which I have to write-up one day), where I simply alternated strands of each yarn to make a stained glass pattern.
It's a simple and fun knit that looks a little bit more complicated than reality. The black yarn really makes the color pop out, and the vertical stripes are a nice visual element.
Monday, June 30, 2014
No Time for Knitting! Well, maybe...
I've barely knitted anything in the past several weeks, what with sewing, etc. And, it's taking its toll on me. So, on Saturday evening, I cast on a pair of just straight vanilla socks but only managed to get an inch of knitting on it, before delving back into sewing because I felt the need to get the mockups done.
However, on Sunday evening, after sewing two pairs of pants, I decided that I needed to just knit and not sew for at least an evening. I knew that I still had several WIPs (not the socks) that were so close to being done.
This project just needed the second thumb gusset of my gloves to be knitted, and it would be done.
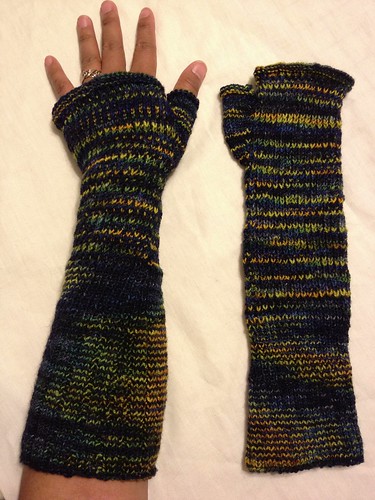
In ten minutes, I was done and had steam blocked it with my iron. It was nice to be able to finish a project quickly.
However, on Sunday evening, after sewing two pairs of pants, I decided that I needed to just knit and not sew for at least an evening. I knew that I still had several WIPs (not the socks) that were so close to being done.
This project just needed the second thumb gusset of my gloves to be knitted, and it would be done.
In ten minutes, I was done and had steam blocked it with my iron. It was nice to be able to finish a project quickly.
Thursday, October 17, 2013
Katwise Gloves
I have been extremely busy with a bunch of different things (including a new job), so I haven't had much time knitting-wise. However, I did finish a set of gloves that were inspired by an amazing artist, Katwise, who creates a variety of upcycled sweater items (like other sweater coats and arm warmers).
I've admired her creative work for a while now. The following image is one of her gloves that she sold on Etsy.

So, I decided to maybe create my own version of her gloves using a three of my handspun yarns that were approximately in the same tonal ranges:
From left-to-right/top to bottom:


I mimicked the serger effects by using Cascade Venezia Sport (in turquoise) as a "break" inbetween each color and making a few rounds of reverse stockinette before using a different yarn.
 The pattern is my own, taking measurements of my arm along the forearm, mid forearm, and wrist so that I could decrease appropriately. I used a variety of textures to make each section slightly different: stockinette, 1x1 ribbing, slip stitch, moss stitch, linen stitch etc.
I didn't care where the colors fell as I wanted something a fairly organic in look.

I think I succeeded. Hopefully, I will get to wear these at ConVolution 2013 as part of "fairy" outfit.
I've admired her creative work for a while now. The following image is one of her gloves that she sold on Etsy.
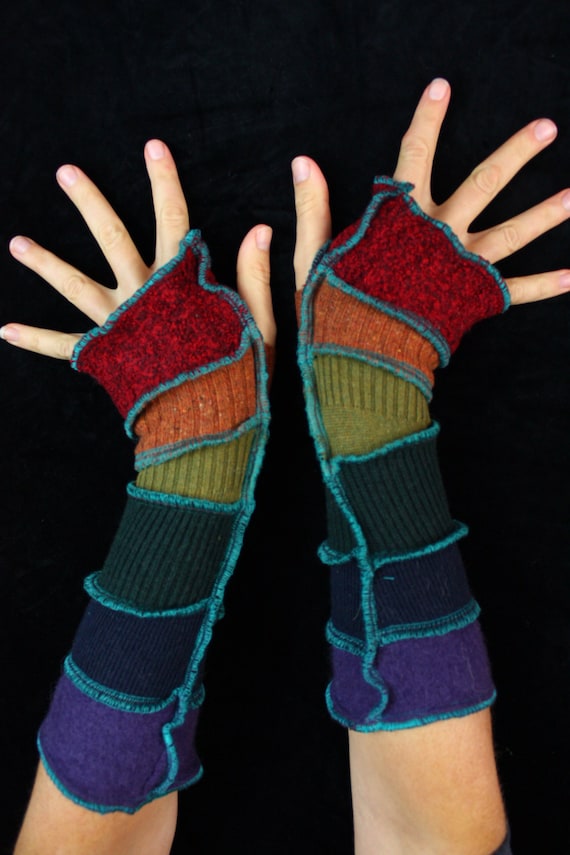
©Katwise -- Upcycled Armwarmers
So, I decided to maybe create my own version of her gloves using a three of my handspun yarns that were approximately in the same tonal ranges:
From left-to-right/top to bottom:
- Silk Cashmerino - from Frabjous Fibers
- Merino Silk - from Chasing Rainbows
- Merino - I think this is also from Frabjous Fibers, but I got it at a Yarn/Fiber swap so I'm unsure of its fiber content.
I mimicked the serger effects by using Cascade Venezia Sport (in turquoise) as a "break" inbetween each color and making a few rounds of reverse stockinette before using a different yarn.
I didn't care where the colors fell as I wanted something a fairly organic in look.
Thursday, August 22, 2013
Three-Glove Curse
Back in May, I picked up this lovely skein of yarn from my LYS. It's Manos del Uruguay in the color "Alegria" which means "happy" in Spanish. I LOVE the rich colors, and thought to make myself a pair of fingerless gloves.

I think I've talked about this on the podcast, but I have a 3-glove curse. I tend to lose one of the gloves in a pair; either in the process of making the gloves or shortly upon finishing the project.
I've had to replace one of the pair of these gloves at one point.


Usually, it's the ONLY skein of yarn that I have, it's handpainted or discountinued yarn.....and I have to carefully eek out enough yardage to make a 3rd pair. UGH.
The other day, I finally finished the 3rd glove for my "Happy Fingers" pair.

Maybe I should take Sandy's advice and use a pair of mitten keepers to ensure that I don't lose anymore.


I think I've talked about this on the podcast, but I have a 3-glove curse. I tend to lose one of the gloves in a pair; either in the process of making the gloves or shortly upon finishing the project.
I've had to replace one of the pair of these gloves at one point.
Usually, it's the ONLY skein of yarn that I have, it's handpainted or discountinued yarn.....and I have to carefully eek out enough yardage to make a 3rd pair. UGH.
The other day, I finally finished the 3rd glove for my "Happy Fingers" pair.
Maybe I should take Sandy's advice and use a pair of mitten keepers
to ensure that I don't lose anymore.Wednesday, March 28, 2012
Tardis Gloves
For Gallifrey One 2012, I decided to go ahead and create a pair of Tardis gloves for myself. After poking around Ravelry, I saw that there were quite a few Tardis patterns, including gloves.
None of them QUITE fit what I wanted, although some came close. I looked up photos of the different Tardis from the Doctor Who: The TARDIS Handbook-- which we happened to have handy around the house -- coz we're geeky like that.

So, I noodled around on the Google docs spreadsheet and came up with my own pattern. I saw that some of the existing glove used purls to either denote the windows or the paneling. I didn't like that. Some didn't have the right number of panels or windows.
I also wanted to have POLICE BOX on each hand, but no matter how much I played with the spreadsheet, I couldn't fit both words onto the small space at the top without having it wrap around to the back of the hand. So, on that front, I compromised.
I made my first one, and had some issues with the thumb placement, which I subsequently corrected in the 2nd glove. But, still, it ain't too bad (despite my lack of duplicate stich skills). Regardless, I got plenty of complients at Gallifrey One.


Eventually, I'll get around to posting up my chart, once I've cleaned up all of the notes I made on it.
None of them QUITE fit what I wanted, although some came close. I looked up photos of the different Tardis from the Doctor Who: The TARDIS Handbook-- which we happened to have handy around the house -- coz we're geeky like that.
So, I noodled around on the Google docs spreadsheet and came up with my own pattern. I saw that some of the existing glove used purls to either denote the windows or the paneling. I didn't like that. Some didn't have the right number of panels or windows.
I also wanted to have POLICE BOX on each hand, but no matter how much I played with the spreadsheet, I couldn't fit both words onto the small space at the top without having it wrap around to the back of the hand. So, on that front, I compromised.
I made my first one, and had some issues with the thumb placement, which I subsequently corrected in the 2nd glove. But, still, it ain't too bad (despite my lack of duplicate stich skills). Regardless, I got plenty of complients at Gallifrey One.
Eventually, I'll get around to posting up my chart, once I've cleaned up all of the notes I made on it.
Thursday, February 10, 2011
FO: Socks & Mitts
So, as mentioned previously, I've been getting a lot of knitting done on my commute to work. I knitted myself a new pair of socks that I made
out of skein I picked up at my LYS (Cascade Heritage Paints). It's a generous skein with nearly 500 yards in the skein. And I really like how well it knits up.

In addition, I designed my own hand warmer using the same skein as the socks and the same design elements. It's cute. I like it. The increases are incorporated into the design.
I made the right hand first, and it fits like a glove (pun intended). It's easy knitting with enough 'interest' to keep it from getting too boring.

Unfortunately, when I made the matched pair, it's not fitting as well as I would like (unlike the right one). I only made cursory notes when making the first and I tried to knit to match the glove and not my hand. I made the thumb portion too big, and the part around the fingers a bit too tight. But I know what I did wrong and will make corrections as I want to reknit the left hand.
Luckily, I have MORE than enough of the Cascade Heritage so I can easily make the 3rd glove, and I'll probably have enough left over for a baby hat or two.
Then, eventually, I'll write it up as the handwarmers as actual pattern!
out of skein I picked up at my LYS (Cascade Heritage Paints). It's a generous skein with nearly 500 yards in the skein. And I really like how well it knits up.
In addition, I designed my own hand warmer using the same skein as the socks and the same design elements. It's cute. I like it. The increases are incorporated into the design.
I made the right hand first, and it fits like a glove (pun intended). It's easy knitting with enough 'interest' to keep it from getting too boring.
Unfortunately, when I made the matched pair, it's not fitting as well as I would like (unlike the right one). I only made cursory notes when making the first and I tried to knit to match the glove and not my hand. I made the thumb portion too big, and the part around the fingers a bit too tight. But I know what I did wrong and will make corrections as I want to reknit the left hand.
Luckily, I have MORE than enough of the Cascade Heritage so I can easily make the 3rd glove, and I'll probably have enough left over for a baby hat or two.
Then, eventually, I'll write it up as the handwarmers as actual pattern!
Wednesday, November 3, 2010
Deb's Gloves
A friend of mine is a terrific beader. She makes really pretty jewelry, and she offered me a trade. She wanted handwarmers and she'd make me jewelry for them. I agreed.
We headed over to Imagiknit in San Francisco, where she picked out some lovely Abstract Fiber laceweight in the Matisse color.

However, I am incapable of really knitting with lace weight, so because the yardage was extremely generous in the skein (420 yards), I doubled up the yarn as I only needed about 210 yards per handwarmer.
I showed her some patterns on Ravelry, and she picked out the design elements she liked from a few photos. Luckily, these design elements were easy (ribbing, vertical ribbing, and some YO/k2tog lace). She wanted longer handwarmers (mid way to her elbow) with a little bit of lace at the palm.
So, I took her measurements for her arms, and sketched out the design she had requested. I made some test swatches so I could get a feel for what gauge the double strand of the yarn was going to be happy (10 stitches per 1"; 15 rows / 1.75" -- US Size 2 needles).
After I found the yarn's happy place, I cast-on. There was some re-designing on the fly to take into account my gauge, actual measurements, and where I thought elements might look good versus my initial sketched ideas.
I took copious notes for each change. There were several "fittings" along the way as she tried on fit. There were also numerous camera phone images via text message as I sent her "progress reports".

At one point when the initial 15 rows of ribbing were done, I cast on the 2nd pair of arm warmers on another set of circular US2 needles using the other end of the yarn cake. I then knit up to the 15 rows of ribbing, and then put both on 2 circular needles so I could make sure that I did all of the decreasing and design elements exactly the same.

A rough guideline for this pattern
1) I cast on 54 stitches in a 3x3 (this allowed me to fit the widest part of her forearm @ 8")
2) Knit for about 15 rounds
3) Began arm decreases (1 decrease every 3 rounds) 6x -- I made the k2tog decreases in the purl part of the 3x3 rib to "hide" the decreases. There was a total of 5.5" of ribbing.
4) Purl 3 rounds, Knit 3 rounds, Purl 3 rounds (for the next design element)
6) Knitted stockinette stitch and started the thumb gusset about 3/4" from where the wrist starts. Increased until the gusset was about 22 stitches.
7) Put the thumb stitches on a scrap yarn
8) Knit for 3 more rounds
Lace bit:
9) Purl 1 round
10) (K2TOG, YO) for the entire round
11) Purl 1 round
Finish:
12) Knit 2x2 ribbing for 3 rounds
13) cast off the hand
Thumb:
14) Picked up 22 stitches for the thumb,
15) Decreased the thumb by 2 stitches
16) BO with a sewn-off binding.
We headed over to Imagiknit in San Francisco, where she picked out some lovely Abstract Fiber laceweight in the Matisse color.
However, I am incapable of really knitting with lace weight, so because the yardage was extremely generous in the skein (420 yards), I doubled up the yarn as I only needed about 210 yards per handwarmer.
I showed her some patterns on Ravelry, and she picked out the design elements she liked from a few photos. Luckily, these design elements were easy (ribbing, vertical ribbing, and some YO/k2tog lace). She wanted longer handwarmers (mid way to her elbow) with a little bit of lace at the palm.
So, I took her measurements for her arms, and sketched out the design she had requested. I made some test swatches so I could get a feel for what gauge the double strand of the yarn was going to be happy (10 stitches per 1"; 15 rows / 1.75" -- US Size 2 needles).
After I found the yarn's happy place, I cast-on. There was some re-designing on the fly to take into account my gauge, actual measurements, and where I thought elements might look good versus my initial sketched ideas.
I took copious notes for each change. There were several "fittings" along the way as she tried on fit. There were also numerous camera phone images via text message as I sent her "progress reports".
At one point when the initial 15 rows of ribbing were done, I cast on the 2nd pair of arm warmers on another set of circular US2 needles using the other end of the yarn cake. I then knit up to the 15 rows of ribbing, and then put both on 2 circular needles so I could make sure that I did all of the decreasing and design elements exactly the same.
A rough guideline for this pattern
1) I cast on 54 stitches in a 3x3 (this allowed me to fit the widest part of her forearm @ 8")
2) Knit for about 15 rounds
3) Began arm decreases (1 decrease every 3 rounds) 6x -- I made the k2tog decreases in the purl part of the 3x3 rib to "hide" the decreases. There was a total of 5.5" of ribbing.
4) Purl 3 rounds, Knit 3 rounds, Purl 3 rounds (for the next design element)
6) Knitted stockinette stitch and started the thumb gusset about 3/4" from where the wrist starts. Increased until the gusset was about 22 stitches.
7) Put the thumb stitches on a scrap yarn
8) Knit for 3 more rounds
Lace bit:
9) Purl 1 round
10) (K2TOG, YO) for the entire round
11) Purl 1 round
Finish:
12) Knit 2x2 ribbing for 3 rounds
13) cast off the hand
Thumb:
14) Picked up 22 stitches for the thumb,
15) Decreased the thumb by 2 stitches
16) BO with a sewn-off binding.
Thursday, June 17, 2010
3rd Glove curse
Apparently, I have been saddled with a curse -- 3rd glove syndrome -- whereby, I will *lose* one glove, and be forced to make another. This has hit me twice over now.
First, it was one of my Dashing Handwarmers that I lost on a train; I think it fell out of my pocket.

Luckily, I had more of the same yarn to make another.
Then, most recently, it was my Hand Thing-a-ma-bobs. A dear friend had given me a *single* skein of hand dyed merino worsted yarn from Spincycle (120 yards) as a gift.

It took me 113 yards to make the last pair (which was a gift). So, I knew I had more than enough to make a set for myself.
I had finished the 1st glove and had started the second. I knew that I should have left it at home because I was afraid I was going to lose it. However, I didn't listen to myself, and brought it to show a friend.
And, guess, what? 20 minutes later, it was no longer in my bag. I double checked to where I was earlier, checked lost & found, filed a report WITH lost & found, but I never got it back.
I *thought* I might have enough yardage to finish it, IF I made it a little bit shorter --- having it come to my knuckles versus the 1st joints on the fingers.
I managed to eek out just enough yardage. I had 5 INCHES left. Talk about heart pounding....

Lovely, aren't they? And, oh, so warm. I have made definite use of them.
First, it was one of my Dashing Handwarmers that I lost on a train; I think it fell out of my pocket.
Luckily, I had more of the same yarn to make another.
Then, most recently, it was my Hand Thing-a-ma-bobs. A dear friend had given me a *single* skein of hand dyed merino worsted yarn from Spincycle (120 yards) as a gift.
It took me 113 yards to make the last pair (which was a gift). So, I knew I had more than enough to make a set for myself.
I had finished the 1st glove and had started the second. I knew that I should have left it at home because I was afraid I was going to lose it. However, I didn't listen to myself, and brought it to show a friend.
And, guess, what? 20 minutes later, it was no longer in my bag. I double checked to where I was earlier, checked lost & found, filed a report WITH lost & found, but I never got it back.
I *thought* I might have enough yardage to finish it, IF I made it a little bit shorter --- having it come to my knuckles versus the 1st joints on the fingers.
I managed to eek out just enough yardage. I had 5 INCHES left. Talk about heart pounding....
Lovely, aren't they? And, oh, so warm. I have made definite use of them.
Friday, November 20, 2009
Two Color on the Train
Currently, one of my projects is a sample two-color version of Swirling Gauntletts. I've done two color work before on a double-sided knitted project when I first started, but this is the first time of two colors on a single row. I only usually work on this while on the train, which affords me a good 30 minutes of just working the simple cabling pattern without interruption.
So far, so good, and I've learned a lot.
For example, when too tight is too tight. A tip that I read (after I was half-way through this glove) was that you can't pull the yarn too tight or you get puckering. Well, couple pulling the yarn too tight WITH cables (which pulls the yarn even tighter) and you get a LOT of puckering & decrease in size. The middle of the project is a lot smaller than the beginning of the project. So, for the last few rows I've relaxed my death grip on the yarn, and it's starting to even out a bit, which is good.
I've finally figured out how to hold both strands of yarn: the knit stitch in the right hand, and the purl stitch in the left hand (as this is a 2x2 rib). It's a bit slower than my normal knitting speed, but it works. English-style knitting is very weird, but for this project it works.

I may or may not make the matching set of gloves for this one. This was really meant to be a sample test with some extra yardage I had left over from my Hexagon Blanket. Plus, it's way too small to fit anyone (except maybe my neices & nephews who are still in the single-digit age bracket).
Of course, this means that I'm going to try my hand at a small Fair Isle project next. :-)
So far, so good, and I've learned a lot.
For example, when too tight is too tight. A tip that I read (after I was half-way through this glove) was that you can't pull the yarn too tight or you get puckering. Well, couple pulling the yarn too tight WITH cables (which pulls the yarn even tighter) and you get a LOT of puckering & decrease in size. The middle of the project is a lot smaller than the beginning of the project. So, for the last few rows I've relaxed my death grip on the yarn, and it's starting to even out a bit, which is good.
I've finally figured out how to hold both strands of yarn: the knit stitch in the right hand, and the purl stitch in the left hand (as this is a 2x2 rib). It's a bit slower than my normal knitting speed, but it works. English-style knitting is very weird, but for this project it works.
I may or may not make the matching set of gloves for this one. This was really meant to be a sample test with some extra yardage I had left over from my Hexagon Blanket. Plus, it's way too small to fit anyone (except maybe my neices & nephews who are still in the single-digit age bracket).
Of course, this means that I'm going to try my hand at a small Fair Isle project next. :-)
Monday, November 16, 2009
Recreate & Replace
The one nice thing about knitting is that you can fix or recreate something you've done before, or make something you want, but can't find anywhere.
In this case, I had to replace one of my fingerless gloves / handwarmer (Dashing from Knitty.com) that I lost last Thursday while on the train. I had been wearing them getting onto the train, but it probably dropped out of my pocket while in my seat.
I could have called the train's Lost & Found, but I wasn't too hopeful. On Friday, my hands were *frozen* in the morning, so I just decided to re-make the one I had lost.
Luckily, I still had two skeins of the same yarn already cake'd, as well as the pattern (with notes on my modifications for it. So on Friday night, I cast-on, then finished about 80% of it on Saturday (as we had a two hour drive for an event).
Sunday evening, I worked on it while some friends were over, then bound off as well. Unfortunately, the new glove is ever-so-slightly larger than the original. I didn't write down one of my modifications to the pattern, and was only following the pattern and not looking at the original. But this is a minor nit, and since I am an "organic" knitter, I am not going to worry too much about it.
I also didn't wash & block the new replacement, mostly because I wanted it to wear to work on Monday morning.
But now I have one finished product, and my hands were nice and warm on today's work commute.
In this case, I had to replace one of my fingerless gloves / handwarmer (Dashing from Knitty.com) that I lost last Thursday while on the train. I had been wearing them getting onto the train, but it probably dropped out of my pocket while in my seat.
I could have called the train's Lost & Found, but I wasn't too hopeful. On Friday, my hands were *frozen* in the morning, so I just decided to re-make the one I had lost.
Luckily, I still had two skeins of the same yarn already cake'd, as well as the pattern (with notes on my modifications for it. So on Friday night, I cast-on, then finished about 80% of it on Saturday (as we had a two hour drive for an event).
Sunday evening, I worked on it while some friends were over, then bound off as well. Unfortunately, the new glove is ever-so-slightly larger than the original. I didn't write down one of my modifications to the pattern, and was only following the pattern and not looking at the original. But this is a minor nit, and since I am an "organic" knitter, I am not going to worry too much about it.
I also didn't wash & block the new replacement, mostly because I wanted it to wear to work on Monday morning.
But now I have one finished product, and my hands were nice and warm on today's work commute.
Thursday, June 11, 2009
Out with the Old; In with the New
The Cigar Gloves are pretty much done. I have to bind off the last finger covering, and then it's over. They're pretty darn comfy, and I'll have to make another set of just actual fingerless gloves. I might have enough of this particular yarn to make another set. I'm absolutely amazed at the yardage that comes with the Socks that Rock Yarn by Blue moon.

In the meantime, the Entrelac scarf is almost done with the last fricking skein. Although this is my train knitting, I've felt like I'm in a project black hole with this one. I heard this term from someone else, and I've been in this situation before, so I thought to appropriate it.
A project black hole is that project, where despite all of your efforts or amount of time spent on it, seems to get *nowhere*.
In this instance, because I like long scarfs, this seems to go on *forever* and it doesn't seem like I'm making any headway, except that the skein is getting smaller. Luckily, I started the very last row today...much to my absolute relief! This will probably be finished by this afternoon's train ride.
New Project:
I've also cast-on a new project, which is "Clapotis", using a 100% Italian merino wool I got on clearance sale on my birthday. It was the last 6 skeins in a gorgeous burgandy red. It's an Aran weight wool and is soo super soft.
However, as I realized upon starting the project, that the yarn has a tendency to split if I'm not careful, despite using my sharpest needles. And the ends of the projects (both on the needles and not on the needles) are curling. However, i think this is in part how the pattern lays out. Subsequent Ravelry.com checks on other people's projects using this pattern show the curling at the ends.
The pattern is one of those really pretty, but it seems to be a viral knitting patterns -- almost everyone seems to have done this pattern after it came out -- so I've decided to call it the Viral Clap on Ravelry. LOL.
It's knit "on the bias"....as I am referring to it. It's an elongated parrallelogram, starting at one point, knitting increases every single round, until you reach the farthest point. The finished product reminds me of a bias cut fabric; and supposedly, the finished knitted piece is super stretch too.
However, this project, too, also seems like a project black hole. Right now, I'm only knitting on it in the evening for a few rows -- so I only have gotten about 4-5 inches since starting it last weekend. The stitch count increases every row, so by the time I'm at the widest part, there should be 100+ stitches & 18 stitch markers separating every 6 stitches. With the aran yarn, this should end up pretty darn warm.
As it is, I'm not making it as long as the actual recommended pattern (820 yards with a finished size of 55 x 21 inches). I have 570 yards (6 skeins), so it'll be just somewhat shorter (40 x 19 inches).
Of course, this required much of my rusty math skills. I had to figure out the area of the original pattern versus yardage used, with the stitch gauge....then apply that to the yardage I do have to keep the same yarn yardage per square inch. OY!
No wonder there's a bunch of mathematicians who have taken to knitting!
In the meantime, the Entrelac scarf is almost done with the last fricking skein. Although this is my train knitting, I've felt like I'm in a project black hole with this one. I heard this term from someone else, and I've been in this situation before, so I thought to appropriate it.
A project black hole is that project, where despite all of your efforts or amount of time spent on it, seems to get *nowhere*.
In this instance, because I like long scarfs, this seems to go on *forever* and it doesn't seem like I'm making any headway, except that the skein is getting smaller. Luckily, I started the very last row today...much to my absolute relief! This will probably be finished by this afternoon's train ride.
New Project:
I've also cast-on a new project, which is "Clapotis", using a 100% Italian merino wool I got on clearance sale on my birthday. It was the last 6 skeins in a gorgeous burgandy red. It's an Aran weight wool and is soo super soft.
However, as I realized upon starting the project, that the yarn has a tendency to split if I'm not careful, despite using my sharpest needles. And the ends of the projects (both on the needles and not on the needles) are curling. However, i think this is in part how the pattern lays out. Subsequent Ravelry.com checks on other people's projects using this pattern show the curling at the ends.
The pattern is one of those really pretty, but it seems to be a viral knitting patterns -- almost everyone seems to have done this pattern after it came out -- so I've decided to call it the Viral Clap on Ravelry. LOL.
It's knit "on the bias"....as I am referring to it. It's an elongated parrallelogram, starting at one point, knitting increases every single round, until you reach the farthest point. The finished product reminds me of a bias cut fabric; and supposedly, the finished knitted piece is super stretch too.
However, this project, too, also seems like a project black hole. Right now, I'm only knitting on it in the evening for a few rows -- so I only have gotten about 4-5 inches since starting it last weekend. The stitch count increases every row, so by the time I'm at the widest part, there should be 100+ stitches & 18 stitch markers separating every 6 stitches. With the aran yarn, this should end up pretty darn warm.
As it is, I'm not making it as long as the actual recommended pattern (820 yards with a finished size of 55 x 21 inches). I have 570 yards (6 skeins), so it'll be just somewhat shorter (40 x 19 inches).
Of course, this required much of my rusty math skills. I had to figure out the area of the original pattern versus yardage used, with the stitch gauge....then apply that to the yardage I do have to keep the same yarn yardage per square inch. OY!
No wonder there's a bunch of mathematicians who have taken to knitting!
Wednesday, May 27, 2009
Cigar Gloves
The photographer (aka Cigar) gloves are almost done. I've got the thumb left on the second hand left to finish, then I can bind off.
In this pattern, the thumb, index, and middle finger are "fingerless" and the pattern stops short of the 1st knuckle. The ring & pinky fingers are fully covered. This should help keep my hands relatively warm while operating a camera. (I only need those fingers to operate the camera controls & lenses).
The gloves went by surprisingly quickly using "left over" yarn from my first pair of socks. I'm thinking about making a small pocket for the palms to hold hand warmers, but I can easily make those later. I'm also trying to figure out IF I can make coverings for those three digits without adding buttons (i.e some sort of elastic that wraps around the hand or another finger?), but I highly doubt that will work.
Actually...now that I think about it, I might be able to knit individual tops for those three digits, then sew a part of the circumference into the ribbing of the glove. I might have to knit it very stretchy in order to remove the finger tops when needed. Hmm. Must experiment. 2x2 ribbing? Or just elastic? Hmm...
Regardless, once this is done, I'm pretty much out of knitting projects to start, which is sad....at least without buying more yarn. I did finish the guage for the shawl, but that's more of a very slow project since the yarn & needle gauge are...not conducive to overall health of my hands...and I need to buy longer needles for this specific gauge. The ones I have are much too short both in needle & cable length.
I might actually have to go back and finish the projects currently in hiberation -- mostly crochet projects.
In this pattern, the thumb, index, and middle finger are "fingerless" and the pattern stops short of the 1st knuckle. The ring & pinky fingers are fully covered. This should help keep my hands relatively warm while operating a camera. (I only need those fingers to operate the camera controls & lenses).
The gloves went by surprisingly quickly using "left over" yarn from my first pair of socks. I'm thinking about making a small pocket for the palms to hold hand warmers, but I can easily make those later. I'm also trying to figure out IF I can make coverings for those three digits without adding buttons (i.e some sort of elastic that wraps around the hand or another finger?), but I highly doubt that will work.
Actually...now that I think about it, I might be able to knit individual tops for those three digits, then sew a part of the circumference into the ribbing of the glove. I might have to knit it very stretchy in order to remove the finger tops when needed. Hmm. Must experiment. 2x2 ribbing? Or just elastic? Hmm...
Regardless, once this is done, I'm pretty much out of knitting projects to start, which is sad....at least without buying more yarn. I did finish the guage for the shawl, but that's more of a very slow project since the yarn & needle gauge are...not conducive to overall health of my hands...and I need to buy longer needles for this specific gauge. The ones I have are much too short both in needle & cable length.
I might actually have to go back and finish the projects currently in hiberation -- mostly crochet projects.
Subscribe to:
Posts (Atom)