Showing posts with label photography. Show all posts

Friday, January 27, 2017

The Art of Phone Photos

I haven't done a Friday Photo post in a while, so I thought I would go over some of my process. This was an impromptu photo shoot. When I was making tea in my new teapot, I wanted to get a photo of it, but didn't want to take too much time to set up.

I don't like taking the big camera out too much, and my iPhone camera takes a halfway decent photo, plus many of the various camera apps with their filters will do in a pinch. The best camera is the one that you have on you.

The following photo took about 3 minutes to take, process, and upload, which is about the same amount of time it took my tea to steep enough to drink. So, it might seem like a lot of steps, it really isn't.

As readers of this blog might be familiar, my dining room table usually has a protective board on it or cats. Neither of which are appropriate backdrops for my image, despite the cats being super cat regardless.


For the background, I grabbed a piece of scrap fabric nearby so as to give it a bit more ambiance. Unfortunately, the fabric was all wrinkled and I didn't want to pull out the ironing board. I hoped that maybe some post processing would minimize the wrinkling in the background.

I opened up the blinds on the left side  (you can see more light shining on the left side), which would give me a bit of natural side lighting.

Original Photo

I was going to post this on Instagram so I knew that it'd have to be cropped accordingly. I shot the photo in a regular frame, capturing the elements I wanted --- the spout, the bottom of the board, the cover of the tea, the tea leaves, and part of the teapot handle. 

I didn't want to use the "SQUARE" option because I wanted to control what was shown. I took this photo, then rotated it slightly so that the square board was level and cropped.

Important Elements

The cropping took a lot of the distracting wrinkles out. The tea leaves were a bit too dark, so I increased the exposure. I also increased the contrast , black point, and saturation by a little bit to make the red pop and the handle a bit darker.

 
Cropped photo

At that point, I took the photo into Prisma, and used one of their base filters. I wanted it to give the impression of a drawing, but I did lower the opacity of the filter to about 15%.

After the Prisma filter @ 15% opacity

I took that photo into Instagram and used  another one of their filters at a lower opacity. Then I increased the contrast and saturation to give a better distinction between the reds & golds. I also used a radial tilt shift and a vignette to downplay the wrinkles a bit more.


The wrinkles still bothered me QUITE a bit, but it would have meant that I needed to find another non-wrinkled piece of fabric or iron the one I had, but that would had meant more work plus at that point my tea was ready to drink.

I suppose I might take this photo again in the future and set it up properly, but for what I had, it worked well enough.

Friday, June 13, 2014

Fanime 2014

Historically, the months of May, June, and July are especially busy for me, and this year is no exception. In fact, this year is proving to be even busier than previous years. Not only did we have our Memorial Day weekend conventions, Valhalla ren faire, and SLO faire, but we're also adding ComicCon to the mix! OY! (More on that later)

However, before I get into that, I need to actually catch-up on the backlog of posts that I've been meaning to write. So, I'll start with the long Memorial Day weekend.

MyViking &; I volunteered at our local (and large) anime convention, which ended up with 40,000 guests. He was the head of the masquerade on Sunday evening, and I was working the photography for that event in addition to putting together some of the audio (music) for various contestants, as well as helping to coordinate between the contestants, judges, and the masquerade crew. Sufficed to say, the weekend was a lot of work, but it was fun.

We arrived on Thursday evening, and set up for photography on Friday. I spent three days taking photos of most of the contestants and of the Masquerade event itself (which was a 12 hour day of work!). And then on Monday, we broke down all the photography gear to be packed and returned home.

I did manage to get out on several days to check out the rest of the convention and wear my own costumes, including my Melinda May cosplay that I had worked on for several weeks. On Saturday evening, we also managed to get to one of the many concerts that were scheduled. (There was also dancing involved). But, even after the convention ended, my real "work" began in getting all the photographs processed for the convention. This process took nearly 1.5 weeks to complete -- mostly in the evenings.

But the results were definitely worth it.


I'll have the photos up on my portfolio website soon enough. I need to work out some logistics with the Fanime convention, and then they can be made available.

Wednesday, July 10, 2013

Avengers Gowns

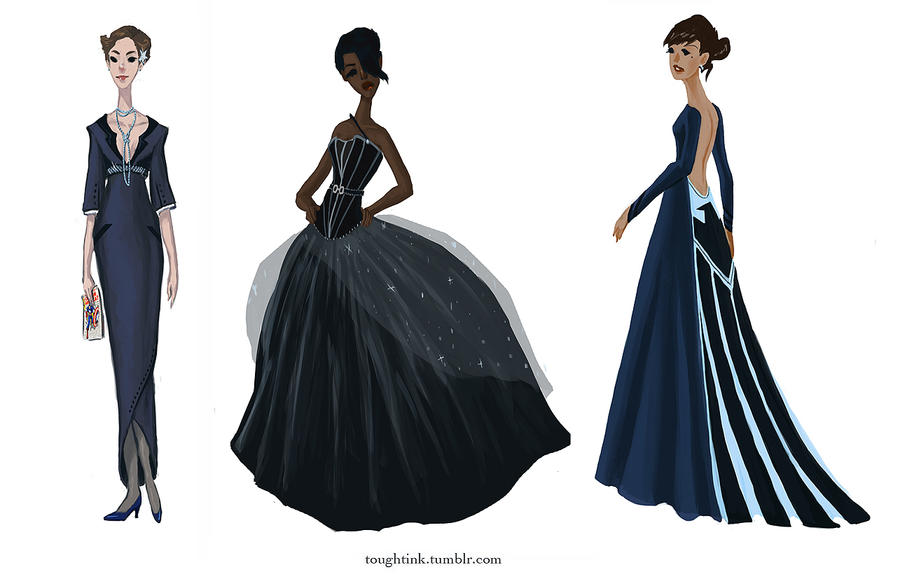
Some time ago, a wonder illustration appeared on DeviantArt by Kelsey Michele, called "Avengers Gowns". I love how many artists take beloved characters into completely new directions.

For the Avengers Gowns, Kelsey flipped most of the genders and put them into evening gowns (of a sort). And my wonderful friends decided to do interpretations of these gowns, and I was lucky enough to be able to photograph them at the WesterCon66 Masquerade.

First up, Thor & Captain America:


Then IronMan & the Hulk

Loki in her green gown and wonderful headdress

Then there's Hawkeye (right) decked out in PVC

And Agent Maria Hill (rightmost)


It's a wonderful take on all of the characters of the movie, and I think they did a spectacular job costuming for their chosen outfits. Their costuming talents are superb and the attention to detail really shows.

Tuesday, July 9, 2013

Knitted Klingon!

As masquerade photographer, I often get to view a costumer's creations before the convention public, and many of them just blow my mind of the craftsmanship, creativity, and effort that these costumers put into their outfits. It's a little perk, but I enjoy it immensely.

This WesterCon had a motley of spectacular costumes, and I enjoyed every single one of them. However, when someone mixes my two loves -- crafting and science fiction/fantasy -- and bring them together in a grand mash-up of creativity -- well, I just have to stand up and take notice. And this particular masquerade entry just blew my mind as a knitter!

IT'S A KNITTED KLINGON!

©Jade Falcon

Yes, you see that right! It's an entire Klingon outfit that has been knitted head to ankle.

The costumer in question (Shael Hawman) knitted an entire Klingon outfit --- from her cabled hat to mimic the Klingon forehead ridges, to her braided yarn wig, to her simple ribbed dress. This Klingon is dressed head to foot in yarn-y goodness! And her bat'leth was knitted out of yarn over a bat'leth form! (Or at least I think so -- I'm not quite sure how she created her bat'leth.)

©Copyright Jade Falcon

This costume was something that I hadn't even conceived of creating, but now that I see the finished object, it is definitely a marvel to behold. She knitted the whole thing out of acrylic yarn -- as she told me it would be much too expensive to knit completely out of wool. Even so, she said was very warm underneath all those knitted garments.

I found out later that she won Best in Show - Workmanship at BayCon2013. So much kudos to Shael on her amazing outfit.

(I'm still working on getting the rest of the Masquerade photos up, but I thought you guys might enjoy a sneak peak.)

Thursday, July 4, 2013

3rd of July Fireworks

Tonite, we went off to a local fireworks display that we had not yet seen before, so I could get my fireworks fix. It was put on by the sheriff's department, and was at a local elementary school (ontop of a very large hill). There were a lot of families with children.


The show, itself, was okay. It wasn't spectacular, but not bad. They only set out a few fireworks at a time, so in a way it was a bit sparse, which IMO, doesn't make for quite the dramatic photographs. But, their budget was small in comparison to other shows, so I understand the constraints.


On the flip side, it was REALLY REALLY CLOSE. We were about 100 yards away from where they were launching them. There were a few times, I had to go really wide (24mm) in order to catch some shots. I'm glad I brought a wider angle lens.


Unfortunately, despite my sage advice about the remote shutter release, I did not have mine with me. After looking for it, I realized that it had gotten packed with my lighting gear for WesterCon66 and had been put on the truck as of Tuesday before the 4th. :-(


So, I used manual setting with F22 and a 3.2 second shutter speed and a self-timer delay. I tried to time it as best as possible, and luckily, with only a few launches at a time, it worked fairly well.


I hope to get more photos before the weekend goes out, and will post those as I can.

Wednesday, July 3, 2013

How To: Shooting Fireworks

Are you planning going out on the 4th of July to shoot fireworks? Here are some helpful hints to taking fireworks photos in your area.

(All photos below are taken at about 100mm @ ISO 100 F11 - F22 for 1-5 seconds. )

1. Get to your location EARLY and decide where to take photos 

You'll need to get to your location early so you can set up your photography gear quickly and time to do some test runs before the big show. You'll want to know where you are in relationship to the fireworks are being launched. You might want to:

  • consider taking photos with trees, buildings, or people in the foreground to show scale of the fireworks OR
  • simply taking photos of the fireworks in the sky. 
Whatever you choose, make sure to set up early. 

In the photo below, our fireworks were above the water, and there was a ship moored in the distance that I used to take photos.


I've been known to arrive 4-5 hours ahead of the fireworks display to set up "camp" in specific locations. DH & I will bring a picnic, blanket, food, and warm drinks. 

 2) Use a tripod 

A tripod is a MUST for shooting fireworks. You need to shoot your photos with a slow shutter speed, and a tripod is an absolute necessity for preventing out-of-focus images. Trust me, you're not going to be able to hold the camera still for the amount of time necessary to take a photo.

Also, make sure no one will accidentally bump into the tripod during shooting. I tend to hang my camera bag or a sandbag on the tripod to help weigh it down so it won't move. 


3) Set Your Camera Settings ahead of time

During a fireworks show, you're not going to have time to make a lot of adjustments to your camera. So, you want to set your camera ahead of time and just take photos (which is why you should arrive early). Here are three things you need to do:

a) Use slow shutter speed. 

You want to capture a good deal of the actual fireworks instead of a few scant moments. I tend to use extremely slow shutter speeds…as in SECONDS. I tend to shoot firework photographs anywhere from 1-5 seconds.

b) Use an increased F-stop (or Smaller aperture)
Use a smaller aperture (f11 - f22). Why these settings? Because if you are using a slow shutter speed, it means that you will let light in for a longer period of time. If you use a large aperture setting (such as F2.0, F4.0), all you're going to get is a white photograph.

c) Manually focus your lens before the show starts

Auto focus is not going to help you take good fire work photos. There isn't enough light or contrast to let auto focus work. The trick is to set up your camera early and take a few test shots. Use something in the distance to help focus your lens --- maybe there is a tree in the distance, maybe it's a plane, or a building. 

Use those to set up your focal length of your camera.


4) Use a remote shutter release 

Because you're using such slow shutter speeds, any movement or shaking in the camera will cause motion blur. Even pressing on the shutter can cause movement in your camera. 

Consequently, a good remote shutter release will help you take those photos. There are cabled versions that physically attached to the camera and wireless versions. I have a wireless version that I hold and count for X number of seconds. I tend to press the shutter release when I see the fireworks launch into the air, and count out the seconds, or whenever I hear 2-3 pops of the fireworks. 


5) Don't Stop Shooting.

Once you have set up your camera properly, all that is left for the fireworks display. There's a certain amount of luck trying to get good fireworks shot. You won't have time to look at your photos during the fireworks show, only afterwards. So keep your finger on that shutter release and keep shooting.


I hope that all of you have a safe and sane 4th of July weekend. I would love to see your photos!

Wednesday, May 29, 2013

Photos from Fanime

This past weekend, we headed over to Clockwork Alchemy, which is a Steampunk convention. It is part of Fanime -- one of the largest anime conventions on the West Coast.

This year, both conventions totaled about 20,000 people (give or take). And we had an absolute blast! We checked in at Clockwork Alchemy, which helped avoided all of the humungous lines at the Fanime portion of the convention. There were a ton of interesting panels from costuming & prop building to in-depth discussions about books, tvs, movies, and panels on how to make things better for everyone. There was also a ton of events, from swing dancing to masquerades, to music concerts.

And lets not forget the sheer number of costumed folks running around both conventions. The amount of cosplayers at Fanime is just staggering. And along with the cosplayers are a fair number of amateur photographers as well.

It reminds me of the various photographers in Venice, Italy during Carnivale. This year, I decided to costume comfortably so I could bring my camera gear with me just so I could take photos.

There are folks who REALLY do an amazing job recreating their chosen fandoms. Some bear a remarkable resemblance to their chosen counterparts. This particular Loki has a very strong resemblance to Tom Hiddleston from the Avengers.


There was some old school cosplayers, too, like this "Hunter Rose" from the old Comico series, Grendel,(which if you haven't read, is just AWESOME!) I intend to coslay Christine Sparr one of these days.

And, of course, there's the amazing set of Star Wars bounty hunters walking around.

Some costumes are rather complex and require a lot of extra helping hands to get fitted.

But the end result is just amazing!

Some costumers were rather "simple", but very well executed.

And other costumes that were understated, yet elegant.


There was a whole slew of anime/manga characters that I didn't recognize, but they looked awesome!

Some, like this Deadpool maid, were just running around having fun. She(?) had a whole crew of various Deadpool cosplayers in various other outfits.

And, lets not forget that many of the cosplayers had some pretty amazing props. 


Of course, cosplayers don't just limit themselves to anime, manga/comic books, or video games. This Snake Plissken, from Escape from New York, is pretty darn good.

And not all of the characters are humanoid in appearance. There were a few fully furred cosplayers there as well. This one walked on all four legs (very convincingly too!)


Unfortunately, because there were a ton of people, it was hard to get some photos that really showcased off the costumes.


Although, sometimes, I could get lucky, and get a few images isolated from the general crowd with lighting and DoF.

Or an isolated background. (If there was one available and nearby!)

And some were outside, so the backgrounds were a little bit better.


It didn't matter who you were, what you looked like, or how you moved around, there were a ton of folks who just loved their fandom enough to want to cosplay it. And I think it was awesome.


We'll definitely be back at Fanime next year, just like the last.