Showing posts with label 2014. Show all posts

Wednesday, January 7, 2015

Yearly Roundup

Every year, I take stock on the finished projects that I finished for that year.

It’s not a contest, but rather a progression bar of how much I've actually finished. It helps me realize that I DID get a lot of stuff done in the year (crafting wise), whereas sometimes I tend to think I didn't get a lot done (which is a fallacy by all rights).

So, for 2014, I made the following things:

  • Three full cosplay sewing projects that had a lot of pieces made:
    • Melinda May - learned how to sew leather with the machine
    • 10th Doctor - learned how to tailor a suit jacket and pants. I also made a bonus waistcoat piece.
    • Han Solo - this was a big project, where I made the entire costume (pants, shirt, and vest)
  • Medium sewing project, where I made a TARDIS messenger bag.
  • Little sewing projects, including pajamas, project bags, and donation blankets
  • Leatherworking projects, where I learned how to tool leather and where I made a quiver
  • Beading projects, where I made a few new pieces of bling for me.
  • 19 knitting projects.  Last year, I knitted 24 projects, but I also did a lot of sewing, as indicated above, so I'm okay with this number. It still comes out to 1.5 projects per month.

Overall, I'm pleased with how my crafting and DIY went this year. I learned a lot of new techniques and got to play with a lot of new crafting toys!

For 2015, I hope to get just as much done as I did this year, if hoping for a little bit more. I already have a backlog of things that will definitely be finished, since I started them late in 2014.

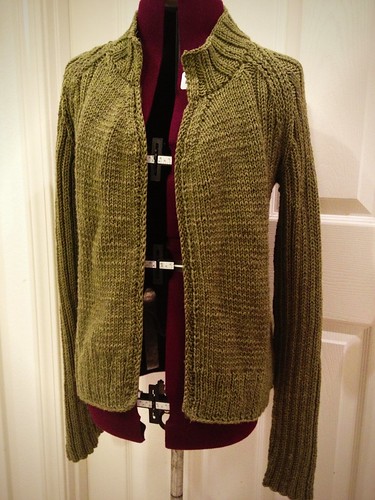
Here's a small sampling of the stuff I made. If you want to go back and read about the others, then check out the link --  2014-list-of-projects.


Scotch Moss Cardigan - full

Wednesday, December 31, 2014

Donation Blankets

There are a lot of knitters, crocheters, and general crafters who often make items for donation for a variety of charities. Sadly, I am not necessarily one of these people, because there's a lot of things that actually do take up my time. Instead, I tend to donate monetary funds to my chosen charities to use as they see best fit. (Charities often get better pricing for bulk items, so cash can be better utilized.)

One of my favorite charities (Nine Lives Foundation) uses an Amazon Wish List to request items, which are then delivered to the shelter. It's an interesting way to solicit donations. I noticed that they wanted pet blankets to send home with foster families for young kittens as well as to use within the shelter. I noticed that these were rather "pricey" for the amount of fabric used in what little construction the blankets used. These blankets were a 26 x 24 inch rectangle of fabric that were very badly blanket stitched at the edges.

Well, heck, I can churn out a polar fleece blanket in minutes. So, I went to my fabric store, which was having a 50% off sale on their polar fleece fabric.

For the price of three blankets, I bought 5 yards of 60 inch wide fabric. I washed it to remove any chemicals.


Then cut out rectangle pieces at 30 x 30 inches, and used the serger to overlock all four edges. At the end, I had 10 blankets ready to be dropped off at the shelter (along with a donation check).

When I got there, I also found out they had a bunch of fleece fabric donated, but that weren't cut up into blanket sizes, so I offered to do it, so it would free them to do other important things.

Like taking care of these cuties. Because, these little guys deserve all the help they can get.


Monday, December 29, 2014

Making My Own Tardis Bag (Part 5): Straps & the Final Bag

One of the changes I made to the pattern was to change up the actual closures. I really liked how my Patagonia bag had parachute buckles on the outside, and I sought to emulate that look.


I picked up one inch parachute buckles and strap adjusters. (I really wanted the 3/4 inch version, but I couldn't find a nylon webbing strap of that same size, so I went up to 1" instead.) I picked up a dark blue version of both the buckles, adjusters, and the nylon belt.


I decided to have the straps come from the "POLICE SIGN".


I added the other end of the strap to come from both ends of the bottom of the bag.

  • A short nylon strap and the separator came out from the front of the bag
  • A longer nylon strap and the other parachute clip came out from the back of the bag.


The finished strap looked pretty good.


I also decided to add a handle at the top of the bag. I find this particular feature very useful in a bag. It becomes easy to pick a bag up from the floor or table. I used scraps of the black denim and added some of the blue nylon webbing for a bit of added strength.


Attaching the lining to the outside of the bag was a bit tricky, but do-able. The inside of the bag is pretty roomy (as shown by my Warcraft Wind Rider stuffed wyvern)


In terms of size, I'm comparing it to my daily Patagonia bag:

  • Patagonia 15" x 12" x 5"
  • TARDIS: 16.5" x 12" x 3.5" . 


The Patagonia serves as my daily use bag, and can fit an iPad mini, two sock projects (or a sweater project), my wallet, phone, water bottle, book, and assorted small items.  The TARDIS allows me to fit slightly bit more, and should be perfect for running around a convention.


All-in-all, I'm pretty pleased with how it came out. There's a few things that didn't come out perfectly but then again, what ever does? I also would have done things slightly differently for a few things. However, I like how it looks and while I make modifications to any other ones I might make, this one is perfectly serviceable! I can't wait to try it.

Now, I'm ready for a Convention to happen so I can test this out! Onwards to GallifreyOne!

You can also find more posts about making this bag by searching on TARDIS MESSENGER BAG or click on the following links:

Saturday, December 27, 2014

Making My Own Tardis Bag: Part 4 - Windows to the Tardis

The front flap was one of the last things I created for the messenger bag.

Why? Because the rest of the bag was relatively straight forward, but the front flap needed some careful consideration in how it was constructed.

One of the things I wanted to add to my Tardis was the set of windows that you see on the front of the actual Tardis. My initial drawings also have the iconic windows on the flap of the bag.

 
I looked at various resources including the Tardis Handbook, which we have on our bookshelf. There are several different variations of the Tardis, depending on which Doctor and which season. I opted to do a stylized version of the windows.

 
But, the question is HOW to accomplish the windows themselves? This question would dictate how I would create the flap for the bag, which I had left as the last task to do on the bag.

There were several ways to do it, including:
  • Painting the windows using white fabric paint -- by far the easiest option, but one that looks flat and one-dimensional.
  • Quilting techniques -- I wasn't sure how to accomplish this, but I'm sure actual quilters would be able to figure it out.
  • Applique of some sort -- I'd have to create each window pane separately and sew them onto the fabric.
  • Embroider the windows -- this would be relatively simple using my embroidery machine, but I still didn't have access to my software.
  • Cut-out window panes using fabric -- probably the most difficult, but would give me a three-dimensional look that I wanted.
I opted to do the cut-out window technique, which meant that my flap pieces would look like the following drawing:

 There would be two pieces:
  1. the Front Flap piece -- it would comprise of three separate fabric pieces: Top, the Police Box Sign (already cut out), and the Window Pane
  2. the Back Flap piece -- it would be the size of the actual flap, and I would sew onto it a piece of white fabric the approximate size of the window panes.
The window pane portion would be the biggest pain to create.

First, I determined how big the window portion of my bag should be, cut out the fabric (with the appropriate seam allowances), and marked out where I wanted the windows. It took several tries to place the windows adequately. (The windows are 2x1 inches.)
 

I added iron-on stabilizer to the back of the fabric, and sewed the outlines of my window rectangles.


Then using very sharp scissors, I created a "Y" cut within the box itself to make the windows.
I edge-stitched of the small triangles after cutting. This left me with "windows".

 (This is a small sample that I used to test out my technique. I tried different cut methods.)

Then, I assembled the front piece together. There were additional items, such as attaching the front closure straps, etc.

Afterwards, I made the Back Piece by attaching white fabric to the wrong side of the back piece of the flap.


Then sewing the whole thing together, as well as stitching down each individual window pane (again) so that it wouldn't shift too much. I had some issues with the edge corners of each pane, but some trimming and fabric glue helped control the edges.


All-in-all, it took about 2 hours of fiddly work to sew the front flap together that primarily consisted of getting the window panes cut, pressed, and sewn down. (It also included the time to do the sample set of window panes on scrap fabric.)

Viola! The finished front flap.

Next up, finishing the bag!

You can also find more posts about making this bag by searching on TARDIS MESSENGER BAG or click on the following links:

Friday, December 26, 2014

Making My Own Tardis Bag: Part 3 - Bigger on the Inside

If you have a Tardis bag, the implication is that acts like a Bag of Holding or at least a bag that has had an Undetectable Extension Charm placed upon it (which makes it a bag of holding....). In essence, it is nondimensional space that makes it bigger on the inside or (if you prefer slightly different terminology) it transcends dimensions.

Now, to accomplish that (lacking Timelord technology) is to simply add a lot of pocketsess (sorry for the Hobbit references) so that the bag can hold a lot more than appearance should dictate, or at least stay very organized. For me, it also means holding knitting projects, a book, maybe an iPad, a small notebook, pen, and all the little extras necessary to traverse a given convention, including a sonic screwdriver --- because if you're going to walk around with a Tardis, you need a sonic screwdriver, naturally!

When I made the original mockup, I noticed that many of the inner and exterior pockets designed into the bag weren't really all that usable.


I looked at my own favorite bag that I use nearly every day, the Patagonia Black Hole Mini Messenger Bag, which has some very usable (and not so usable) pockets.


I also wanted to be able to add this embroidered patch to a pocket. I had picked it up at some convention, which had originally given me the idea for making a Tardis bag. The pocket had to be the size of the patch so I could sew it as a front covering.


So, I redesigned the pockets a little bit more to my choosing. I did the following:
  • Made the pocket area slightly larger than the mockup.
  • Resized one of the pockets to actually be able to hold my smart phone securely.
  • Added two extra pockets to the front, as well as transforming one giant pocket to a divided version that hold pens, pencils, crochet hooks, knitting needles (you get the drift).  This pocket was the size of the embroidered patch.
I added a zippered pouch and a separator to the inside, as well as adding a "bottle" holder to the inside lining (or in my case, a Dalek cup, because...well, I can....)

(Inside bottle holder and zippered pouch)

The finished outer pockets turned out fairly well. I used a heavy duty "purse" zipper with double zippers.


In addition, I added a key fob to the inside zippered pocket. I used a swivel hook and some grosgrain ribbon. I find this feature useful on my other bags -- it allows me to attach my keys and find them relatively quickly.


The rest of the pattern pieces were fairly straight forward, so I followed the instructions for the pattern (McCall M5824) for the larger pieces of the bag (front piece, back piece, gusset, and all of the lining).

Next up, sewing the front flap!

You can also find more posts about making this bag by searching on TARDIS MESSENGER BAG or click on the following links:

Wednesday, December 24, 2014

Making My Own Tardis Bag (Part 2) - Embroidering the Sign


After I made my test embroidery piece, I sized it on my mockup bag to determine how wide I wanted the final sign. It turned out that including the seam allowances, the sign would be approximately 5 inches (12.7cm) wide and 16 inches (40.64cm) long.


Here's how it looks on my machine.


Here's the final piece on black denim. The hoop is 360 x 150 mm. I used a stabilizer on the back of the fabric. It required a bit of babysitting (mostly to prevent the cats from jumping up to see what was happening).


Unfortunately, I had to make two signs. On the very first version, the "X" of box got mangled when the bobbin thread managed to "catch" somehow. I managed to fix it, but it wasn't quite perfect, so I opted to make a second version. Luckily, the second version had no issues.

(The first version of the sign)

I made the piece about 18" x 5" to give me enough of a seam allowance to create the front flap.

Next up...making it bigger on the inside.....adding pocketsess!

You can also find more posts about making this bag by searching on TARDIS MESSENGER BAG or click on the following links: