Showing posts with label archery. Show all posts

Thursday, January 12, 2017

Target Archery Beanie

I haven't posted much about my archery but rest assured that I'm still flinging arrows at various targets.

Over the summer and fall, I was outside target and field archery. It was a blast. This is a typical target face, and each ring represents a score.

White = 1, 2 points. Black = 3, 4 pts. Blue =5&6 pts. Yellow = 7,8 pts. Yellow = 9, 10 points. 
The inner most yellow is also an X or a Bullseye.
(Bigger 120 cm targets are used when you're at least 60 yards away)

Now that winter is here, I've moved to indoor archery, and surprisingly, it's pretty darn cold in those indoor ranges because they are usually large drafty warehouses with very little insulation. So I decided to make myself some archery related gear, including this archery beanie.

When I'm outdoors, I typically wear a hat with a brim to act as shade from the sun. Indoors, I don't have to worry about the sun, but just keeping my head warm.

It looks like a target face, except for the arrows.....

I made some minor modifications to the pattern. The pattern used a lot of white (the 1&2 rings), but I am not particularly fond of white clothing, so I just opted to use a lot more black (the 3&4 rings)

This project was a great stash-buster because I had all of the colors in my stash from previous projects. All of the yarns that I used are Cascade 220!

Monday, August 17, 2015

Archery Geekery

I have to say, archery has had a learning curve, but it's a blast. Plus, it caters to my inner competitive nature; not to mention my inner comic book geek with Huntress, Green Arrow, and Hawkeye (from both the Avengers and Young Avengers series).

Plus, it turns out that the competitions also have a bit of a fun geek element to them. A few weeks ago, I went to the "Million BC Shoot", where we shot 3D dinosaur targets.


I mean, who doesn't want a chance to shoot down a pteradon or a veolciraptor?

Not so Clever Girl.......


Oh, and mammoths....

Viewed from 110 yards...

Oh, and there was even a Zombie BootCamp & Training, where we shot at paper target zombies.


Where I earned my certificate for completion...

And my International Zombie Hunting Permit and dog tags....


What's not to love about archery?

Wednesday, October 15, 2014

Archery Leads to Leatherworking (Part 3)

Once the quiver had been stained appropriately, it was time to turn the flat piece of leather into a tube to hold arrows. Leather stitching is a bit of a tricky animal at times, but one of my go-to books on the subject is very helpful.


I had punched holes into the leather for stitching and lacing prior to making it into a tube. However,  trying to wrangle the leather into a tube was fairly difficult until I managed to get a third of the way. And then it was smooth sailing. (This is when I find myself wishing for several sets of arms to help)


Once I was done, the patterning on the stitching looks like this:

Once the tube was completed, I added the bottom stopper to the quiver, which was a royal pain in the arse to attach to the tube despite having lined up the holes on the quiver and the stopper. It took about 2 hours to finish.


Afterwards, I laced the top of the quiver with a "Single Loop Lacing".


Here's the final quiver.


Now, it's a matter of putting on the appropriate hardware so that it hangs correctly at my side or on my back. (To be continued.... Additional posts about this topic can be found here.)

Monday, October 13, 2014

Archery Leads to Leatherworking (Part 2)

After doing a lot of research -- pouring over some of my design books and looking at the Internet -- I finally decided on a simple, yet (IMNSHO) elegant design of a dragon.

Dragon, you say? A bit cliche, I know, but hey, I'm a geek that loves Sci-Fi / Fantasy, so you'll just have to deal. :-P

I made a test of the design I wanted to use.


I had some issues with it, mostly because I just starting with leather carving. I had to modify the pattern a bit -- enlarge the wings, etc. -- to make it easier for me to carve it on the final piece.

Once I traced the final pattern onto the leather, I started cutting and beveling. When you carve leather, you have to get it wet (called "casing"). Carving is a bit tedious and slow going, and I had to stop and rest, but I really liked the end result.
("Casing" the leather)

Because you have to get the leather wet in order to carve it, the leather gets dry. An application of neetsfeet oil removes the dryness and darkens it a little bit.


Then it was a matter of applying the leather stains (black & brown) to the leather, painting the dragon, then applying a clear finishing coat to protect the paint and stain. This process requires a bit of time (several days) for the leather to dry in between coats of stain/paint/finishing.


Unfortunately, I forgot to snap some in-progress photos of the process, but here's one finished photo.


Once the flat quiver was completely dry, it was time to start lacing it into a tube.

To be continued.....

More posts about this topic here.

Sunday, October 12, 2014

Archery Leads to Leathercrafting (1)

Recently, I took up archery, because it's one of those things I've always wanted to do. (Not to mention that Huntress probably influenced me "slightly" as a kid, followed closely by Green Arrow.) Plus, honestly, archery is COOL.

I've been at it for about a month and not doing too badly.


However, the one thing that taking up a new hobby is that it allows me to learn a new crafty skillset! (For The Win!!!)  Archery has a few accessories that have often been made from leather -- quivers and armguards. I already know the rudimentary basics of leatherworking, but, I didn't want a plain quiver, I wanted a design on it, which meant I needed to learn a bit of leather carving.  I felt that leather carving was a complimentary skill set to my rudimentary leathercrafting skills.

First, I did a whole bunch of research on the Internet for quivers, because I needed to figure out what type of quiver I wanted and how to make it.  (For those interested, I have a Pinterest board for leatherworking ideas.) While I researched quiver patterns, I started practicing leather carving.

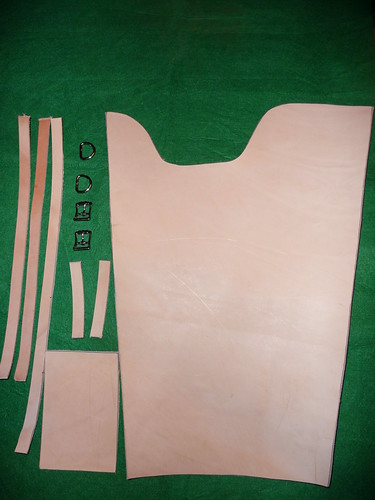
I stumbled across a Flickr album for a hip quiver class where folks were learning leather carving, which had good enough photos to make my own pattern. They were kind enough to include dimensions for their quiver, which I used as a guideline to make my own pattern.

Hip Quiver Pieces

I used poster board and painters tape to make a mockup of the pattern.


I liked it, so it was time to cut out the leather.


I had some suitable veg-tanned leather lying around (as you do), and got started. I also made a bottom stopper for the quiver, which would fit inside the quiver.


To make the bottom stopper, I cut out the leather, got it wet, then formed it over an appropriate sized plastic container with rubber bands. When it dried, it was the appropriate shape.


Now that I had the leather quiver cut out, it was time to tool (i.e. carve) the leather with a pattern that I picked out.

(Additional progress posts can be found here.)