Showing posts with label photo lessons. Show all posts

Friday, January 27, 2017

The Art of Phone Photos

I haven't done a Friday Photo post in a while, so I thought I would go over some of my process. This was an impromptu photo shoot. When I was making tea in my new teapot, I wanted to get a photo of it, but didn't want to take too much time to set up.

I don't like taking the big camera out too much, and my iPhone camera takes a halfway decent photo, plus many of the various camera apps with their filters will do in a pinch. The best camera is the one that you have on you.

The following photo took about 3 minutes to take, process, and upload, which is about the same amount of time it took my tea to steep enough to drink. So, it might seem like a lot of steps, it really isn't.

As readers of this blog might be familiar, my dining room table usually has a protective board on it or cats. Neither of which are appropriate backdrops for my image, despite the cats being super cat regardless.


For the background, I grabbed a piece of scrap fabric nearby so as to give it a bit more ambiance. Unfortunately, the fabric was all wrinkled and I didn't want to pull out the ironing board. I hoped that maybe some post processing would minimize the wrinkling in the background.

I opened up the blinds on the left side  (you can see more light shining on the left side), which would give me a bit of natural side lighting.

Original Photo

I was going to post this on Instagram so I knew that it'd have to be cropped accordingly. I shot the photo in a regular frame, capturing the elements I wanted --- the spout, the bottom of the board, the cover of the tea, the tea leaves, and part of the teapot handle. 

I didn't want to use the "SQUARE" option because I wanted to control what was shown. I took this photo, then rotated it slightly so that the square board was level and cropped.

Important Elements

The cropping took a lot of the distracting wrinkles out. The tea leaves were a bit too dark, so I increased the exposure. I also increased the contrast , black point, and saturation by a little bit to make the red pop and the handle a bit darker.

 
Cropped photo

At that point, I took the photo into Prisma, and used one of their base filters. I wanted it to give the impression of a drawing, but I did lower the opacity of the filter to about 15%.

After the Prisma filter @ 15% opacity

I took that photo into Instagram and used  another one of their filters at a lower opacity. Then I increased the contrast and saturation to give a better distinction between the reds & golds. I also used a radial tilt shift and a vignette to downplay the wrinkles a bit more.


The wrinkles still bothered me QUITE a bit, but it would have meant that I needed to find another non-wrinkled piece of fabric or iron the one I had, but that would had meant more work plus at that point my tea was ready to drink.

I suppose I might take this photo again in the future and set it up properly, but for what I had, it worked well enough.

Wednesday, July 3, 2013

How To: Shooting Fireworks

Are you planning going out on the 4th of July to shoot fireworks? Here are some helpful hints to taking fireworks photos in your area.

(All photos below are taken at about 100mm @ ISO 100 F11 - F22 for 1-5 seconds. )

1. Get to your location EARLY and decide where to take photos 

You'll need to get to your location early so you can set up your photography gear quickly and time to do some test runs before the big show. You'll want to know where you are in relationship to the fireworks are being launched. You might want to:

  • consider taking photos with trees, buildings, or people in the foreground to show scale of the fireworks OR
  • simply taking photos of the fireworks in the sky. 
Whatever you choose, make sure to set up early. 

In the photo below, our fireworks were above the water, and there was a ship moored in the distance that I used to take photos.


I've been known to arrive 4-5 hours ahead of the fireworks display to set up "camp" in specific locations. DH & I will bring a picnic, blanket, food, and warm drinks. 

 2) Use a tripod 

A tripod is a MUST for shooting fireworks. You need to shoot your photos with a slow shutter speed, and a tripod is an absolute necessity for preventing out-of-focus images. Trust me, you're not going to be able to hold the camera still for the amount of time necessary to take a photo.

Also, make sure no one will accidentally bump into the tripod during shooting. I tend to hang my camera bag or a sandbag on the tripod to help weigh it down so it won't move. 


3) Set Your Camera Settings ahead of time

During a fireworks show, you're not going to have time to make a lot of adjustments to your camera. So, you want to set your camera ahead of time and just take photos (which is why you should arrive early). Here are three things you need to do:

a) Use slow shutter speed. 

You want to capture a good deal of the actual fireworks instead of a few scant moments. I tend to use extremely slow shutter speeds…as in SECONDS. I tend to shoot firework photographs anywhere from 1-5 seconds.

b) Use an increased F-stop (or Smaller aperture)
Use a smaller aperture (f11 - f22). Why these settings? Because if you are using a slow shutter speed, it means that you will let light in for a longer period of time. If you use a large aperture setting (such as F2.0, F4.0), all you're going to get is a white photograph.

c) Manually focus your lens before the show starts

Auto focus is not going to help you take good fire work photos. There isn't enough light or contrast to let auto focus work. The trick is to set up your camera early and take a few test shots. Use something in the distance to help focus your lens --- maybe there is a tree in the distance, maybe it's a plane, or a building. 

Use those to set up your focal length of your camera.


4) Use a remote shutter release 

Because you're using such slow shutter speeds, any movement or shaking in the camera will cause motion blur. Even pressing on the shutter can cause movement in your camera. 

Consequently, a good remote shutter release will help you take those photos. There are cabled versions that physically attached to the camera and wireless versions. I have a wireless version that I hold and count for X number of seconds. I tend to press the shutter release when I see the fireworks launch into the air, and count out the seconds, or whenever I hear 2-3 pops of the fireworks. 


5) Don't Stop Shooting.

Once you have set up your camera properly, all that is left for the fireworks display. There's a certain amount of luck trying to get good fireworks shot. You won't have time to look at your photos during the fireworks show, only afterwards. So keep your finger on that shutter release and keep shooting.


I hope that all of you have a safe and sane 4th of July weekend. I would love to see your photos!

Thursday, May 23, 2013

How to Take Better Photos - Lighting for Texture

This post is part of the "How to Take Better Photos" series of this blog. In this post, I'll discuss lighting for texture.


Your fibercrafted items, whether it be handspun yarns or items that have been knitted, crocheted, or woven, have texture and details. When taking photos of your product, you want to show off these textures and details to your audience.

In a previous post, I wrote about the qualities of different types of light. However, in addition to light, shadows (and the subsequent highlights) are also an important element of defining texture in photography. Without shadows & highlights to act as a contrast, you cannot see detail and texture. Shadows are just as important to photography as light.

By angling your light in different directions, you can produce the necessary shadows to show off texture and detail. The direction of your light determines where the shadows fall, and how much of appears in the final photograph. (The same principles also apply to portrait photography.)

If you remember from your high school physics class, light bounces. Light bounces at the same angle it strikes the surface(1). Remember this fact, as I discuss lighting from different directions and angles to help show off your work.

Front Lighting

I'm sure many of you have taken a photo with your on-camera flash and the photos have a flat and washed-out look, or where your subjects have that deer-in-the-headlights look.

Most on-camera flashes provide straight-on, front lighting to a given subject. This type of direct light literally washes away any shadow that might provide any texture or detail, which results in that flat and washed out look characteristic of photos using a direct front flash.

Direct light (much like the sun at noon) have harsh shadows that move in the same direction as the light. The shadows are behind the subject, so any and all details are lost to the camera.


Side Lighting

In contrast, when you take photos with the light at one side or another, this is known as side lighting. It emphasizes texture and shape, which is important when you want to show off your handmade goods, like yarn, knitted/crocheted garments, etc.

The camera is able to pick up on the shadows and highlights produced by the angle-to-subject ratio.


I often use a lot of side lighting at home, where the light is coming off to one side (via a sliding glass door or other light source). You can do this at home as well, if you find a large window where light is streaming through it. Position your subject (and yourself) with the light coming from the side.

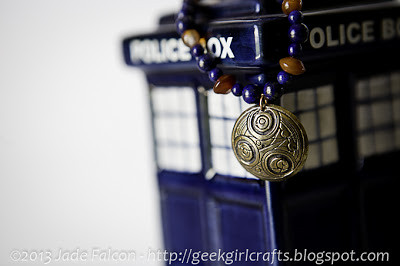
  Dr. Who Pendant 

In both of these photos, the shadows provide enough depth and detail that you can see the texture of both the pendant and the linen stitch.
Pretty Twisted

Back Lighting

In addition to side lighting, there is back lighting where the light is behind the subject, shining at the camera. 

The advantages of backlighting is that it helps highlight fuzzy projects that have a halo (such as mohair or angora). It can really convey the softness of a particular knitted object. However, backlighting should not be your only source of light for your photograph of your handmade items. If it were, you'll only get dark shadows, like this photo below. (2)


You can also backlight a subject by either placing the light source to the back and side. A large window with a lot of sun streaming through it can act as both a side and back light. You can also go outside in the sunlight and position your subject accordingly.

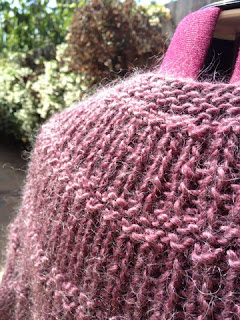
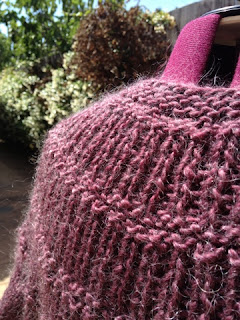
As a note of caution, backlighting can cause some problems with getting the correct exposure. You need to ensure that your exposure is set on the subject and not the backlight.  For instance, in this photograph, I'm using the window light as a side and backlight. The rightmost part of the image is overexposed but you can see some of the fuzziness of the yarn being photographed.


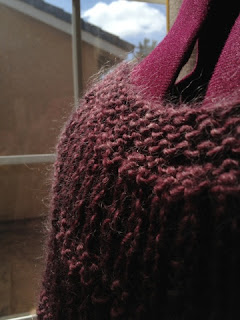
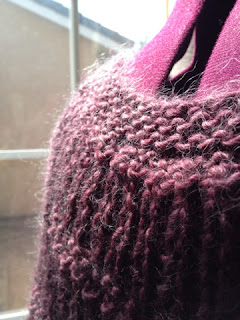
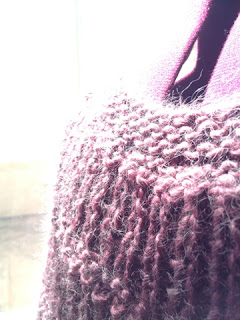
You'll have to play with the exposure with backlit objects in order to get it correct. In the following three (straight-from-the-camera) photos, I have the light coming from the side from a glass window, which provides backlighting and some sidelighting. You'll notice that I've played with the exposure settings to try to get a balance of the fuzziness with good side lighting, but each one of these have their own set of problems.

  1. The exposure works for the sky and clouds in the background, but might be slightly too dark to show off the sweater very well, although you do get to see some of mohair halo.
  2. The sky & clouds are over exposed, but I get more of the halo of the sweater and bit more light
  3. Everything in this photo is overexposed. You definitely see all of the halo of the mohair, but there's no detail in the background anymore.

1)   2) 3) 


So, how do you fix the exposure? In the case above, I simply did not have enough light in the front area to take a properly exposed photo. Moving the sweater outside solved THAT problem, because I am able to get more light in general. (But, I still needed to play with the exposure settings even outside.)


Another solution is to use two separate light sources -- your main light source off to the side and a secondary (and weaker) light source behind the subject. (This is an example of cross lighting). In the above outside photo, the sun was acting as my backlight and sidelight because light is bouncing off everything,


However, I won't get too much into cross-lighting in this post, because I think I've probably filled your brains with too much information. I'll talk about cross lighting at a later time.


If you really want to get more lesson about light & photography, I HIGHLY suggest this book, Light: Science and Magic: An Introduction to Photographic Lighting

If you would like to see some of my photography work, please take a look at my Photography website - WyldFire Studios.

Questions?
Let me know. I'd be happy to help you answer any you might have.


Footnotes:
(1) Different surfaces, such as reflective or translucent surfaces (glass/water), will cause light to bounce differently. So, the angle of reflection is relative to the surface from which it bounces. But, for the purposes of this post, we're dealing with matte surfaces.
(2) There are reasons to do backlit only photos, but product photos are not necessarily a good candidates for it!

Wednesday, May 1, 2013

How to Take Better Photos --- The Best Camera

Sometimes, a lot of amateur photographers get into a gear-mindset --- in order to take a good photo, you need the best possible camera/lens. The photography forums are filled with people asking minute details about the technical specifications of this or that camera or this and that lens. They get so caught up in the technical details about their gear that they have forgotten that photography is about light.

Camera gear isn't a guarantee that you'll take better photos. Yes, good gear can always help a good photographer who knows how to see light. But if you don't understand the fundamentals of photography and how to see  light, then what good is your gear?

It's like buying a several thousand dollar sewing machine with all the bells and whistles and not knowing how to sew.

You can take excellent photos with a simple point-and-shoot camera (or even your smart phone camera) if you understand the fundamentals of using light in your photography.

Real World Example

Take a look at the following two photos. Using things I found around my house (sunlight and some ecru-colored fabric), I set up a simple photo shoot with a skein Manos del Uruguay yarn that I purchased at my LYS.

One image was taken with my big expensive camera and one was taken with my smart phone camera.**  Both images were taken within minutes of each other. Can you guess which is which?


They look pretty darn similar, don't they?

Are there differences? Yes there are some slight differences, but both of these photos are essentially the same.
  1. The colors in both photos are very close to true, which is important to most crafters who want to take a good representation of their work.  (And, interestingly enough, the color of the background of the rightmost photograph is actually more true than the left.)
  2. One photo is a little bit more saturated than the other (i.e. a little bit extra deeper color), but not by much. Saturation is a matter of taste, and the left most photo is actually a little too saturated in comparison to the actual yarn.
  3. There's a matter of depth of field, but that's also a matter of taste
(A good photo editing software or app can easily remedy #2-3)

If you haven't guessed yet,
LEFT: Canon 5D with a 24-70 mm lens.
RIGHT: iPhone 5 camera.

Are the differences extensive enough to quantify spending several hundred to several thousands of dollars to essentially get the same exact photo? Well...

  • If you're selling your handmade crafted items online as your own business, it might be worth the money to invest in photography gear (not necessarily the top of the line, but a decent camera/lens that you can afford).

  • If you're simply taking progress shots for your blog or maybe for your Ravelry project/stash page, then these differences aren't probably worth spending the money.
And, here's the BIGGEST difference, at least to me, especially if I'm only taking photos for posterity
  • On my iPhone, it only takes me a few minutes to grab my phone, take a photo, make sure that I like it, then upload it to my blog, Flickr, or wherever I want to host it.
  • For my big fancy camera, it takes me about 15-30 minutes to:
    • Drag out the camera & lens
    • Take a few photos, 
    • Take the card to my computer
    • Download the images
    • Open up my photo editing software, crop, tweak, etc
    • Upload to my blog, Flickr, etc.

For just general blog posts, Ravelry project/stash photos, etc....guess which camera I grab the most often?

The best camera isn't necessarily that fancy expensive camera that you have sitting in the corner.

The BEST CAMERA is the one you have with you and the one with which you take the most photos. And, if you understand the basics of photographic lighting, then you can take equally good photos with any camera.

Check out my previous posts on photographic lighting:


** No post processing was done on either of these images. I did crop both photos to make them approximately the same size for comparative purposes.


Questions?
Let me know. I'd be happy to help you answer any questions.

Wednesday, April 24, 2013

How to Take Better Photos: Color Balance

In my last photography post, I talked briefly about how light is not all equal, and that different light casts different "colors".  Once you understand to see that, you can easily correct this color cast to show "true" colors (like for product photography) or you can use these color casts to set a "mood" for your photograph.

Your camera has the ability to "balance" out the color casts while you're taking a photo. Most of you probably simply use the "auto white balance" on your camera setting.

This is PERFECTLY okay! I tend to use the Automatic White Balance (AWB) on my own camera about 80% of the time. The following image was taken with AWB. (It's my Hemlock Ring Blanket that I blocked recently.) The color of the yarn is "Oatmeal" (Cascade Eco), and the color in this photo is pretty darn close to reality. I used the late afternoon sun as my source of light.


But, there are times, when the automatic white balance (aka WB) doesn't work.

Simply put, when you take a photo, your camera tries to figure out the overall color of your photo. BUT, sometimes, if there is no white or "neutral" color in the image or if there is a single color dominating the image, then your camera is fooled and you get a photo where the color doesn't match reality.

You can set your camera's WB to a specific color temperature (known as Kelvin -- which is another topic entirely involving lots of numbers and photography geeking, so I won't bore you), or you can try using some of the presets built into your camera. Here are some of the most common icons used in cameras:

(I highly recommend reading your camera's manual to understand how to use these presets.)


Using these Pre-Built Settings


The above icons represent the types of color casts your camera is capable of correcting. Basically, what happens (in simplistic terms) is the following  .....

Your camera assumes that there's a specific color cast (at a specific temperature) and adds the opposite color to balance it out to "white".  So, if there is an "orange" cast for tungsten, it adds "blue" to your image. If there's a green cast, it adds magenta.***

I'm going to go over each of these icons, what they mean, and what your camera is doing for each of them.

(You don't have to use these presets under these specific circumstances. You can use any of these settings to add mood or a different type of lighting to your image. These are just guidelines!)

  1. Daylight --- 
    • Used when? This setting is for when your location is relatively sunny. 
    • What your camera does: Balances this as the sun at midday.
  2. Fluoresent -- 
    • Used when? if you're inside a gymnasium or work that has fluoresent lighting, set your WB to "Flouresent" to get rid of the green cast
    • What your camera does: Adds magenta to balance it out to white.
  3. Tungsten -- 
    • Used when? If you're inside your house and you use incandescent lightbulbs, then set your WB to the lightbulb icon. 
    • What your camera does: Adds blue to balance it out to white.
  4. Shade / Cloudy-- 
    • Used when? These option is an interesting one. Whenever it's a cloudy day or if you're in the shade during a sunny day, there's a bit more "blue" in your image. You can use either of these for the same thing.
    • What your camera does:  Adds a little bit of orange to warm up your image. For "Shade", it adds a bit of extra orange.
  5. Flash  --- 
    • Used when? When you're going to be using your on-camera built-in flash
    • What your camera does: Adds a bit of orange and magenta to balance out the color of your flash.
The following images* shows how each of these presets work and the color the camera** adds.

Color Balance Presets

You can notice the following from the images.

  • The "Fluoresent" & "Tungsten" images are the most obvious color changes. Because I'm using sunlight as my light source, the color changes are very obvious here.
  • The "Daylight" is closest to AWB because I was using sunlight as my main source of light. 
    • For this image, I might actually choose "Daylight" because it's a bit closer to the "Oatmeal" color than the AWB image above -- but they are pretty close to each other. It just becomes a matter of taste.
  • The three options "Shade", "Cloudy", and "Flash" add varying degrees of "warm" orange to your image.

Okay, now what? How Do I use these Presets?

You can probably get away with using AWB or "Daylight" especially, if you're using natural sunlight as your color source. However, if you have mixed lighting in your house (say tungsten and daylight light bulbs in your house), you might run into problems.

These presets can help you fix the color problem. Digital "film" is cheap, and you can easily take a few shots using the different white balance setting on your camera, then compare them to see what you like the best!

  1. First, try AWB and take a photograph.
  2. Look at your preview image. 
  3. Try "Daylight" and compare the two images.
  4. If either looks okay, then continue shooting. Otherwise:
    • If the preview image looks blue-ish or "cool", then try "Shade" or "Cloudy" and take another photograph.
    • If the image too warm, then  try Tungsten 
    • If the image is too yellow or green, then try Fluorescent.
  5. Compare your images.
  6. Choose the best option, and continue shooting.
One of these presets should fix 85-90% of the problems that you might have.  If you still have a problem after trying these steps, try changing your light source for your craft project.

Of course, you can always fix the white balance of your photo is a photography software, like Photoshop or similar, but that means that you have to buy the software and learn how to use it.  Hopefully, you will discover that getting it right in the camera is often times faster.


Questions?
Let me know. I'd be happy to help you answer any questions.


Notes:
* The images are straight out of the camera without any post-processing, but I did resize and put them into a single image for comparison.
** I use a Canon 5D camera. The lens is a 24-70mm lens.
***  If you don't understand why this happens, it's because of Color Theory, specifically the Opponent Process. While you don't need to understand all of color theory, it's good to at least understand the basics, especially if you work with color.

Check out my other blog series on "How To Take Better Photos"

If you would like to see some of my photography work, please take a look at my Photography website - WyldFire Studios.


Thursday, April 18, 2013

How to take Better Photos --- Seeing Light

Photography is the art of drawing with light. It comes from the Greek words "phot" for light and "graphs" for drawing. So light is extremely important in photography. But not all light is made equal.  This fact is important to note, because it does affect your photography.

Our brains normalize light that our eyes see so most people can't tell the difference in the quality of light. Most people can only tell when it gets dimmer or lighter, or natural light from artificial light. But did you know that light has color and can cast different shades of color?

In order to take good photos, you need to do is to train yourself to see the actual differences in light, especially if you're taking product photos of your handmade products. You want to portray accurate colors!

Once you begin to "see" light and see the color of light, you can make adjustments and take better photos.

Natural Light

Let's go over natural light first. There are a lot of proponents who claim that natural light (aka sunlight) is the best form of lighting. There are also people who claim that chocolate is better than vanilla or strawberry. It comes down to personal taste, choice, and how well you understand light well enough to replicate results you want repeatedly. (There are many photographers who can trick you into thinking their artificial light is sunlight).

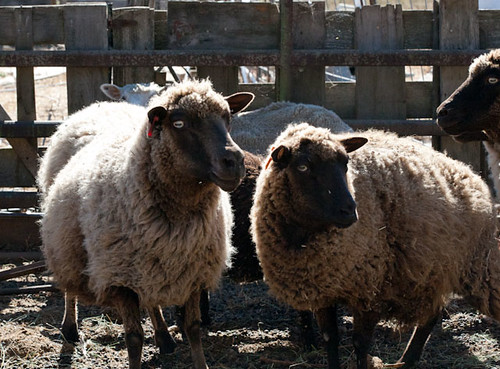
Not all sunlight is equal. Sunlight at noon (esp. during the summer) is very harsh, striking very short and very crisp shadows. We've been told to try to stay out of the sun during the high hours of noon because that's when the sun is at its highest peak and the strongest. Because the sun is at its zenith, the harsh shadows come out. (There are photographers who refuse to take photos during the mid-day sun, and often with good reason.)

This photo was shot in the bright noon day sun. It's not a bad photo, but you can see that the shadows are rather short (right under the sheep) and they're pretty sharp and crisp. You can see that the sunlight is directly above the sheep (given the glare off of their wool).

Shetland

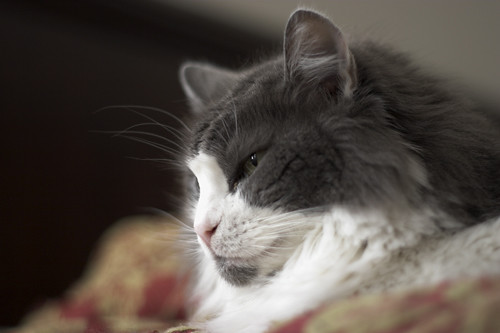
Whereas the sunlight at dawn and later afternoon (towards the evening) is much softer, and you get long fuzzy shadows.

This photo of my cat, Blue, was taken in the early morning hours. Our room gets a lot of lovely sunlight in the morning, and you can tell that the light is "softer" and not as harsh. In fact, in this photo, you can see a lot of texture in her fur, but not as much for the Shetland sheep above.

Blue in Repose
(I also used a very shallow Depth of Field for this photo.)

The shadows in this photo (taken just before sundown) are elongated and much softer than the one above. The sun is at an angle, and the light is "elongated". You can tell that the sun is coming at an angle due to how the shadows are falling.


Now, interesting enough, the color from the sun "changes" in our perceptions, depending on the time of day, your location on the globe, the season, clouds, haze, etc. It's why you'll sometimes see a pink or orange sky.  The above photo shows a yellowish hue while Blue and the Shetland photos don't.

But generally, you can consider sunlight as having a "blue" cast to it (it's why the sky is blue!)

Artificial Light

Artificial light is an interesting animal. It changes depending on what kind of light bulbs that you have. (YES! It's true!) But our brains and our eyes automatically adjust these hues to "white".

You'll have to learn how to see the cast of light in your home, studio, or wherever you're taking photos, because the type of light might affect the color of your project! (Ever take a photo of your yarn, and the photo of the yarn isn't the same color as the yarn in real life? This is why )
  • Fluourescent lights give off a green tinge,
  • Incandescent (regular) lightbulbs (aka tungsten) give off a yellowish cast. 
  • Daylight bulbs give off a blue cast
  • The flash on your camera will always give a blue cast.
There are other uncommon sources of light, such as vapor lighting that use sodium or mercury that have their own hues, but I digress. If you're taking photos of your handmade items, chances are that you'll use whatever you have around the house, which is most likely going to be fluorescent, incandescent, daylight bulbs, or sunlight.

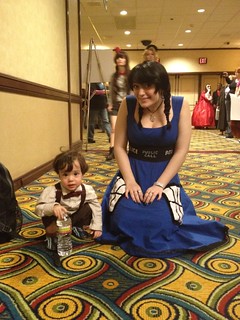
This photo was taken inside a hotel with predominantly tungsten lighting. You can see the yellowish tinge of the lightbulbs.

The smallest doctor

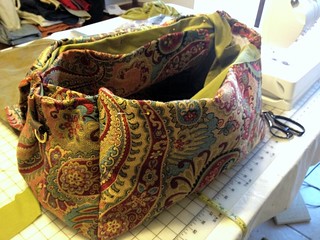
In addition, you might even be using different type bulbs in the same room, or maybe you'll use a flash when you have tungsten lighting in the room. See this photo below? Sunlight was streaming into the room (from the right) giving a blue cast, but I had the overhead lights on (which are tungsten).

So the left side of the photo has a yellow cast and the left has a blue cast. You can't accurately get a good feel for the colors in this bag, can you? The colors are muddied. It's because of the different and competing light sources. It would be difficult to "fix" this in a photo software, like Photoshop (not impossible, but it would take some work). And frankly, I'm more of a fan of getting it right the first time.

(But as this photo was an "in-progress" photo, I didn't much care about the color cast.)

Semi finished bag

Now, color casts aren't necessarily a "bad" thing. You might want a color cast (like the above photo of the masked person). A color cast can add mood to your photo. But when you're taking a product photo of your handmade items, showing true and accurate colors is going to be your primary goal so ensuring you understand the hows and whys of light casts a color is good to understand.

The Purpose of Seeing Light

As I've mentioned above, the ability to see light allows you to understand what's going on, and thus be able to  modify light to make it better for your purposes (but that will be the topic of another discussion).

Eventually, you can compensate for these color casts in your camera, in a photo software program, or through modifying your light sources OR you can choose to keep the color casts for a specific effect,  but for now, it's good to learn how to see the color of light.

So.... START WATCHING LIGHT!

Since photography is all about light, I highly suggest that you start watching light to get a feel for the different types of light in and around your home or where you want to take photos.

LOOK at the light bulbs in your house. What type of bulbs are you using? Can you see the color being casted?

WATCH how sunlight comes into your house and yard (or wherever you want to take photos). If you want to use sunlight to take photos, then notice the WHEN, WHERE, for HOW LONG the sunlight comes into your house or backyard, and WHAT SEASON you're recording this light   ---- Write these times and locations down. (Trust me. Don't rely on your memory.)
  • Maybe the early morning sun comes in through your living room. 
  • Maybe the afternoon sun hits your backyard porch just right around 4pm and is a wonderful golden glow?
  • Maybe you get a lot of light from 1-3 in your backyard in the Winter, but then it shifts 2-5 in the summer?
In my craft room, the light comes in through a sliding glass door, but I only get the best light between 2-3:30pm (from spring to summer). At that point, the sun moves and my neighbor's house blocks the sun. So I know that I can take some nice sun lit shots during these times and in this location.

Pretty Twisted
(Notice the slight blue color cast and the shallow depth of field?)

Once you start looking and watching light, you can pick a spot in your home or other location that has good lighting that will make good photographs for your handmade crafted items. You won't have to second guess, and knowing allows you to do some pre-planning.

Next time, I'll discuss how to correct for color casts......


If you really want to get more lesson about light & photography, I HIGHLY suggest this book, Light: Science and Magic: An Introduction to Photographic Lighting

If you would like to see some of my photography work, please take a look at my Photography website - WyldFire Studios.

Questions?
Let me know. I'd be happy to help you answer any questions.

Tuesday, April 9, 2013

How to Take Better Photos of Your Craft Projects --- Depth of Field

So, one of my geeky past times is photography. Whilst in college, I minored in photography, and took an inordinate amount of photography classes, and probably inhaled too many chemicals in the dark room.

I love photography, even if I don't have enough time to do my photography for myself nowadays. It seems that I only get to do personal shooting whenever I'm taking photos for Ravelry! (Of course, there's taking photos for other people too, but that involves money and I don't consider it personal photography.)

I realize that many makers and crafters have gotten into photography; partly to take better photographs of their projects. So I figured that I might help you take better pictures by telling you a bit of photography and combine it with product photographs.

Depth of Field & Yarn

When taking photos of my yarn, I like to play with the depth of field. Depth of field (or DOF) is the distance between the nearest and farthest objects in a scene that is sharp in an given image.

Personally, I like playing with low or shallow DOF in my images. What's that Depth of Field, you might ask?

Depth of field is the range of distance that appears acceptably sharp in your photograph.
  • A shallow depth of field is when a select amount is in focus and everything else is blurry
  • A wide depth of field is when everything (or nearly everything) is in focus.

Personally, I like a shallow depth of field in most of my photographs. It's a matter of personal taste.  In this example, only the area around Cascade Label is sharp and everything else is blurry.
This photo has a shallow DOF.

_MG_0829

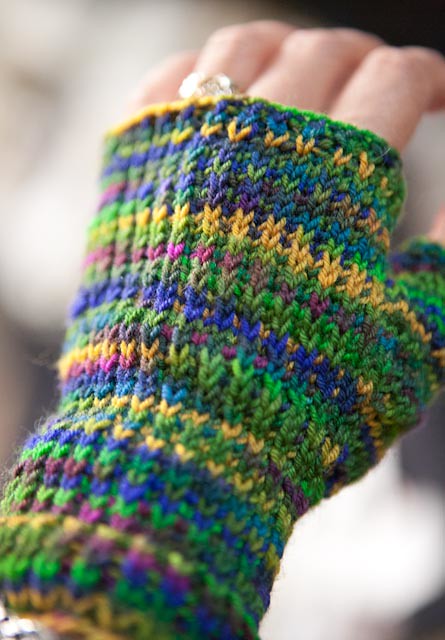
In another example, the background is artistically out-of-focus, but most of the handwarmer is IN focus. (However, notice that the part of the wrist closest to you is also blurry.) The DOF is somewhere around the middle of the photo. (This photo also has a shallow depth of field)

Green Apple Mits

Whereas if you look at this photo, everything is more (or less) in focus from the foreground to the background (the only thing fuzzy is the Shetland sheep). This photo has a wide DOF.

Shetland

How do you get different depths of field?

Depth of field is controlled by a variety of factors.
  1. Camera apertures (which corresponds to F-stop number, like F1.8, F2.0, F4.0, 5.6, 8, 11 etc)
  2. The size of your lens -- If you have different size lenses for your camera or have a zoom lens, then a longer lens length helps produce a shallow depth of field. If you don't have different lens sizes, then you can still control DoF by #1 and #3.
  3. The distance between you & your subject --- this is easy. The closer you are to your subject, the shallower your depth of field
For most people especially with point-and-shoot cameras, it's easier to control #1 & #3.

Now, #1 requires a bit of explanation. The apeture controls how much light hits your film. Think of the apeture like the "iris" of your eye. When it's a bright sunny day, your iris gets smaller, and if it's darker, then the iris gets bigger to let more light. Much like the iris of your eye, the apeture can get be very small or very wide and let in a set amount of light.

The size of the apeture is known as the "F-stop". And a smaller apeture (like F2.0) means a BIGGER hole. (Just remember: Small number = BIGGER apeture hole. Big number = smaller apeture hole)

  • If you want a shallow depth of field (not everything is in focus), then use a large apeture, which is a small Fstop (F1.8, 2.0, 4.0, 5.6, etc), which gives you a bigger hole.

  • For a wider depth of field (everything is in focus), then use smaller apetures, which have a larger Fstop numer (8.0, 11. etc) give you a smaller hole.

You'll need to play around with these factors to produce the DoF that you want to create for your photographs.

For a tutorial (and a lot of math) on how to use DOF and how it works, check out this webpage. Also, check out this really cool YouTube video. It's 20 minutes long, but a really good visual explanation on how DoF works and how all of the above elements that I just explained work together.


If you really want to get more lesson in photography lighting, I HIGHLY suggest this book, Light: Science and Magic: An Introduction to Photographic Lighting

If you would like to see some of my photography work, please take a look at my Photography website - WyldFire Studios.

Questions?
Let me know. I'd be happy to help you answer any questions.