Monday, September 30, 2013

Getting out of the Comfort Zone: Technical Spinning

A few days ago, I wrote about how I "failed to spin adequately enough for sock yarn. Someone asked me if I couldn't just run the finished yarn through the spinning wheel again, which would tighten up the plied yarn for socks.

I could certainly do that, but one of the things spinning for socks is accomplishing for me is to "break" my default comfort spinning. Yes, I can spin different weights of singles in order to create different weights of yarn, but my singles always nearly have the same twist angle and my plied yarns tend to be more-or-less "balanced" coming off the niddy noddy (usually 1/2 or 1 twists of the finished skein). And for general purposes, spinning this type yarn is definitely good enough. But, I really want to get out of my "comfort" zone. I want to become a better spinner and not just rely on my general default comfort spinning. I wanted to become a better "technical spinner".


So, I spoke with my SpinU teacher, Sandy, over at Purlescence about what I was doing incorrectly. (Notice that I didn't say "wrong" here, because what I was doing wasn't WRONG, per se, but incorrectly for the application I needed.)

After discussing which wheel and ratios I was using and my technique, she determined that I was doing several things (when combined) were the incorrect application for spinning socks -- primarily which wheel, my drafting technique, and my take-up. I hadn't considered these things before, but once I thought about it, it made absolute sense.

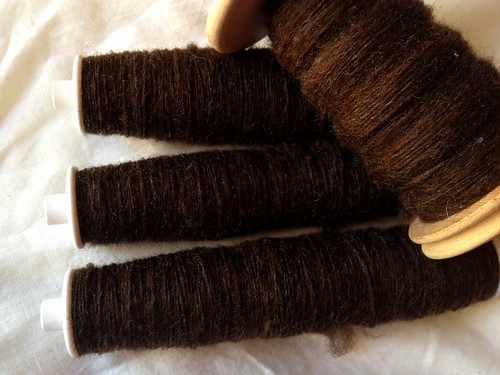
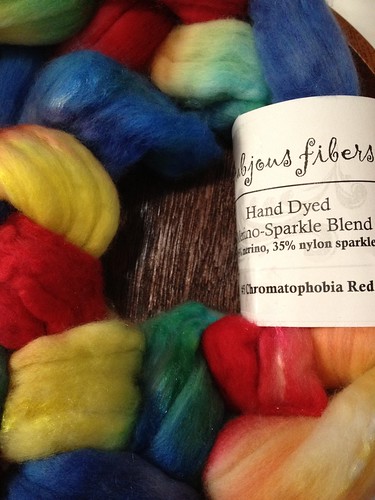
So later in the week, I went to my LYS with my Traddy in tow and I sat with Sandy to over the technical aspects of spinning for socks using some superwash merino / nylon blend fiber. She made some corrections to how I spin and went into a lot more detail about my application of each of the items that we had briefly discussed before.
  1.  I was not using a wheel with a high enough ratio -- my Sidekick -- despite using the high speed whorl on it. It has a 13.75" wheel diameter and it's highest ratio the Sidekick is also 13.75:1. Instead,  I should be using my biggest wheel, the Traddy, which has a 22" wheel (and 17:1 ratio), or even my Kiwi with its 17.5" wheel (with a 14:1 ratio).
    (It is possible to spin for socks on the Sidekick, with some change in my technique as noted below)

  2. I need to draft a lot more slowly. When I demonstrated how I was drafting, she said I was drafting much too fast. I had a cadence of 1:1 --- one press of the pedal = one draft.  Consequently, this part is going to require some conscious effort in my part to draft a heckuva lot slower than I'm used to doing.

  3. My brake band needed a lot more slack. Sandy was spinning socks on the Sidekick, but she showed me how little slack the brake band hand. In general, I use a moderate amount of take-up on the brake band. However, it turned out I was using far too much than was necessary to get the necessary twist. (Also, because the Traddy is a double drive, d have to make sure that the differential between the bobbin and the whorl was "low". With Scotch Tension wheels, I just need to ensure that my brake band is fairly loose.)
By drafting more slowly and with a slower take-up on the wheel, I can get the necessary twist (and consequently twist angle) in my singles necessary to do long-wearing sock yarn. With a lot more practice with #2-3, I could even spin socks on my Sidekick.

Adding these bits of information really was an eye opener. I had always pretty much just thought it was a matter of wheel ratios for spinning different yarn types.  I thought about my own drafting techniques and how much take up I normally use on my various wheels, and realized that I have a few gaps in my spinning knowledge that I need to fill, especially if I want to get into spinning more 'technically' challenging yarns.

Luckily, Sandy has mentioned that Purlescence will do some SpinU intensives -- concentrating on one aspect of spinning (i.e. JUST woolen or JUST color maintenance) for a number of weeks. I think I shall try and take a few of these intensives so as to "break" my spinning and thus become better at it.

I'm very lucky that I have a resource that I can go to for advice to help fix my mistakes and help me get better at this whole spinning thing. I think I shall take some of what I learned from Sandy, make the adjustments necessary, and practice a bit to spin technically and correctly for socks.

Wish me luck.

Wednesday, September 25, 2013

Barter System: Trading Craft Supplies

I love bartering. It means that I can trade something to someone for something else that I want. In the crafty world, I had bartered spinning lessons for photography lessons with a certain pink-haired podcaster.

Then few months ago, the Jasmin pinged me about some bobbins that I wasn't using on my Sidekick. She had a Mouse problem with her existing wooden bobbins and she had heard through the grapevine that I was not using my plastic ones. So, we arranged a barter.

I wasn't quite sure what I wanted or needed, but she suggested some fiber from her Stash. I readily agreed, because she has excellent taste and I was willing to take any of her leftovers! She was very generous in trading me four bobbins for some CVM (California Varigated Mutant) and Rambouillet wool -- fibers I had not yet spun. (Frankly, I was a bit surprised at the moment...she had more than fairly traded.)

And of course, I couldn't to try out the CVM with a semi woolen draw on my Ashford Traddy.


It's a beautiful dark chocolatey brown.


And it spins beautifully with a woolen draw.

CVM


Right now, I've spun all 8oz and have begun plying it into a 2-ply DK weight/light worsted yarn. I'll probably dye and use for something...maybe a shawl? a hat? a really warm cowl? I'm not sure yet, but it's lovely and it gives me a chance to spin a completely new fiber than I'm currently used to spinning.

Here's the first skein of the yarn: 301 yards @ 2.875 oz; 2ply; 10-11WPI @ twist angle of 24.5

Untitled

Now, I just have to finish the rest of the skeins, full them, and dye them to some undetermined color.

Thursday, September 19, 2013

Learning to Hand-Sew Leather

Things in my life are somewhat in flux, right now. Members of my family (both human and feline) are having serious medical issues, and the energy I have is being spent primarily on them instead of other things (like crafty goodness).  There are 'other' things eating up my energy, which I won't go into at the moment. However, I do have periods of downtime and keeping busy helps me take my mind off of various things, but I don't have the wherewithall to start anything new.

So, I took the opportunity to work on some of my UFOs (UN-Finished Objects) that I have lying around. These UFOs are of various crafting projects; some are knitting, crochet, sewing, and some are leather. In this case, I opted to work on a leather project where I had cut out the pieces some time ago, but haven't put together yet.

This project is a messenger bag using some oiled leather that I had left over from a previous project. The pieces are (left-to-right, top-to-bottom): inside pocket piece, front piece (with flap), outside pocket piece, back piece, and the one long piece in the middle is the bottom & sides of the bag.


Sewing leather is no different from sewing fabric, except it's a bit more labor intensive. You can use a sewing machine that can handle leather (like an industrial sewing machine) or you can hand-sew leather. In this case, I  needed more practice hand-sewing leather. Before I started sewing, I punched the D rings into the long side "strip" of the bag.

Then, it was a matter of punching holes in all of the leather pieces.


Afterwards, I threaded two needles with waxed nylon thread and started sewing. I started with a leather sewing awl, but found the tension better if I just used two needles. (Learn more about saddle stitching in this YouTube video.)

Here's the finished messenger bag from the side.


And here is a view from the top. I made a few mistakes here and there, including not giving enough of a "seam" allowance by punching the holes too close to the edge. Plus my stitch tension is a bit uneven, so it pulls in certain places. The bag is completely serviceable and will probably be gifted to my Eldest Nephew (as he was very jealous of his sister's messenger bag and wanted one for his own).

I still need to add the bag straps, but those are fairly easy to make.


Overall, however, it was a definite learning experience.  In order for me to get better hand sewing leather, I have to make leather projects to get better as it behaves very differently from fabric. I'll be making another bag soon, hopefully.

And here's your obligatory kitten photo! (They're getting huge and are a constant source of joy in my life)


Wednesday, September 18, 2013

Spinning for Socks: FAIL

In my opinion, spinning for socks is one of those hallmark tests for a spinner. The fibers need to be spun worsted and tight, then tightly plied in order to give the socks a lot of durability. My problem is that I tend to spin & ply fairly balanced yarns, which has a lot of applications, but isn't the "ideal" for socks as they need to be long-wearing.

So, in my attempts to become a better spinner, I tackled sock spinning. I took some Frabjous Fibers that was super wash merino and nylon and spun them. (Aren't those beautiful colors?)

IMG_1322

They turned into three lovely bobbins of singles. These were fairly tight twist (or at least I hoped it was tight enough). My ply back tests gave me a fairly tight 3-ply.


For plying, I used the same exact ratio as I did for spinning. (Normally, I go "up" one ratio per plying as we learned in SpinU, but since that normally gives me a balanced yarn, I opted to stay at the same ratio.)

While I was plying, I stopped every now and then to ensure that I was getting enough twist. And yes, the resulting yarn was very 'active' even before it was wound onto the bobbin. I was getting about a 27 degree twist angle.

Here's what it looked like when I wound off the plied yarn onto the skein winder.


During my class at SpinU @ Purlescence Yarns, our instructor, Sandy, told us what sock yarn should look like straight off the niddy noddy or skeinwinder --- a super gnarled mess of spaghetti that you need a heavy weight (like a can) to set. So, I held my breath as I pulled the yarn off the winder.

Instead, what I get is only a slight twisty mess. This skein had about 2.5 twists, which is more than my usual-somewhat balanced skeins, but it's not enough twists for socks.

I ended up with about 450 yards of sock weight yarn, but not quite the sock-specific yarn for which I was aiming.  (Here are the left over bits that I navajo plied)


I think I need to go back to my spinning instructor, Sandy, and get some more helpful tips on spinning sock yarn.

Monday, September 9, 2013

The Making of a Costume: Waist Cincher (Part 2)

This cincher needed some additional structure in the form of boning. However, it doesn't need a lot of structure, but just "enough." Some time ago, I had purchased some very good "plastic" boning from Farthingales LA. Normally, I eschew the plastic boning you might normally get from a big box store like JoAnn's Fabrics, because it tends to "warp" over time.

However, a friend and former costuming instructor (who taught a class on corsets) highly recommended these plastic bones from Germany. I used them with great success on my 17thc corset (which I'll post about at a later date), and have been using them for garments that require very light boning.

Plus, the added benefit is that they can be shaped with a pair of scissors.


I cut the boning down to size. (Your garment must be mostly completed in order to size boning correctly. ) Then, using the oversized seam allowances, I created boning channels in the lining of the fabric.


I only added boning to the two side-back seams, as well as in the front piece where I'd be placing the grommets. The boning would add some structure and keep the laced grommets from de-forming the fabric.

Here's the finished front/back of the waist cincher. I sewed down the bottom edge, then top seamed all of the edges accordingly.

As you can see, it's only about 4 inches wide at the narrowest point, so it acts more like a "belt" than an infrastructure garment.

Once all of the sewing was done, I got out all of my grommetting tools:
  1. a marble slab to pound upon
  2. a plastic mallet
  3. an stiletto awl 
  4. a grommet anvil & setter
  5. nice heavy duty grommets (from Tandy Leather.)
  6. a piece of leather to place under the anvil.


I use the stiletto awl to pierce a hole through the fabric. I prefer this technique versus "punching" a hole through the favric.

I insert the grommet and use the setter to anchor it into the anvil. Then I use the rubber mallet to pound the grommet close. (I much prefer using "leather" grommets that you can get at Tandy Leather versus the very cheap metal versions from JoAnns or other big box stores.)

Viola! One nicely attached grommet. (You can see the two bone channels that will add stability to the grommets.

Whenever I add grommets to a garment, I always place the non-negotiable grommets (top and bottom) accordingly, then space out the rest as needed. I finished grommetting one side in under 10 minutes.

Once I finish up an edge, then use it as a "template" for the other side. In this way, I know that the grommets always line up. Here's the finished waist cincher pinned onto my mannequin (which doesn't fit it correctly as the mannequin "torso" doesn't match my own so it sits differently).

(On me, there is an 1.5" gap between the bottom of the vest and the top of the cincher)

The last thing added to the cincher was the lacing. I learned a nifty trick from looking at various costumes made especially for theatre-use -- sew the lacing directly into the garment bottom so you never have to look for lacing AND the lacing will always be the right "size" for your garment.


I tend to use flat cotton show laces whenever possible. This time, I used nylon ones, but you have to carefully burn the edges of the lacing so that it doesn't fray too badly. (Make sure you do this outside or with good ventilation!)

So, I am DONE with the sewing portion of particular costume. I tried on the whole outfit and it looks great. I still have to make a few accessories to go with the costume, but that'll be later.

And, of course, photos of the cats "supervising" my sewing efforts, and making sure the roll of boning doesn't fly off the table.


Friday, September 6, 2013

The Making of a Costume: Waist Cincher (Part 1)

After I finished the vest, I realized I needed an accompanying waist cincher for my costume. I certainly had enough scrap fabric from making the vest to make myself a waist cincher. I had made these before of various patterns. For this particular piece, I opted to use an existing pattern I had made previously -- the Truly Victorian corselet.

I knew exactly what size I needed to make, but, I also needed to modify this pattern in several ways:
  1. 1.5" shorter at the top. I wanted a very big gap between the bottom of the vest and this waist cincher/belt.
  2. Front laced opening (instead of rear-lacing). 
  3. A more "scooped" out back
These are pretty simple modifications. First I re-drafted the pattern to included #1-#2. 

For #2, it meant that the two original back pattern pieces combined to form one piece. And the original front piece (initially intended to be placed onto a "fold") was turned into 2 pieces with an extra seam allowance. The two remaining pieces (side front & side back) were relatively unchanged.


(Pattern pieces: front, back, side front, side back)

Obviously, a mockup was needed just to check fit. The back part wasn't "scooped" enough, so my Viking marked how my back scooped out. It only affected the back pattern piece and the side-back pattern piece


I transferred those marks to the pattern and added a 1/2" seam allowance. Then cut the mockup accordingly to double check fit.
(Modified Back & Side back pieces. The dotted line is the "cut" line)

Then I had to figure out how I wanted the scrap fabrics to lay out. I didn't want a complete replica of the vest, but I felt that a similar color scheme would look nice. So taking pencil and my box of 64 Crayola Crayons, I colored some ideas out.


First, I made the lining out of the solid green fabric. For stiffness, I used a light fusible iron-on interfacing. (Normally, I would interline instead of interface, but I didn't need a lot of structure to the garment, and I wanted to keep much of the drape of the linen.)


Afterwards, I pieced together the fashion fabric side of the cincher. Unlike the front of the vest, this part was extremely easy as each pattern pieces were cut from different colors.


You might notice that I have a huge seam allowance for this cinched. I actually have a 3/4" seam allowance. Why you might ask? Because I needed to bone part of this cincher in order to maintain some structure to it. I use a combination of a seam allowance and a casing for the bone to hold it in the appropriate location.

Here, I seamed together the top and double checked it, before seaming up the sides. (And always, press after each seam!)


More in another post about the boning and grommets of the finished cincher.

(And of course, the obligatory kitten photos! They love to sit and sleep while I sew....)


Wednesday, September 4, 2013

How to: Keep your Cakes of Yarn Tidy

Whenever I'm doing stranded colorwork, there's always a problem of keeping the balls of yarn intact without getting the dreaded tangle of spaghetti from both ends of the yarn cake. I was just about to start the two color section of the Color Affection Shawl when I realized I needed something to keep the yarn cakes from tangling.

There are several things out in the market that help you keep your yarn cakes tidy, including everything from ziplock bags to coffee cans to plastic containers. Sometimes, I personally use old pantyhose, which work just as well, but I couldn't find the ones I had already previously cut up to use.

Necessity was the mother of invention, and you come up with an AHA moment. This time around, I was realized that my (non-handknit) sock drawer) contained some old (clean) gym socks that had a few holes that I had been meaning to upcycle.


Normally, I would use these as rags, but I realized I could probably re-use a portion of the sock for something much more useful. So, I cut off the ribbed cuff a little bit past where the ribbing ended.

I used my serger to "serger" one of the socks and my machine to do a simple zigzag stitch on the matching pair to see which held up better. Then I slipped it onto my yarn cakes.


So far, it seems to work very well. I've been knitting on my color affection in this manner, and the yarn stays pretty tidy. I very much like the idea of upcycling old items that you would normally discard in some manner for more useful and practical applications.


I know that a lot of people like "cute" items that are a specific use for a given task, which is fine, but I find that I much prefer to re-use something than purchase a task-specific thing-a-ma-bob for the job.

I've also been playing very much with the kittens and trying to teach them that yarn is NOT a plaything. My previous cats couldn't care less about yarn and I could leave a project with no fear of it being tangled. So I'm teaching my new kittens this lesson as well.

Of course, there's also the obligatory kitten pictures :-D

Monday, September 2, 2013

The Making of a Costume: Vest (Part 2)

I need to apologize for this next post, because I was a doofus and forgot to take a bunch of in-progress photos. But I'll walk you through it.

After I finished the lining of the vest, I needed to make the fashion fabric side.

The front panels of the vest were pieced together using the marigold, burnt orange, and chocolatey- brown linen fabrics I had purchased.


The back panel was going to be a warm chocolately-brown linen, and I was going to use a "slashing" technique to expose the colorful lining underneath, reminiscent of the Renaissance type clothing.

After I made the back panel, I marked where I wanted the slashes with chalk, and then cut the fabric accordingly. (See the green of the lining peeking out between the slashes?)


In order to prevent fraying, I used fray block as well as carefully hand stitching around each slash. However, when everything was said and done, I wasn't too happy with how it looked. There was no "dimension" to the slashes, and while you could see flashes of color, I wanted it to be more "obvious".

So I took strips of fabric -- the same color as the lining, attached them to the lining, then "puffed" them out in between the slashes.


Here's the front with the attached buttons. The buttons are only for show, and I use some hidden clasps on the inside lining.

And the ONE nice thing about this vest? It's finished on BOTH sides, so that it is completely reversible! I would need to add frogs to the "lining"to hid the small clasps, but it works in either direction!

Here's what it looks like on the inside (albeit a bit wrinkled).