Tuesday, April 26, 2016

Shego Costume: Making a Bodysuit (Part I)

One of the things that I have not made for myself is a bodysuit. Spandex fabric has been my anetham and I have avoided it for a long time. However, with a lot of costumes using bodysuits, I knew that it would be inevitable that I would have to suck it up and make one for myself. (It's been over 20 years since I started costuming so it'd have to be inevitable that I would need to make one). Previously, I had made "do" with commercially available bodysuits.

A few pattern companies have patterns for bodysuits, but as this item needs to fit me extremely well, I was  was a bit worried about having to make multiple mockups from a pattern and have it fit me correctly.


So, I asked a few friends who have specialized in super hero body suit costumes as part of their cosplay, and they gave me excellent suggestions!
  • Go to a dance store and buy a bodysuit that fits you. (BLOODY BRILLIANT!)
  • Take it apart and use it as your pattern. (AMAZINGLY SMART!)
  • Make sure that the bodysuit is a 4-way stretch and that your fabric is also 4-way stretch. (I didn't know this part.) A 4-way stretch fits better to a human form.
So, not only will the bodysuit will fit me from the start, I won't have to struggle with fit too much. Plus, the cost of the bodysuit would be well worth the time and effort trying to fit me from a paper pattern.
I went online and bought a bodysuit that were for my measurements from a dance store.

Long Sleeve Mock Unitard from Baltog

I bought two on sale -- one black for future use and one a bright fluorescent green that I wouldn't mind taking apart. I bought the green because it was hideously colored and so I could easily see the stitches, which were all done on a serger. So I spent two evenings taking apart the bodysuit with a seam ripper and binge watching the show, Young Justice.

With a bit of care, everything came out well, and I took a few notes on the construction order.


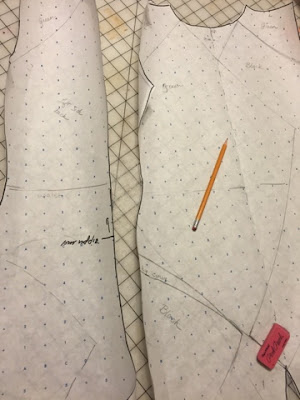
I copied the patterns onto paper so that I could have a master pattern I could use for any bodysuit.

I had made initial drawings of the bodysuit patterning that I wanted to use. I did this for the front and back. Notice the asymmetrical lines? The outfit has a harlequin (NOT Harley Quinn) feel to it.
I proceeded to sketch out the markings on the master pattern, including all of the color coding that it required.

I traced out all of the colored pieces and added additional seam allowance as needed. (Note: The original pattern already has the seam allowances included. The colored pieces needed seam allowances where it attached to each other.


Once I completed all of the colored bits, I laid them out on the original master pattern to ensure everything lined up correctly.

And now all I have to do is create the bodysuit. I bought enough fabric to make at least two versions, just in case I make a bunch of mistakes on the other one.

And no, the green of my fabric is not the same as the fluorescent green of the original body suit. Now, it's just a matter of cutting out my pattern pieces and do some "swatches" with fabric scraps.

Wednesday, April 20, 2016

Organizing Crafts on a Utility Cart

As part of my craft-room cleanup, I've been wanting to get a cart to store many of the supplies I use on a regular basis so that I could:
  • Keep my work area surface clear of all of those small things, like pencils, scissors, tailor's chalk, etc.
  • Be able to roll out said supplies into the craft room whenever people come over instead of a mad-dash to tidy up my work space.
A lot of people have been using the IKEA Raskog cart with a lot of success. (Check out all of these ideas on Google or Pinterest.) I loved looking at all the photos of how people used them, and knew that something like this would be super useful for me.

Dimensions: 13.75 x 17.75  x 30.75 inches

However, after seeing one in-person at IKEA, I realized that it was a lot smaller than I had anticipated, especially for my type of costuming or other projects. If we had a smaller house/apartment, I might make due with this type of cart and have it be handy, bu my Viking said that I needed something sturdier with much more capacity, and I agreed -- my projects and supplies tend to be bigger than most hobbyists.

So, as when we were at Home Depot, we ran across this little beauty. It was more expensive than the Raskog, but it's rated to about 400 lbs of weight (not that I would use 400lbs worth of weight....)

They had a sample already built, but it was on a high shelf, but it looked like it would work for me.


The first order of business was to build the darn thing, which was fairly easy. It was pretty easy to assemble and all of the pieces were extremely sturdy.  However, upon building it, I realized just how BIG this thing was, and I started having some doubts. (It comes up taller than my waist).


But, when I started filling it with my supplies, I slowly started to realize that it might not be too big after all.
I put some craft foam down as a liner so pieces wouldn't fall through the holes.

The top shelf contained my caddy with the little things I use on a regular basis -- different scissors or blades, pens/pencils, button hole rules, awls, seam rippers, tracing wheel, etc., etc., etc.
The second basket held all of my different pins (glass, silk, quilting), different fabric/paper weights, needles, and other items that I didn't want accidentally floating around. I keep these in a plastic container so that the cats don't play with them. And no one wants to accidentally step on a pin or needle.
On the bottom shelf, I put my fabric, pattern pieces, etc., that I need close by when I'm working on a costume, but that just need to be out of the way in the meantime. I also put my manual and parts for the serger in the bottom basket, which kept it handy, but also out of the way.

Previously, my workspace would be extermely crowded. All the necessary supplies would be on one corner of the table (as illustrated when I was working on my 10th Doctor pants) -- scissors, weights, pins, pattern, etc.,
Everything shoved to the top most of the table.

And the cats would be at the other end of the table.

A litter of books, paper, scissors, pattern pieces, fabric weights, etc.,

With the cart, I gained a TON of space on my workspace area (i.e. dining room table), which was all sorts of awesome. Plus, I wasn't constantly moving the cat to see if he was laying on ruler.  It also gave me a place to place a drink with worrying I was going to accidentally spill liquid over the fabric.

 Cat space is very important, ya know.

Despite the cart is taller than my dining room table, but it definitely helps clear up the space quite nicely. It probably could be a tad bit smaller, but I'd rather it be a tad too large than too small to use effectively.

When I finished sewing for the evening, I discovered a nice bonus. The cart was sturdy enough to hold my serger on the top shelf. All my pattern and fabric pieces went into a basket.
By putting everything into the cart, the table was now clear for other things, like eating, or if my Viking needed the table for another reason, he'd have the space to use it without worrying about disturbing my projects. And I could move it to a better location where it would be out of the flow of foot traffic.

It would be self-contained in the cart until I was ready to start sewing again. And, if visitors came by, I could wheel this whole thing into the dedicated craft / storage area without a frantic clean-up of a project. Or if we set up a separate work station, I can just wheel all my stuff over to the new table without any fuss.

As I use the cart more, I might move things around to make it more efficient for me to use. (For example, I might move the tool caddy to the second cart so I can reach it easier, and put the patterns on the top shelf. ) But for right now, this particular cart is extremely useful and I'm very happy with it.

Monday, April 18, 2016

Lessons Learned - Part 2

After last week's heart-breaking debacle with my colorwork hat, I decided that it was going to be worth the time to re-skein all of the Miss Babs yarn (both the Dark Andromeda and Funny Papers colorways) and do a citric acid soak. (Read the first post.)

I compared the vibrancy of the non-treated yarn with my poor hat. You can see how muddied the colors are on the hat versus the skein. If I hadn't found this out so soon, I would have had a heart-break as big as a sweater. :-(

While the results of the hat were heart-breaking, at least it wasn't with a FULL SWEATER.

I had to take 3 cakes of yarn and turn it into skeins. I spent about 40 minutes re-skeining  and tying all of that yarn up for dye'ing. Yowza is 560 yards of yarn per skein.

Ball of yarn vs. skein

Then I followed the directions for the citric acid soak.

And microwaved it. The skeins were so big, that my cling-wrap couldn't contain all of it.


In addition, I put my in-progress sweater on waste yarn and repeated the process for it as well.


After all of the yarn dried, I had to re-cake all of that yarn, but of course, I still hadn't quite recovered from the heart-ache, and so I put the sweater aside for now, until I have the fortitude to come back to it.

Today, I sent Miss Babs an email about what happened. While I'm extremely disappointed, I still love her yarn and her colorways, but I'm afraid my trust is a bit broken. Any future Miss Babs yarn purchases will automatically get a citric acid soak before I start swatching for another project.

As an end consumer, I don't feel like I have to go through this step to enjoy a dyer's yarn. :-(

Friday, April 15, 2016

Small Sacrifices ...or a Lesson Learned

Sometimes, it's worth a small sacrifice to save the whole, I think.....

I had bought some of Miss Babs YOWZA yarn at Stitches West in a beautiful burgundy color and a coordinating variegated yarn for a sweater that I had in mind. Now, I've used Miss Babs yarn before WITHOUT any problems previously, but I'd never purchased any of her red colorways.


I dutifully made a swatch for my sweater. I washed and blocked the little swatch (perhaps 3x5 inches), which bled a little tiny bit, but nothing major. So, I started my sweater.

At the same time, I started a much bigger "swatch" in the form of a slouchy hat, because I wanted to make sure that the coordinating color worked well, and I wanted to see how many rows of the coordinating color I wanted to use as "stripes" for the overall sweater. I wanted to finish the hat before I got to the stripes of the sweater.

I proceeded to wash and block the hat; only to discover that the initial washing left the water a deep dark blood red....and completely muddied the beautiful colors of the coordinating stripes! The "white" parts of the variegated yarn are now a slight pink. And the red yarn has a slightly washed out look to it. :-(

(It's hard to tell from the photo, but the colors are definitely a lot more muddied after it got washed)

ARGH!!!!

The water was so filled with red dye that it stained my palms red. I used a paper towel to wipe up some spilled water, and it turned pink.


I can't imagine what this would do to my beautiful sweater once I wash it! Luckily, I'm only about 1/4th of the way through the sweater, so I figure I can do a citric acid soak with the incomplete sweater, the remained of the burgundy yarn, and the coordinating color. However, I'm going to have to skein up the balls of the YOWZA! yarn first, which is a HUGE ball.

I'm glad I figured this out before I got too far into the sweater. It's going to take me a bit longer to finish since I have to do these intermediary steps, but I'm glad I discovered this now. I had heard that reds were hard dyes to set, but I'm very surprised at how much dye came out in the washing!

I still love Miss Babs yarn, but I'm so very disappointed in this colorway.

Lesson learned -- treat the yarn BEFORE you start knitting.

Thursday, April 14, 2016

Legos

I love Legos. I never had them as a kid, but I discovered them in college. A former roommate was a Lego representative for our area, so he managed to get us a bunch of Lego sets. My nieces and nephews have a ton of Legos and I enjoy building those things with them.

This past weekend, my in-laws gave me a belated holiday gift -- A Doctor Who Lego set!!


What's not to love? I'm a total geek over Doctor Who, and Legos definitely falls into "making and crafting".

A friend was over, so we decided to break it out. Her OCD nature organized the pieces by color and size.

There's over 600 pieces! The first order of the day was to put together the actual figures, as they are the easiest things to create.


However, it was interesting to note that Clara, the 11th Doctor (Matt Smith), and the Weeping Angel had two different faces on a single head  -- one smiley face and one serious face --- or in the case of the Weeping Angel --- one SCARY face and one not-so-scarey-face.


Whereas the 12th Doctor (Peter Capaldi) only had the single serious face.  I think there's a definite resemblance there!

We had to keep the cats from playing with the Lego pieces. We finally hit on a compromise and set up a "distraction" fabric away from the Legos. Pharaoh was very put out that we wouldn't let him bat around the pieces.


It took an hour to complete the control room. Then another hour for just the TARDIS portion.


There were 129 pages of instructions! But I'm amazed at how well it came together. The Daleks look like Daleks.


Unfortunately at one point, we had to deconstruct a good chunk of the control room, because we realized that we had misused two pieces that we needed for something else -- there was a couple of pieces that looked exactly like each other except for a cut-out opening. Then there were the weird leftover / extra pieces; we were afraid that we had done something wrong, but everything seemed okay.


Overall, it was a blast building it. The TARDIS detached from the control room as a separate individual piece, so we could just play with the TARDIS if we wanted. I love the Daleks and Weeping Angel.


I think I need more Legos.