Showing posts with label Dr_Who_Scarf. Show all posts

Wednesday, February 4, 2015

How to Knit Long Fingerless Gloves

I like to knit a lot of fingerless gloves as I find them extremely useful in a variety of situations. I particularly like long fingerless glvoes (elbow-length), for when I want a little bit of extra warmth when I'm wearing a t-shirt, but don't want to wear  coat. (And it's easier to carry around gloves than a jacket.)

I've written up a general recipe for how to knit yourself long fingerless gloves, specifically in relation to my knitting of my Doctor Who Scarf Gloves. However, you must know your knitting gauge and you must have your arm measurements, as shown below.

If you don't want a generic recipe, I've included pattern instructions for *my* size gloves below. I hope this helps you. If you have any questions, please leave a comment below, and I'll answer as best as I can.

Choose from one of the following:


Generic Recipe


  1. Make a gauge swatch. 
    • Get your stitch count - number of stitches per inch
    • Get your row count - number of rows per inch.
  2. Measure your arm. You are going to need someone to help you with this part:
    • A -- the measurement around your wrist
    • B -- the measurement around your arm just below your elbow (or wherever you want the gloves to end)
    • C -- the  distance between A & B. This measurement helps determine how much you need to decrease from your elbow to your wrist.
    • D -- the measure around your arm at half the distance of D. For example, if C = 9 inches, then you want to measure your arm at 4.5 inches.


Now for the math part:

  1. Number of stitches at A =  A x stitch gauge
  2. Number of cast on stitches = B x stitch gauge = ___
  3. Number of stitches at D =   D x stitch gauge = ___
  4. Number of stitches to decrease (E): = #2 - #1 
  5. How many rows to decrease:

    • (C x row gauge) ÷ #4 = Decrease 1 stitch by ____ rows 
NOTE: These measurements are for ZERO ease. If you want negative ease, reduce the number of stitches by 5-10% (or more, depending on what you want)

I put together a worksheet if you don't want to do the math. Fill in the GOLD boxes.


Dealing with the Thumb:


Personally, I like thumb gussets, but you can do any sort of thumb treatment for your gloves. Here's some ways you can deal with the thumb. I've linked some tutorials that I found (but will not vouch for... so caveat emptor). I've tried all three treatments and prefer thumb gussets
NOTE: Make sure to use the Jogless Jog method for any stripe color work.


Pattern for Small-Medium Gloves

If you don't want to do the math, or want an example, the following are MY numbers for gloves that fit me.
  • A: 6 inches
  • B: 10 inches
  • C: 9 inches
  • D: 8 inches
  • Gauge:
    • Stitch gauge: 8 st/ inch
    • Row gauge 9 rows / inch 
Consequently, the numbers for my pattern are:
  • At B, cast on 80 stitches = B (10 inches)  x stitch gauge (8 stitches/inch)
  • At D, I should have about 64 stitches =  D (8 inches) x stitch gauge (8 stitches/inch)
  • At A, I should have 48 stitches = A (6 inches) x stitch gauge (8 inches)
  • For decreases:
    • I need to decrease my stitch count between A & B by 32 stitches ===> 80 stitches - 48 stitches = 32 stitches
    • I have 81 rows to decrease 32 stitches == C (9 inches) x 9 rows/inch
    • 81 rows ÷ 32 stitches = 2.5 rows per stitch
    • So, I have to decrease by 1 stitch every 2.5 rows. The .5 rows is a bit of an annoyance to remember, but I can double the row count (2.5 x 2 = 5): Decrease 2 stitches every 5 rows

Consequently, my general pattern is this:
  1. Cast on 80 inches and do ribbing for 1.5 inches.
  2. Switch to Stockinette and decrease 2 stitches every 5 rounds. 
  3. Continue Step 2 until you reach 4.5 inches (C ÷ 2).You should have 64 stitches (or thereabouts)
  4. Continue Step 2 until until the glove is 9 inches @ 48 stitches.
  5. Knit rounds until reaching the base of the thumb.
  6. Work glove and thumb gusset until you have 17 stitches for the thumb. (See thumb gusset tutorials above).
    • Place 17 thumb stitches on waste yarn.
    • Continue working the rest of the stitches (47) in the round.
    • Make 1 stitch to get 48 stitches.
  7. Continue working in the round until 1.5 inches from desired length.
  8. Do 1.5 inches of ribbing.
  9. Cast off
  10. Thumb:
    • Pick up 17 stitches of the thumb + 4 more stitches
    • Knit thumb until desired length.
Note: These are general pattern instructions.
Please make any modifications as you need for yours.


Stripe Pattern

For the Dr. Who Stripes, I followed the original scarf pattern as listed on the Doctor Who Scarf webpage. I started the stripes as follow, using either end of the scarf to start a new glove. Although, frankly, you can probably start anywhere in the pattern and get your own unique looking set of gloves.

The following illustration should help you get started. Remember to follow the rest of the original scarf pattern.

(Divide row count by 2)

In order to make it scale correctly for the gloves, I divided the number of rows by 2. For example, if the pattern said,  22 rows of Red, then I would only knit 11 rows instead. (I was also contemplating dividing by 4 so I could incorporate more colors into the gloves, but in the end, I chose to divide by 2.)

Monday, February 2, 2015

Knitting Doctor Who Scarf Gloves

Despite having multiple projects on the needles, I got a bug in my ear to add one more project to the list -- a Doctor Who set of fingerless gloves! I had made a full sized scarf on the knitting machine years ago for my Viking, and it's an impractical thing to wear on a regular basis -- except for when cosplaying the Doctor! Fingerless gloves would be a little easier to knit and wear.

However, this new project required the purchase of some yarn, in specific colorways. A trip to my LYS yielded colors that were close to what I wanted. (Some colors were slightly off, but it's what the LYS had in stock and I really wanted to cast on right then and there!)

Cascade 220 Sportweight superwash

An initial test swatch told me that the yarn weight was wrong -- the fabric was just too thick for my liking, and the bright yellow was going to bother me. Plus, I had missed one colorway So, I went back to my LYS and scoured their yarn selection. I wanted a thinner fabric, hence, I needed a thinner weight yarn. Consequently, I ended up the Cascade 220 sock weight yarn (Heritage solids).


(Note: I had PLENTY of left overs from each skein.)

While most of the colors were exact, the brown is slightly too dark and the tan is a little too light, but as a design choice, I decided to go with it. Here are the colorways I selected from Cascade 220 Sockweight:
  • 5662 Maroon (maybe too red, but it works)
  • 5663 Wine 
  • 5631 Charcoal (there might have been a better darker grey for this)
  • 5639 Brown (slightly too dark)
  • 5643 Sunflower
  • 5681 Limestone (slightly too light of a beige)
  • 5640 Cinnamon 
Another test swatch later told me that this yarn was the right weight. So I started knitting.


As a scarf reference I used the "definitive" Doctor Who Scarf website that lists out the color combinations and number of row repeats for each color. Specifically, I used the original scarf pattern, which is called the Acheron Hero Scarf.

I chose spots in the pattern that I felt were representative of the scarf and that looked good and started knitting there. For these, I selected the ends of the scarf and knitted towards the middle.

In order to make it scale correctly for the gloves, I divided the number of rows by 2. For example, if the pattern said,  22 rows of Red, then I would only knit 11 rows instead. (I was also contemplating dividing by 4 so I could incorporate more colors into the gloves, but in the end, I chose to divide by 2.)

NOTE: Make sure to use the Jogless Jog method when switching colors.
They aren't too shabby.

Plus the Cascade 220 Sport superwash is really soft.


I love these. I might make another pair using a different scarf or maybe even Romana's scarf. I still have a ton left from each skein.

I'll be posting the actual pattern for the gloves very soon, so you can make your own.

Tuesday, February 19, 2013

24 Hours of Gallifrey

This past President's Day Weekend (for those of you in the U.S), which is Feb. 15-18, I attended a Dr. Who convention down in Los Angeles, called Gallifrey One.

Now, Gallifrey One is probably one of THE largest Dr. Who conventions on the West Coast. They manage to get an amazing array of actors, writers, costume designers, producers, etc, who have worked on Dr. Who. It's a Dr. Who Geek Paradise.

And, it's the one SF/F convention where I have seen the largest gathering of fiber artists attending. At many other conventions, there are your typical  costumers and prop makers, and Gallifrey is no exception. The costumers are pretty diverse. Every year there are numerous doctors, ranging from #1 - #11, as well as their respective companions. In addition, there are the other characters from the show and the adjunct t.v. shows, including Captain Jack Harkness, Silurians, and, obviously, the Master.

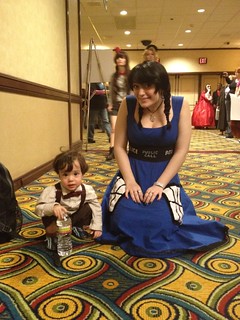
This year, there were a ton tardis dresses, a ton of 10s & 11s, Amy Ponds, and River Song. I spotted this littlest doctor with his Tardis. (You can see more Gallifrey One costumes here.)

The smallest doctor 

But, in addition to the number of customers, there is an extremely large number of extremely creative fiber artists who attend Gallifrey. The most knitted item is (obviously), the infamous Dr. Who scarf, but there were a variety of Tardis & Dalek hats.

In every panel that I attended, there was always at least two knitter in various panels, knitting away on DPNs or circulars. In the Dealer's Room, there was one enterprising knitter selling her hats & knitted scarves for the attendees.

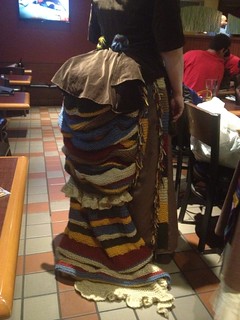
But, a lot of knitters took their fiber creations to completely different levels, incorporating many of the iconic elements in completely different ways. This costumer did an amazing femme Dr. Who costume, incorporating the scarf into her bustle!

 Dr. Who Bustle
  Dr Who bustle
If you're a fiber artist and a Dr. Who fan, you might want to consider coming to Gallifrey. You'll feel right at home with all of the knitting & crocheted items wandering the halls!

Friday, November 11, 2011

Adventures in Machine Knitting

So, yesterday, I finally picked up the knitting machine from the repair shop, which was a mini-saga. If you listen to the podcast, you'll have heard the story. Sufficed to say, everything's working now.

So, when I got it home, I grabbed our workhorse table, clamped it down, grabbed some left over yarn (Cascade 220), and set about making some test swatches.

Worsted weight yarn is about the "thinnest" this machine can do unless you want a loose weave. As it was, the weave for worsted is also pretty loose, but nothing that I can't live with in anything I'd make on this machine.

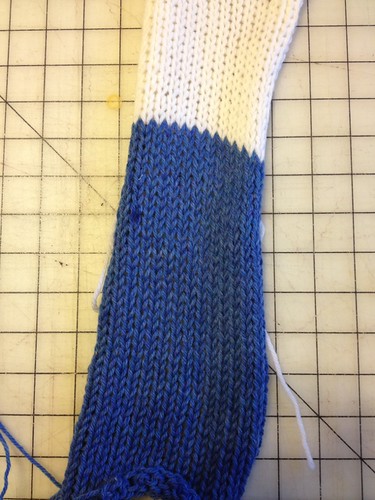
I also played with changing color. As seen in the photo, it ain't bad. It's stockinette stitch only, so it "curls" in on itself, but nothing that a good washing & blocking won't fix...or a crocheted edge.

Knitting machine test swatch

I also figure that since its Cascade 220, I can felt the yarn just a little bit to tighten up the weave, and it won't harm the overall end product.

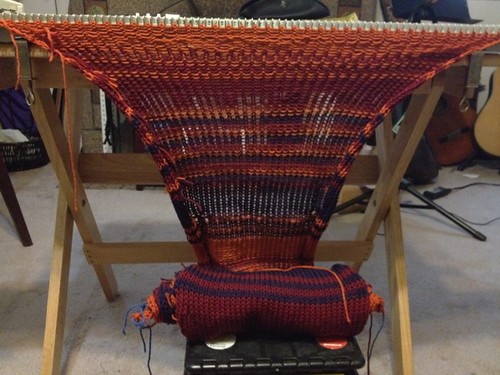
Why am I using a knitting machine? So, if you listen to the podcast, you'll know that my Viking wanted the Doctor Who scarf from Season 18 (the red outfit with the red scarf). I am NOT about to hand-knit a 20 foot scarf by ANY means as it takes TOO DAMN LONG -- ask anyone who has knitted one -- but a machine knit one? Sure it won't be "exactly" like the original (the original was a garter stitch scarf, and this is stockinette, but honestly...who's gonna care outside of the Doctor Who police?

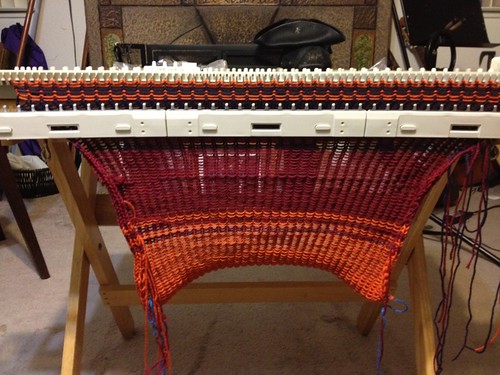
So after a few test runs where I made some mistakes, learned some things, then I started in on the Scarf. After about 10 minutes of putzing, I had this:

Docto who scarf

Overall, the machine is a *blast* to use. It is relatively easy to use, and everything goes by quick! After playing with the machine for several hours, I had ~8 feet of scarf, and had gone through nearly 1 skein of every color. I have one more skein of every color, and am going to need to pick up about 2 more of each color.

It was nice to see so much progress after a few hours work. This would have taken MONTHS to do by hand.

Knitting Doctor Who


Not to say that I didn't have any problems. I made some minor mistakes, which were easily fixed, and some BIG mistakes that...while fixable took a LOT of time to fix.

1) always make sure you have enough yarn for a row. If you don't, everything comes off the machine, and you have to carefully put everything back on carefully and tear your hair out. If you're unsure if you have enough, then you don't have enough so SPLICE in another skein!

2) MAKE SURE THE WEIGHT is on before you even start. Otherwise, it drops stitches of the needles.

3) move the weight every 10 rows. It helps with the tension.

4) When you move the weight every other time, double check the following:
a) no other needle has moved into position. Otherwise, you increase a stitch, which can be corrected easily by a K2TOG.
b) make sure that no stitch has accidently dropped. This is also easily fixable since it's just like regular knitting, but a PITA, because you're looking at the reverse side of the stockinette stitch.

5) Small color changes are a PITA, because you have to snip the yarn in order to do a small color change, unlike hand knitting. This makes for a LOT of loose ends to knot & weave into the scarf.

Overall, I could see making a bulky-weight blanket for just around the house or something similar...or making something nifty to just felt and cut out squares...after all, different tools provide different uses, and the knitting machine is no exception. But I'm not going to be giving up my needles anytime soon.