Monday, December 31, 2012

Beading

My SIL makes jewelry as part of her job, so over the holidays, we were able to sit down a bead a little bit. I had acquired a fair bit of lampwork and beads from a bead show one year, and had been unable to create anything due to time or lack of inspiration.

However, my SIL helped me get inspired and I was able to put together some very beautiful pieces. (All of the lampwork beads are from gracebeads.com). Many of these are a mixture of glass, stone, metal, or horn.

I love making jewelry for myself because it gives me some flexibility in what I want to wear on a daily basis. And, these pieces are one-of-a-kind, as I don't make to sell.

Matching Necklace & Bracelet. 

Made with Lampwork & Malachite with Silver beads

  Green lampwork, stone, and silver Stone & Silver

Bronze & Emerald pendant.

Beads are: jade, carnelian, bronze. The pendant is from Dragon's Treasure.
Bronze, Jade, and Carnelian

Red Lampwork beads

With horn, onyx (or jet), and carnelian beads
Red Lampwork beads with horn & Onyx

Owl Pendant &; Bracelet Set

Lampwork owl & donut beads. Other beads include: opalite, silver, lapis
Owl with lampwork beads, silver, and lapis Lampwork bracelet to match the owl

Lampwork Beads

With faceted blue tiger eye, green pearls, and silver beads. The center silver bead is from  Green Girl Designs.
Lampwork beads with jade, pearl, and silver beads

Red Lampwork

with silver & red dyed horn.
Red lampwork beads with horn, garnet, and silver beads

Saturday, December 29, 2012

Gifts for the Holidays

One of the things that I love doing for the holidays is gift giving, but obviously giving so many gifts to people can be...well....expensive, if you were to buy gifts from the store.

But, as a crafter, I love making the gifts that I make, just for a bit of a personal touch, but making gifts for everyone on my gift list can potentially drive me to the brink of madness. So, I do some batch making of gifts -- either chocolates, cookies, or liqueurs. They allow me to give handmade gifts, without having to make every individual gift...individual.

For my tea liqueurs, I usually make an Earl Grey, but this year, I also made a Jasmine Tea Liqueur for a Jasmine-Lychee Martini mix. (I'm still experimenting with this recipe). I've also made a Gunpowder Liqueur, Irish Breakfast, and Green tea.

Here's how I make my Earl Grey tea, which is the easiest by far. (There are plenty of other web resources for making your own liqueurs. I highly suggest doing a search & experimenting!)

  1. Buy some commercial vodka. If you have a Costco or a Sam's Club, you can get a 16L bottle of Kirkland vodka for a decent price.
  2. Add 6,7,8 tea bags to the vodka bottle and let that steep for at least one week.
  3. Make some brown sugar (or regular sugar) syrup, and add to the Earl Grey. You can also just add the sugar straight into the vodka, but you'll have to shake up the bottle very well.
  4. Let sit until you're ready to bottle.
  5. Buy some bottles. I got mine from Speciality Bottles (8.5 oz). Make sure you wash the bottles and the caps thoroughly. (I find a nice hot run through the dishwasher works well.)
  6. Buy some blank labels
  7. Decant your tea into your bottles and cap.
  8. Create nifty labels for your tea.
  9. Gift wrap and give to your friends!


  Tea Liqueurs

Monday, December 24, 2012

Steampunk Utility Belt / Apron

For the holidays, I decided to make my SIL a steampunk apron/utility belt that she could wear to Ren Faire over her costumes. She works at the faire as a shopkeep, so I wanted her to be able to have this be functional and decorative.

I've made this pattern before, and tweaked it a bit to fit her measurements.

She loves blues, so I found a lovely jacquard fabric that had her colors. It's really lovely. For the lining, I chose a cordoroy matching the gold tones.

Steampunk Utility Belt Fabric 1 Steampunk Utility Belt Fabric 2

Unfortunately, I forgot to take in-progress of the photos, but here's what it looked like before I added the snaps. I used the opposite side of the fabric to give it a pop.

Steampunk Utility Belt 5

Steampunk Utility Belt 6

And the final product
Steampunk Utility Belt 4

Steampunk Utility Belt 2

Saturday, December 22, 2012

FO: Gretta's Sweater

I finally finished the last sweater of 2012. It's a handspun, handknit sweater using the Simple Summer Tweed Top Down V-Neck with a few modifications courtesy of Wendy Bernard's book, Custom Knits 2.

First, it started off with a provisional cast-on, because I wasn't sure if I wanted a hood or not, which was contingent on the yardage I needed for the sweater. I also have wider shoulders and bigger biceps so I changed how many decreases for the sleeves. I also did an icord edging around the sleeves, hood, and bottom of the sweater.

This sweater makes me unbelievably happy. It started it's life as a raw fleece, processed, woolen spun (by me), and then knit by me, for me, to my custom specifications. It took about 3 weeks total to finish, and I *love* it.

It fits like a glove, super squishy, and warm. I ended up finishing the sweater with 3-5 yards of yarn left over, which is enough for any repairs that might need to happen. The sweater has already been steam blocked, and is awaiting its maiden "wearing".

From these locks (Gretta - a merino/corriedale cross from Janet Heppler's Nebo Rock Ranch)

Gretta Before / After

To this roving (courtesy of Morro Fleeceworks)

Gretta


Spun woolen to this:

Gretta Sampling 2


And to the final product -- a hooded raglan (icord edgings)

Gretta's Sweater 3 Gretta's Sweater 2

Wednesday, December 5, 2012

Finished Sweater

Recently, I finally finished my Adam's Rib Hoodie vest out of Cacase Eco Cloud, and I have to say, I love love love the finished product.

The yarn is so squishy and makes the finished sweater so comfortable, warm, and squishy.

I've worn this multiple times already (having finished it JUST before Thanksgiving). I'd wear it everyday, except that people might notice LOL.

I need to make another, maybe out of a lighter yarn for more of a drape...or I might make another out of Cascade Eco Cloud. Or maybe some woolen spun handspun.

Adam's Rib Hoodie Vest 3
Adam's Rib Hoodie Vest 1

Tuesday, December 4, 2012

Spin U: Third Trimester - Weeks 9-10

Week 9

This week, we continued working on novelty yarn spinning, including core spinning. This part was a lot of fun. We leared how to do turkish knots & beehives. We spun up some silk at a very tight WPI and angle so that we could do these techniques.

Sandy provided some nylon core yarn for which to wrap our spun yarn around.

Turkish Knots &; Beehives

Beehives & Turkish Knots

Week 10

As much as I hate knitting with boucle, it turns out that I'm pretty darn good at spinning it. For our homework, we had spun some long wool yarn, which then got turned into boucle for this session.

Boucle

Boucle

Frosted Yarn

Frosted yarn is essentially a form of novelty yarn where you "frost" yarn with roving, mohair, or other fiber. I don't particularly care for this type of novelty yarn either, but it's good to have the technique down.

Frosted

Cotton spinning.

Then, it was onto learning how to spin for cotton. Sandy helped us set up our wheels and demonstrated how to spin with cotton. Then gave us homework to spin cotton.

I hates it I do...

I discovered that I dislike spinning cotton. I *could* do it, but do I want to? No. Sandy had us spinning both worsted & woolen. I prefered woolen over worsted, but that's like saying, I'd rather burn my hand versus burning the bottom of my foot. (Honestly, I'd just prefer to avoid both if at all possible). My DH listened to my swear like a drunken sailor the entire time I was spinning.....

I used a cotton top (worsted) & cotton punis (woolen) for spinning. This photo shows the woolen spinning with the cotton punis.
Cotton Punis Woolen Spinning Cotton Puni
And the resulting yarns?

Worsted Spinning
This form of spinning cotton makes for a VERY HEAVY yarn -- as in rope heavy. The yarn itself doesn't feel like rope, but it is heavy.

Cotton - Worsted

Woolen Spinning
Spinning cotton woolen leaves you a much lighter yarn weight for the amount of fiber (which makes sense).
Woolen Cotton

Here they are side by side. You can see how much "denser" the worsted spun yarn (bottom) is compared to the woolen (top)
Worsted / Woolen Cotton


Monday, November 12, 2012

SpinU: Second Trimester

Our second trimester of SpinU was just as full as the first trimester. Here's some of the highlights

Week 5

This week, we learned the art of 4-ply (and plying more than 3 strands), as well as a 3/2 ply (a 3-ply of 2-ply strands)

  SpinU Homework - Week 4 Homework SpinU Week 5 Plying

Spin U - Week 5 Splying

 Week 6

This week, we learned about carding & combing, and spun the resulting fiber for homework.

  Spin U - Week 6 Homework

Week 7

This week, we learned how to spin bulky yarn, as well as thick&thin yarn.

2-ply Bulky
2ply Bulky

For homework, we had a ton of spinning to accomplish.

Thick & Thin Homework -- Single
I had some somewhat felted roving, which was prefect for it. I simply split the roving vertically and started spinning a "single" of thick & thin. Then it was washed and set under tension. I used a PVC niddy noddy so I could wash the whole thing under tension.

  Thick Thin Roving - Felted Thick Thin on Niddy Noddy
Then after washing....
  Thick Thin after washing2

This was not the most "pleasurable" of spinning for me, as spinning thick & thins require a bit of tugging and pulling at the roving.

High twist Single Homework --- greater than 20 degree angle @ 28 WPI
 Single 20-30% Post Wash

Week 8 

 This week, we plied some of our homework yarn (the thick & thin) into a two-ply.

Thick and thin


Sandy also taught how to woolen spin (a technique that I was already familiar with, but it was good to practice), and assigned it for our homework. And, for this week, she assigned a ton of homework, including the start of sock yarn.

Friday, October 26, 2012

Moths!


This past week, the weather finally started turning, and I went to wear one of my hand knit sweaters (made out of merino/angora), and promptly found a moth hole. And I had absolutely no time to fix it.
So, I took out another sweater (this one handspun AND handknit), and found yet another hole. GAH!

All I could think of was...MOTHRA attacked my sweaters! I'm not used to dealing with moths, as I've never had issues like this...ever.

I quickly dumped all the other sweaters from that drawer out (and found no other moth hole), wore another hand-knit sweater to work, then later that night set about fixing the holes.

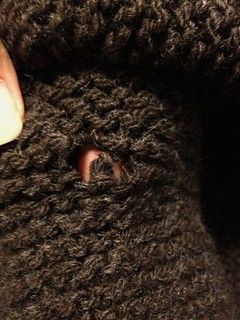
For the merino/angora sweater, I found FIVE HOLES (two of which weren't quite holes yet, but you could see the thinning fabric). This one is not heavily worn sweaters by ANY means, so it HAD to be something eating my sweater.

I took leftover yarn and darned the actual holes, then duplicate stitched the not-quite-yet-holes. Luckily, none of them were in obvious locations (like the front cabling). Then I wrapped the whole thing in plastic and chucked it into the freezer.

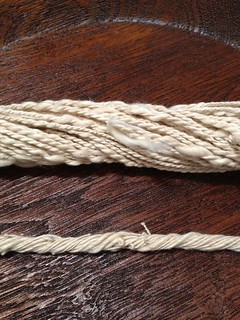
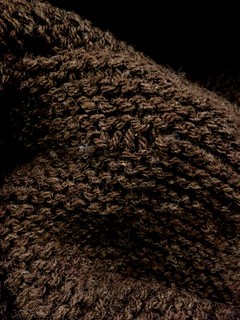
My handspun/handknit sweater only had one hole, which was small and fixable. But I did have a hard time with it, as this is a garter stitch sweater. Plus, I had to really dig into my stash to find the itty bitty left over yarn from the project (which I'm glad I kept!)

Moth hole

It's in a non-obvious spot and you'd have to be VERY close to notice that two stitches look more stockinette than garter.

Moth hole fixed

All of the other sweaters were absolutely fine. I took a look at my handknit socks (in another drawer in the same bureau) and they were fine. I looked at the other sweaters (located in other areas) and those are all fine too. It was just that one drawer.

So the whole thing got put out into the garage, and I'm filling up sacks of cedar & lavendar and lining everything containing wooly product

Thursday, October 25, 2012

Wheel Sneak Preview

Okay, here's a small taste of things to come. I'm still pretty much staining, sanding, and re-finishing the wheel, but I did a test run with the kate & bobbin to ensure that I have the right color combination. I really wanted a green coppery color -- something that would have the sheen of metal, but still be a beautiful green. Originally, I was thinking "verdigris", but not as teal.

Here's the unfinished portion of the kate plus a singular bobbin.

Unfinished Kate
 
Here are the color chips that I was considering. It was a toss-up between "botanical" and "verdigris".

Color choices

I went with "botanical". And I also picked up a metallic "glaze" in gold.


Here's the finished bobbin. (I think I went a bit heavy with the gold glaze.)

Bobbin


And here's the finished kate

Finished Kate


So far, so good. The rest of the wheel is still in progress.

Monday, October 22, 2012

Early Saturday morning, I went to check out a used spinning wheel. One was for sale for cheap, but appeared to be in good-working-order, as she was a spinner. However, when I got there, only to discover that while it DID work, it was like trying to pedal a bike up a super steep hill.

I had no idea what was wrong with it, and neither she or I could get it to work smoothly so I passed on it, despite it being a good price. I could tell that she kinda sorta took care of it and that she felt this was the normal for this wheel, but...it really wasn't. There were other things about it that bothered me a little bit (the wood was kinda dry and she had done a crappy varnish job on it), but it was really the treadling that broke the deal for me.

It was good that I had tried another wheel of the same style previously, and knew what a well-maintained wheel felt like, and this just wasn't it. I was REALLY ready to get it, but it just wasn't in the cards.

I spoke with Sandy at Purlescence about the wheel and what problems I had with it. She diagnosed a few things that might be wrong with it and how it could be fixed (fairly easily I might add, but still a pain to get fixed). I'm very glad I didn't get it, because now, I have something that is going to be just absolutely faboo.

What is it? You might ask? Well, I'll post about it later, because I have photos to upload, and no post is really completely without photos.

As they say, Pictures or it didn't happen.

Thursday, October 18, 2012

She Will be Called Geoge

As a note, my lovely Ashford Joy found a new home the other day. Another spinner's wheel was tragically destroyed during her cross-country move, and she was looking for another wheel and had fallen in love with the Joy.

I was looking for a new home for her, so this was synchronicity. My Joy found a loving home, and a spinner got the wheel she could love, hug, pet, and call "George". :-)

Ashford Joy

Although, I did think she renamed it "Georgina" :-)

Tuesday, October 16, 2012

Spin U: Thicker Yarn - Week 6

I'm jumping around from week to week as I get photos taken and uploaded of the various in-class & homework assignments.

In the first trimester of SpinU, we worked on perfecting techniques for worsted spun yarn in smaller WPI (lace, fingering, sport), because for most of the spinners in the class, this is their default spinning. In the second trimester, we worked on creating chunkier yarn (aran, worseted, bulky) by spinning thicker singles.

For the 6th week of class, we did a 2-ply worseted weight yarn. The singles were 16 WPI, and the resulting yarn was an 7-8 WPI 2-ply (heavy worsted/bulky).

I used the same fiber as I did with the 3ply

Untitled

2-ply