Showing posts with label pattern. Show all posts

Monday, March 14, 2016

Designing My Own Cowl

After Stitches West, I got a hankering to knit myself up a cowl with the scrumptious cashmere/silk that I picked up from the Miss Babs booth -- Sojourn -- 65% cashmere / 35% silk. The colorways are "Pretty Wreckless" and "Bare". While "Pretty Wreckless" is definitely in my color palette, Bare is not. I had originally wanted to get a charcoal grey to mute the colors of "Pretty Wreckless", but they had sold out. :-(

The "Bare" natural color was a second choice, but it really makes the vibrancy of the colors pop!

Scrumptious yarn!

I knew that wanted something with a bit of colorwork and lace. I looked on Ravelry I wasn't 100% happy with many of the existing patterns, especially given my yardage. So I decided to design my own.

I went through a few of my stitch dictionaries and found some very simple lace patterning that didn't require too much mental effort to memorize.  I started off with a bit of lace, then moved on to some minimal strand work and stripes.


It started well enough, but then I would become unhappy with a section and have to frog.


And re-knit a section again. I couldn't make up my mind whether I wanted asymmetrical patterning or something that was relatively balanced


I ended up frogging quite a number of times. I was pleasantly surprised at how well the Miss Babs Sojourn held up to lot of frogging. A small halo developed, but it's cashmere, so I wasn't too surprised.

I read on Ravelry that many people had issues using Sojourn on metal needles, but since I use wood needles, I didn't have any issue.


I lost count of how many times I had to frog and re-knit sections. It took nearly two weeks to finish the knitting!

I haven't quite blocked it yet either, as it has been cold, so I've been wearing it instead.  Can I just say how SOFT and lovely this yarn is? I'm in love, and I have two more skeins of different colorways to use.


I have the pattern written down, which I need to complete and get it ready to put on Ravelry.


Wednesday, February 24, 2016

DIY Geeky Pillow Cases

There is an often a dearth of practical geek goods that don't cost you an arm and a leg, like bedding. There are some out there, but they are often made for child size beds. The adult size geek bedding is often made out of crappy fabric --- I'm looking at you ThinkGeek and your polyester bedding! And I've been longing for my old Star Wars, Batman, and Holly Hobby ones (hey, don't judge...:-P)

(Edited to add: Someone just pointed to PotternBarn Kids, where they have QUEEN size sheets of the old Star Wars prints!! http://www.potterybarnkids.com/products/star-wars-sheeting/)

I've been wanting to remedy the situation for myself. So I was at the fabric store the other day and found some geeky type fabrics in the remnant bin of soft cotton flannel with each one was about not-quite 2 yards in length. I knew the perfect projects for them, and they only cost me $5.00 per remnant.

So I got to serging and sewing.
Since standard pillows measure 20x26, the amount I got was more than enough to make a good size pillow case. Plus, as pillow cases are rectangular, it took a total of 20 minutes to make two pillow cases.

The following diagram shows the dimensions I used for the pillow case.
 

(Note: This is a quick and dirty tutorial. There are more elegant ways to make a pillow, and certainly one with more construction effort. However, this is what I did.)

  1. WASH and DRY your fabric first before you start sewing. So, you know how much you actually will have before you start sewing. It'll be tragic to sew your case, then have it shrink in the wash.
  2. Measure & cut your fabric per the diagram.
    • I simply folded the fabric so I would have less sides to sew. However, you can also cut out two pieces of fabric instead.
    •  Pinking shears are your friend!
  3. (Optional) Serge all of the edges or use an zig-zag stitch (on your regular sewing machine)
  4. Fold over the fabric, as shown in the diagram, and measure accordingly.
  5. Pin the wrong sides together along the longer side. Sew both the long sides.
  6. Turn the Top Hem by 1" all around the edge. Pin in place then sew. (You can have a bigger top hem than what I did with mine. I was just constrained by how much fabric I had.)
  7. Turn right side out.
Viola! Finished pillow case!

I love flannel fabric. It's so soft and warm. Even one of the Boys helped me test drive it.


Wednesday, February 4, 2015

How to Knit Long Fingerless Gloves

I like to knit a lot of fingerless gloves as I find them extremely useful in a variety of situations. I particularly like long fingerless glvoes (elbow-length), for when I want a little bit of extra warmth when I'm wearing a t-shirt, but don't want to wear  coat. (And it's easier to carry around gloves than a jacket.)

I've written up a general recipe for how to knit yourself long fingerless gloves, specifically in relation to my knitting of my Doctor Who Scarf Gloves. However, you must know your knitting gauge and you must have your arm measurements, as shown below.

If you don't want a generic recipe, I've included pattern instructions for *my* size gloves below. I hope this helps you. If you have any questions, please leave a comment below, and I'll answer as best as I can.

Choose from one of the following:


Generic Recipe


  1. Make a gauge swatch. 
    • Get your stitch count - number of stitches per inch
    • Get your row count - number of rows per inch.
  2. Measure your arm. You are going to need someone to help you with this part:
    • A -- the measurement around your wrist
    • B -- the measurement around your arm just below your elbow (or wherever you want the gloves to end)
    • C -- the  distance between A & B. This measurement helps determine how much you need to decrease from your elbow to your wrist.
    • D -- the measure around your arm at half the distance of D. For example, if C = 9 inches, then you want to measure your arm at 4.5 inches.


Now for the math part:

  1. Number of stitches at A =  A x stitch gauge
  2. Number of cast on stitches = B x stitch gauge = ___
  3. Number of stitches at D =   D x stitch gauge = ___
  4. Number of stitches to decrease (E): = #2 - #1 
  5. How many rows to decrease:

    • (C x row gauge) ÷ #4 = Decrease 1 stitch by ____ rows 
NOTE: These measurements are for ZERO ease. If you want negative ease, reduce the number of stitches by 5-10% (or more, depending on what you want)

I put together a worksheet if you don't want to do the math. Fill in the GOLD boxes.


Dealing with the Thumb:


Personally, I like thumb gussets, but you can do any sort of thumb treatment for your gloves. Here's some ways you can deal with the thumb. I've linked some tutorials that I found (but will not vouch for... so caveat emptor). I've tried all three treatments and prefer thumb gussets
NOTE: Make sure to use the Jogless Jog method for any stripe color work.


Pattern for Small-Medium Gloves

If you don't want to do the math, or want an example, the following are MY numbers for gloves that fit me.
  • A: 6 inches
  • B: 10 inches
  • C: 9 inches
  • D: 8 inches
  • Gauge:
    • Stitch gauge: 8 st/ inch
    • Row gauge 9 rows / inch 
Consequently, the numbers for my pattern are:
  • At B, cast on 80 stitches = B (10 inches)  x stitch gauge (8 stitches/inch)
  • At D, I should have about 64 stitches =  D (8 inches) x stitch gauge (8 stitches/inch)
  • At A, I should have 48 stitches = A (6 inches) x stitch gauge (8 inches)
  • For decreases:
    • I need to decrease my stitch count between A & B by 32 stitches ===> 80 stitches - 48 stitches = 32 stitches
    • I have 81 rows to decrease 32 stitches == C (9 inches) x 9 rows/inch
    • 81 rows ÷ 32 stitches = 2.5 rows per stitch
    • So, I have to decrease by 1 stitch every 2.5 rows. The .5 rows is a bit of an annoyance to remember, but I can double the row count (2.5 x 2 = 5): Decrease 2 stitches every 5 rows

Consequently, my general pattern is this:
  1. Cast on 80 inches and do ribbing for 1.5 inches.
  2. Switch to Stockinette and decrease 2 stitches every 5 rounds. 
  3. Continue Step 2 until you reach 4.5 inches (C ÷ 2).You should have 64 stitches (or thereabouts)
  4. Continue Step 2 until until the glove is 9 inches @ 48 stitches.
  5. Knit rounds until reaching the base of the thumb.
  6. Work glove and thumb gusset until you have 17 stitches for the thumb. (See thumb gusset tutorials above).
    • Place 17 thumb stitches on waste yarn.
    • Continue working the rest of the stitches (47) in the round.
    • Make 1 stitch to get 48 stitches.
  7. Continue working in the round until 1.5 inches from desired length.
  8. Do 1.5 inches of ribbing.
  9. Cast off
  10. Thumb:
    • Pick up 17 stitches of the thumb + 4 more stitches
    • Knit thumb until desired length.
Note: These are general pattern instructions.
Please make any modifications as you need for yours.


Stripe Pattern

For the Dr. Who Stripes, I followed the original scarf pattern as listed on the Doctor Who Scarf webpage. I started the stripes as follow, using either end of the scarf to start a new glove. Although, frankly, you can probably start anywhere in the pattern and get your own unique looking set of gloves.

The following illustration should help you get started. Remember to follow the rest of the original scarf pattern.

(Divide row count by 2)

In order to make it scale correctly for the gloves, I divided the number of rows by 2. For example, if the pattern said,  22 rows of Red, then I would only knit 11 rows instead. (I was also contemplating dividing by 4 so I could incorporate more colors into the gloves, but in the end, I chose to divide by 2.)

Tuesday, February 12, 2013

Pattern: Project or Ditty Bag

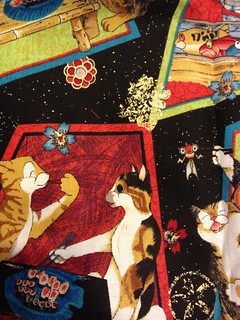
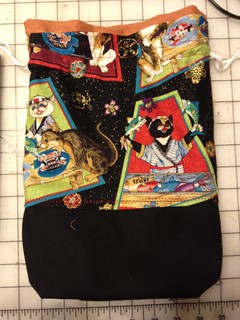
This past weekend, I needed something small to make, and one cannot have enough ditty bags for knitting projects and whatnought. So, I made up two knitting project (or ditty) bags using some fabric that I had been given by a friend:
  1. medieval cats
  2. cats & sushi (from my pattern holder)

Project bag 1Untitled

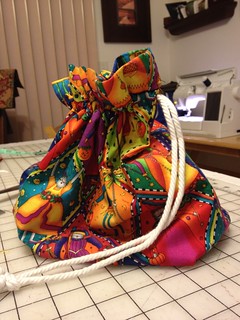
Luckily, ditty bags are easy to make as it's a bunch of rectangles sewn together to form a bag. It takes less than an hour to make a ditty bag if you use a sewing machine, but it's just as easy to handsew a bag like this. If you've sewn something as simple as a pillowcase, you can sew a ditty bag.

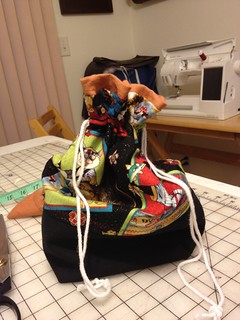
These particular ditty bags have a flat bottom, so will stand (more or less) when you put them down onto a table.

Project bag 1 finished Untitled

Instructions on How to Make Your Own Ditty Bag


Materials You Need:

  • Fashion Fabric
  • Lining fabric (preferably cotton)
  • Cording (for the closure) 
  • Sewing machine or needle/thread

FIRST: Cut out your rectangles as shown in the illustration
  • Cut 2 fashion fabric
  • Cut 1 of the lining fabric
You can make them to any size. (In the schematic, I make a suggested size that should be big enough for a socks project.) However, the diagrams should work for any size -- just cut to your desired lengths.


SECOND: Sew the seams as shown in the diagram with 1/2" seam allowance.
  • Fashion fabric: Sew both side edges and the bottom edge
  • Lining Fabric: Fold your fabric over and only sew one edge and the bottom.
Make sure to press your seams open, as that will help in the next step.

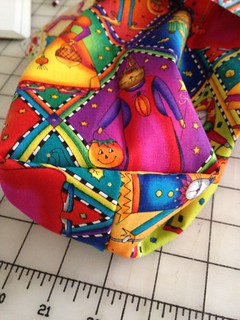
THIRD: Sew "triangles" along the bottom of the bag, which makes a flat-bottomed bag. (In the diagram, the dotted lines are the actual sewn seams.) The triangle is 2" from the tip. You can cut these triangles off later when you are happy with how it looks.


When you turn the bags right-side out, the flat bottom should look like this:

Untitled

FOURTH: Insert the lining into your bag WRONG SIDES together (DO NOT SEW...yet). Pin the lining to the fashion fabric together so it does not move. (I find that it is easy to line up the outside side seams and start pinning from there.)

FIFTH: Finish the top edges of your bag in whatever manner you choose. You can use bias tape (or french bind) the top OR fold in the edges and topstitch, serge the edges, or any motley of finishing techniques. (Note: You can also choose to do this as the last step.)

SIXTH: Sew the casing  about 2" from the top of the bag (or to your liking). You need to sew two lines that are about .75" - 1" apart, depending on the size of your cording.
IMPORTANT: Make sure you REINFORCE the area where the outside seams are located by backstitching.


SEVENTH: Carefully seam rip the outside seams between the casing lines of the FASHION FABRIC ONLY. Do not seam rip the lining. You can do this on one or both sides, depending on how you want your bag to close. (Personally, I prefer two sided).

This gives you the casing for the drawstring closure.

EIGHT: Thread your cord through the channel casing left-to-right. Repeat going right to left. (See the illustration).  Attach a safety pin to one end and pull through the channel. (you can also choose to do this only on one side (but it doesn't close as well).

Here are pictures of two bags with one sided or two-sided closures.(You can see that the one sided draw string doesn't close 100%).

Project bag 1 finished Untitled


There are other variations you can choose to do with this type of bag, from fabric choices to making a reinforced bottom (like my cats&sushi bag -- I used black denim as a reinforced bottom).

Untitled

But, I hope you like the pattern. Please let me know what you make from these instructions!

Wednesday, November 3, 2010

Deb's Gloves

A friend of mine is a terrific beader. She makes really pretty jewelry, and she offered me a trade. She wanted handwarmers and she'd make me jewelry for them. I agreed.

We headed over to Imagiknit in San Francisco, where she picked out some lovely Abstract Fiber laceweight in the Matisse color.

Abstract Fiber Matisse

However, I am incapable of really knitting with lace weight, so because the yardage was extremely generous in the skein (420 yards), I doubled up the yarn as I only needed about 210 yards per handwarmer.

I showed her some patterns on Ravelry, and she picked out the design elements she liked from a few photos. Luckily, these design elements were easy (ribbing, vertical ribbing, and some YO/k2tog lace). She wanted longer handwarmers (mid way to her elbow) with a little bit of lace at the palm.

So, I took her measurements for her arms, and sketched out the design she had requested. I made some test swatches so I could get a feel for what gauge the double strand of the yarn was going to be happy (10 stitches per 1"; 15 rows / 1.75" -- US Size 2 needles).

After I found the yarn's happy place, I cast-on. There was some re-designing on the fly to take into account my gauge, actual measurements, and where I thought elements might look good versus my initial sketched ideas.

I took copious notes for each change. There were several "fittings" along the way as she tried on fit. There were also numerous camera phone images via text message as I sent her "progress reports".

IMG_0284

At one point when the initial 15 rows of ribbing were done, I cast on the 2nd pair of arm warmers on another set of circular US2 needles using the other end of the yarn cake. I then knit up to the 15 rows of ribbing, and then put both on 2 circular needles so I could make sure that I did all of the decreasing and design elements exactly the same.

IMG_0293

A rough guideline for this pattern

1) I cast on 54 stitches in a 3x3 (this allowed me to fit the widest part of her forearm @ 8")

2) Knit for about 15 rounds

3) Began arm decreases (1 decrease every 3 rounds) 6x -- I made the k2tog decreases in the purl part of the 3x3 rib to "hide" the decreases. There was a total of 5.5" of ribbing.

4) Purl 3 rounds, Knit 3 rounds, Purl 3 rounds (for the next design element)

6) Knitted stockinette stitch and started the thumb gusset about 3/4" from where the wrist starts. Increased until the gusset was about 22 stitches.

7) Put the thumb stitches on a scrap yarn
8) Knit for 3 more rounds

Lace bit:
9) Purl 1 round
10) (K2TOG, YO) for the entire round
11) Purl 1 round

Finish:
12) Knit 2x2 ribbing for 3 rounds
13) cast off the hand

Thumb:
14) Picked up 22 stitches for the thumb,
15) Decreased the thumb by 2 stitches
16) BO with a sewn-off binding.

Friday, July 2, 2010

Top Down No Gauge Stocking Cap Pattern

I finally finished writing up my notes for the stocking cap pattern that I worked on last month using my handspun. The pattern can be found on Google Docs.

You can read more about the evolution of the stocking cap in two previous posts:

1) The beginning

2) The end.


Enjoy.

Thursday, November 5, 2009

My Very First Hat

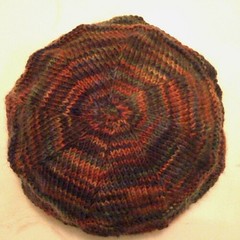
Just before Halloween, I cast on my very first hat using left over sock yarn (Socks that Rock Heavyweight). I know a lot of people like to knit hats as they are very easy and very quick to knit, but I hadn't yet. Plus, I seriously needed to get away from the endless rows of stockinette stitch of my cardigan and do something "quick" that would satisfy my 'finished project' need.

So, a quick look on Ravelry found the no swatch, Lifestyle Top Down Hats (link to Ravelry. The actual website is here. Of course, I'm a sucker for not having to swatch for a given project, so this was perfect.

I carefully measured my head, and started knitting in the round. When I got to my actual head size, I stopped the increases, and started down the sides of the hat. Then I tried it on, and realized that it was just a *tad* to big.

Being somewhat of an organic knitter, this didn't bother me "too" much, so I opted to create a "pillbox" style hat. During one point, I asked a friend who regularly does hats, and she told me that she normally takes off 20% off a head measurement to account for yarn stretch. Well, I'll keep that in mind for the next time.

My very First Hat
(Photo of it being blocked on a stainless steel mixing bowl)

The top portion of the hat is follows the pattern, then I did a basket weave stitch pattern along the straight portion of the hat. I then ended with a rolled brim.

My own version of the pattern is thusly:

1.    Start the hat per the instructions, and knit until it's your head size.

2.    Purl one round.

3.    Count the number of stitches between two markers (They should all be the same number).     Call this number Z

4.    Divide that number by 2. This is your new stitch count.

    * If Z is even, you have one new stitch count. Call it X.
(X * 2 = Z stitches)

    *If Z is odd, then you'll have TWO new stitch counts. X1, X2.
(X1+ X2 should = Z stitches)

5.    Knit as follows for either odd or even.

    For EVEN Z --> *Knit X stitches, then purl X stitches.* Repeat * for the entire round.

    For ODD Z  ---> *Knit X1 stitches, then purl X2 stitches*.
(X1 + X2 = Z)  Repeat * for the entire round.

6.    Knit in the round

    For EVEN Z: Knit X rounds.

    For ODD Z: Knit whatever number of rounds is bigger. Either for X1 and X2 rounds. You want a "square" shape for each weave.

7.    After X rounds, switch purls & knits.

    For EVEN Z --> *Purl X stitches, then knit X stitches.* Repeat * for the entire round.

    For ODD Z  ---> *Purl X1 stitches, then knit X2 stitches*. 
(X1 + X2 = Z). Repeat * for the entire round.

So you basically have something that looks like:
(x = knits, 0 = purls)

    X X X X 0 0 0 0
    X X X X 0 0 0 0
    X X X X 0 0 0 0
    X X X X 0 0 0 0
    0 0 0 0 X X X X
    0 0 0 0 X X X X
    0 0 0 0 X X X X
    0 0 0 0 X X X X

8.    Continue knitting Steps 5 - 7 for however many rounds you want. Stop when you're X rounds from where you want to end.

9.    Change to knitting in the round for X rounds. (You're trying to keep the symmetry)

10.    Bind off.