Showing posts with label face castings. Show all posts

Wednesday, May 8, 2013

Breaking Faces

Last night was supposed to be the quickest part of the face casting process -- separating the alginate resin faces from its hard fiberglass shell cover. It was ONLY supposed to take about 20-30 minutes. We spent over two hours working on it, because the mold release that we used (recommended to us by TWO professionals in the SFX field) FAILED! So, the plaster faces were sticking to the inside of the soft mold, and the soft mold was sticking to the inside of its fiberglass shell!

Consequently, we had to take chisel/screwdrivers and mallets to those wonderful plaster casts that we created back in December, because they were creating too much friction for us to pull apart the fiberglass shell & soft mold. In addition, the mold release had pooled a little bit on the inside of the fiberglass shell, which added even more friction. According to my friend who has worked at a professional S/FX shop, this "should" have been easy.

Part of me was hoping to preserve these casts, but when they refused to come out of their molds, well, it was time to break the faces. (Plus, because we have these molds, I can always cast another one.)


A lot of effort went into creating these plaster casts, and it took some effort to fully destroy them (except for the occasional face parts that we managed to pry out of the soft resin).


Here's the final soft resin cast and it's fiberglass shell, which will help keep the soft mold shape and provide foundational support for future casts.


And here are some of the broken face parts that we managed to pull out wholesale from the resin. I think I might preserve mine as some form of modern art. :-)


The next step? Cast some face molds to do some prosthetic work, but that won't happen until mid-June when some of our crazy convention schedules have subsided!

Tuesday, May 7, 2013

Face Castings - Part 2

On the 5/5/13 weekend, a bunch of us got together to finish off the face castings that we had started previously. Between conventions and scheduling, we never finished the next step -- which was silicone resin molding and fiberglassing, plus the weather was not proving to be cooperative as all of our free weekends it rained -- and fiber glassing + rain doesn't work. Consequently, it wasn't until Spring that we managed to sync everyone's schedule with warm weather.

The following blog post is a short synopsis of the effort it took to finish up these molds. It was a grand total of 2.5 days. We were spending 8-12 hour days to complete a majority of the work.

We started on a Friday evening, where we spent four hours building the necessary walls to hold the molding material in place, with the appropriate keys. The walls are built up of clay. And we poured the very first layer of molding material -- alignate. (This foundation layer had to completely dry overnight for us to work the next several layers.


Saturday, we poured multiple layers of more material to cover the plaster heads. Each subsequent layer would protect the previous one..


There was a lot of downtime in between, as we waited for the resin to dry, so each of us brought multiple projects to work on while we waited -- some worked on costumes, some on prosthetics, and I just knitted.

We also did a lot of cleanup while waiting --- getting all of our tools & containers cleaned for the next layer.


We finally poured the last layer, which we let cure over night. Everyone climbed into their own respective beds way after midnight, exhausted.


The next day was all about resin & fiberglass. We started by cleaning and preparing the semi-finished molds.


We donned all of our safety gear, including two layers of gloves and respirators. The resin is particularly stinky, and not conducive to breathing. We did all of this work outside as there wasn't any industrial fans to suck up the fumes.


Fiberglassing the molds was grueling work. The resin & fiberglass are extremely sticky, and we had to work fast before the resin set.

We worked on a single head at a time with 3-4 people frantically layering fiberglass. Each head took about 40-60 minutes to complete. We would rotate 2-3 people in-and-out in order to give people breaks. We basically worked non-stop. As the heads were taking so much time to complete, we wanted to get done before the sun went down.


When one head finally was dry enough (about 2 hours later), the excess fiberglass was cut away. This process was a tricky one, because you had to time the drying process correctly. If the fiberglass was too wet, you couldn't cut it, but if it got too dry, it would have been impossible to cut.


Of course, this process isn't completely finished. The fiberglass has to completely cure, and then we can separate the fiberglass from the alginate molds.


Monday, May 6, 2013

Face Castings - Part 1

Back in December, a bunch of us got together to create face casts for costuming purposes -- specifically prosthetic work. We were going to make life-like replicas of our facings. There were seven of us that gathered in my garage to accomplish this task. (NOTE: We had a trained person with us to help guide us through what the professionals use as their process and to ensure we were all doing it correctly and safely.)

The final result of this work will give each person a (more or less) permanent face casting from which we can cast as many positives as necessary to do multiple types of prosthetics....everything from Klingon foreheads to full alien faces, from facial wounds to anthrophomoric features.

However, while it was extremely awesome and creative..and very exciting. It was several weekends worth of work broken up over several months.

There are two major parts of this process:
Part 1: create all face casts using plaster & prep them for molding
Part 2: mold all face casts in resin & fiberglass.

And each part had a a lot of little parts to it.

Of course, this original plan (which was to take place over one weekend) hinged on a few things: 1) everything happening according to schedule and 2) the weather. Obviously, these two things are never 100% reliable.

The weather was the biggest impact. There was no way we were going to be able to use resin & fiberglass with the storm, the humidity, and the cold. So, while we finished Part 1, there was no way we were going to finish Part 2 until it got warmer with no chances of rain.

This post is about the Part 1 Process, which ended up being 1.5 weekends. (Part 2 will be a separate post.) I tried to take as many possible photos with my iPhone during the process, but failed to take a photo every step.

Without going into too much detail about how this process is done (you can find plenty of instructions on the Internet), each face casts involves:
  1. Prepping the person with baldcaps, cotton balls, mold release. etc.
  2. Putting the alginate molding material on that person's face/head. (This took 3 people)
  3. Add the necessary binders  (2 people)
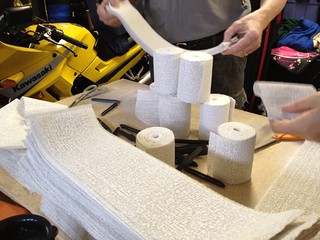
  4. Wrap the person's face with plaster bandages (4 people in an assembly line)
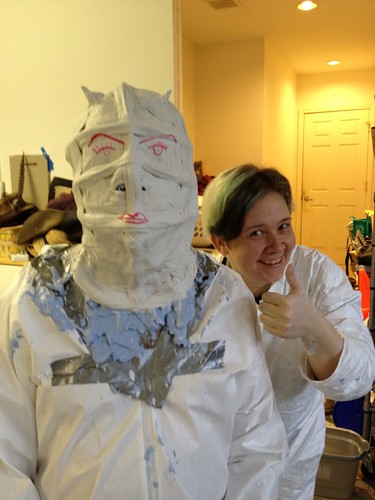
  5. Waiting for everything to set, while having some fun with that person
  6. Peel the finished cast off the person's head.
  7. Rinse & repeat for the next person.
Then while the next person was prepped, a few people would
  1. Prepare the the finished face mold with a releasing agent
  2. Pour plaster into the face mold for the positives (2-3 people)
  3. Go help on the next person.


Prepping plaster bandages

It takes about 30-45 minutes to do one person's head completely, once we got the 'hang' of it. (And of course, we had a bit of fun with each person who got casted.....)

Untitled


Then, it took some time for the plaster "positives" to dry. As the day wore on (and got colder), it took longer for each positive to dry.

We finished the last face cast at about 8:30pm (we started at about noon), but still had to wait for the last few positives to dry (which was about midnight)

On another day, we prepped the plaster positives. Air bubbles and imperfections from the plaster molds had to be sanded & smoothed out with a variety of tools. And problem spots (such as an imperfect ear/nose, chin, etc) had to be touched up with clay, and in some instances, re-created completely. For example, the underside of my chin wasn't properly casted, so I had to stare in the mirror and fix the chin on the plaster version of myself.


Here are the finished plaster positives with their clay "fixes."

I will post about the 2nd half of this process in another entry.