Wednesday, January 30, 2013

Fair Isle Mittens

As a "quick" little knitted project, I'm working a set of Dire Wolf mittens for someone's birthday.  Normally, I wouldn't knit mittens, because, well.....I'm in CALIFORNIA....where mittens aren't as useful as fingerless gloves (unless I'm going up to snow country).

But this pair is for someone who frequently finds himself out in the cold and needs a bit of warmth, esp. at night when sleeping outside.


Dire wolf mittens


I'm really enjoying the fair isle work. It's a small quick project that involves a bit of concentration, but not so much as to not be enjoyable. I can see why there are a lot of knitting patterns for fair isle mittens.

Tuesday, January 29, 2013

Making of a Carpet Bag: Part II

On Saturday, I stopped by Tandy Leather to pick up the buckles that I needed for the carpet bag.


Of course, I didn't get out of there with "just" the buckles. I also picked up a tiny bit of leather (to make straps), as well as a few odds & ends. (It's rare I can just run into a good crafting store and get out with just one item.)

Later that day, I started with the strap making for the bag. This took a long while to complete because I sat putzing wondering how I wanted to accomplish certain things. Plus, I had to do all of the grommetting before I could add the lining (which would hide all of the grommets.)

According to my diagram, I needed to make a minimum of 4 leather straps (two leather straps to go around the body, one strap for the bag handle, and one strap as the long purse handle).

Carpet bag plans

First, the body straps needed to be cut, and the buckles added. I have a strap cutter, so it makes creating different width straps easy. Punching and grommeting leather-on-leather is pretty easy as well.

Strap making 1

But the straps needed to be added to the body of the carpet bag, which is a little bit trickier to accomplish. First, I punched holes in the leather, then used the awl to pierce holes in the bag, and then it was a matter of grommeting the strap onto the bag.

Add to bag

Here's one strap added to the bottom of the bag.

Untitled

I also added a few touches here and there for usability. This D-ring is to hold the strap in place on the front of the bag.

Untitled

And I also added a leather version on the backside side for when the bag is belted shut and the strap wraps around the body. I took some softer oil-tanned leather and stitched it shut. (The stitching is easy, but it does take some time to accomplish. A curved needle & waxed thread are my friends.)

UntitledUntitled

Before I grommeted all of the strap down, I had to make the bag handle for the top of the bag. This part took the longest as I knew I wanted a "fabric" handle. And it needed to be under the bag straps for added stability. I made a mockup of the fabric handle to ensure that I had the correct size and width.

Then I cut out a length of leather, sewed fabric around it (stuffed with poly fill), then grommeted the whole thing down.
 
Untitled

At this point, the most work-intensive parts were completed. Cutting out the leather straps was easy. Grommeting the straps to the bag was a bit harder as the shell of the bag had already been sewn together, so it was a bit awkward in places to hammer the grommets in place.

After the "hard" part had been completed, it was a matter of doing some of the smaller or easier things.

I also made some smaller straps that were added to the inside of the bag.

Mini strapUntitled

Why?

So I could clip my keys to the inside of the bag. And allow me to put the straps somewhere if the bag wasn't buckled shut.

UntitledStrap holder

I also wanted an adjustable shoulder strap. This took a little bit of thought. I didn't want the unfinished side of the leather strap showing once it was adjusted. I could have used a belt buckle to adjust the straps or two D-rings. (I didn't have an adjustable buckle to use that worked well). Eventually, I opted for the D-rings.

Untitled

I also sewed a shoulder strap "pad" that would do double duty:
  1. allow me to "hide" the adjustable strap so it wouldn't flop around
  2. act as a shoulder pad

Untitled

That pretty much completes the "leather" portion of the bag.  This portion took about 4 hours to complete, because it involved small "fiddly" work that just took extra time. Plus, I had to make test a few ideas out before committing to them.

Up next? Sewing in the lining.

Monday, January 28, 2013

Creative Juices

I saw this image on Facebook the other day, and BOY! does it resemble me and my creative juices.


I'm always concerned when friends want to stop over, because my house is nowhere near the neatness of Martha Stewart, and I'm always amazed at seeing other people's craft rooms that look spic-and-span (although that's probably because they just cleaned up for the photoshoot.

Case in point: Take this particular craft room. Nice isn't it? Everything organized and put away.

I envy people who only take up a single room in their house AND who manage to keep it neat & tidy. I wish that were one of my super powers.

My entire house is basically my craft room. The fabric lives in storage bins in the garage. My leather & Yarn Stash (TM) live in one room. My spinning wheels reside in a 3rd room. My costumes are kept in a dedicated closet. The only room not currently used for any crafting purposes is our bedroom.

The dining room is my general DIY table for everything from sewing to leatherwork to resin to beading...and everything in between. If I need extra table space, we'll bring out the 6 foot folding tables.  (I can count on two hands how many times I've seen my lovely, lovely wooden dining table sans its protective vinyl & plastic cutting top.)

Plus, I have plans to completely revamp the living room (which we really don't use as a living room) into more crafty purposes!

Oh, don't get me wrong -- things are organized (as well as possible).  I have my materials organized neatly into plastic bins & containers. There are baskets of Works-in-Progress. All the little pieces are organized in various tackle/fishing boxes or organizational containers. But, I seem to have more materials than room at times, and (consequently) are in several different rooms and the garage.

My dear friend, D, once called my house an "atelier's workshop", where at any given time, I can begin making whatever I want. This is mostly true. If I want to start a new project, then chances are high that I have the materials and I can start making it is what I want.

Unfortunately, this usually means that my home is in various states of "creativity" at any given time. And, if both my Viking and I are working on projects at the same time? Well, the house gets extremely "creative".

Anytime I start to put stuff away to clean, then one of two things usually is about to happen:
  1. we have guests coming over and we need the dining room table for things it was meant to do...i.e. eating.
  2. I'm about to start a new project and I need to clean up so I can make another mess.
My "work table" while working on the Carpet Bag (containing the sewing machine, fabric, and leathermaking gear...)

Craft room

So, I'm not really making a "mess", per se. It's just the effluvium of my creative juices.

Friday, January 25, 2013

Changing Gears

Sometimes, I find that fiber arts has lessons that we can apply to life in general. Case-in-point, my recent spinning attempt taught me a lesson.

At Stitches 2013, I picked up four ounces of this beautiful cashmere, merino, and silk that I wanted to spin for a cowl. Its in the colorway, Malificient.

Cashmerino silk

I thought I wanted to spin it woolen, but after making a small attempt on my traddy, I had PROBLEMS and the resulting singles were spun too tight, had too many thick & thin spots. And I was just generall not happy. And this is not cheap fiber and I only had 4 ounces! I lost less than 1/2 ounce before deciding to try something completely different.

And, it turned out that I could spin it worsted just fine. So, I switched gears (and wheels) and began to spin it worsted on my Sidekick. The yarn and I are MUCH happier at this point.

The moral of this story? Sometimes, it's much better to completely switch gears and do something different than what you intended. There's no sense in pushing a boulder up hill when rolling it around the hill works just as well.

Thursday, January 24, 2013

Practice Makes Perfect

Since the holidays, I've been a little neglectful of my spinning, which is sad, because I love spinning. It's very relaxing, and I use it to meditate a bit each day.

So, to get back into the swing of things, I've been practicing woolen spinning on my Ashford Traddy. It's an unknown purple fiber that I picked up at my LYS yarn swap. I'm pretty sure it's Frabjous Fibers AND I'm pretty sure it has merino or polwarth.

I'm trying to get ready to woolen spin some cashmere, merino, and silk fiber that I have for a very special project, and I haven't had much of a chance to spin on my Traddy for its intended purpose -- woolen.

Here's the finished product. It's 118 yards of sport weight yarn.

Untitled

There's some thick and thin spots, due to the darker spots clumping just a little bit, but overall, it's not a bad attempt, but I need a tiny bit more practice in spinning woolen on my traddy before I make the leap to the cashmere. After all, practice makes perfect.

Wednesday, January 23, 2013

The Making of a Carpet Bag

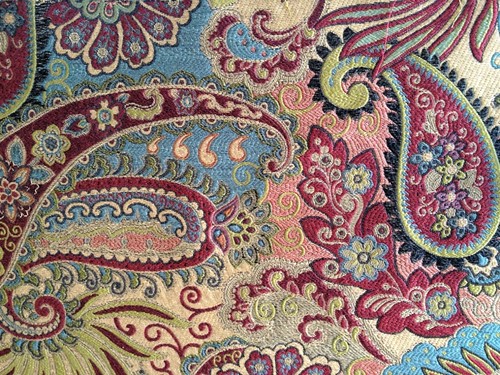
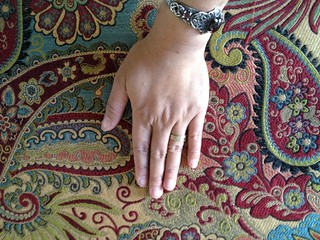
After just admiring the fabric for a few days, I finally decided to make something that I could use nearly everyday that allowed me to appreciate the fabric. I could have made a costume.

My DH actually suggested as such, but I found the paisley pattern just a little too big (and I am rather petite), plus I wouldn't be able to enjoy it on a regular basis.

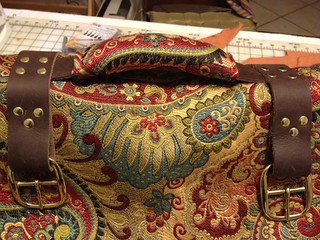
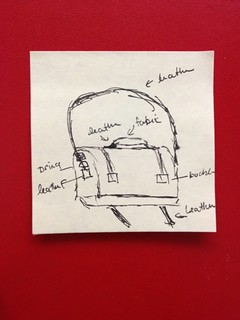
So, I decided to make myself a carpet bag, but not just any carpet bag. I wanted one that would fit all my daily gear AND any and all knitting that I wanted to carry -- including sweater size knitting.

Carpet bag plans
I had made a purse-like carpet bag before, and while it was useful, it had flaws. I looked through one of my bag-making books that I had used previously to make other bags, but nothing that really fit.

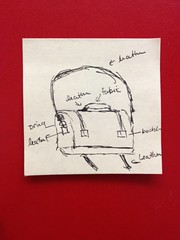
I decided to make my own pattern....and I'd make it on the fly. Of course, I know many that would stop and say, WTH? Really? This beautiful fabric and you're going to make this on the fly?

Sure why not? I've made bags before, and getting "fit" or "gauge" is not necessarily important here. I knew what I wanted and was expanding on things I had already created.

I had all of the necessary fabric (fashion & lining) and I could probably find other things that would match if I didn't.

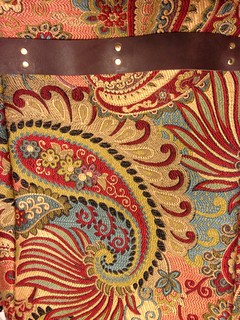
For the pattern, I took an existing bag that I had (that was a bit smaller than what I wanted), and more or less copied the shaping. To make the bag sturdier, I added some buckram as a stiffer interface to the fashion fabric so that the sides wouldn't fall in on itself.

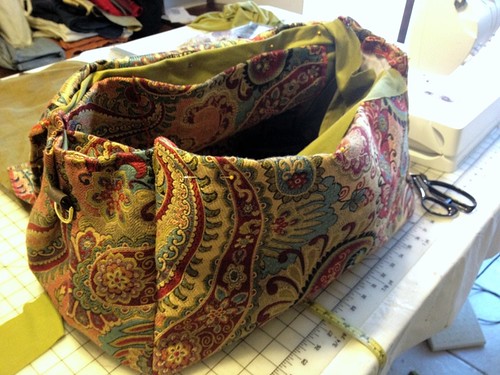
I made a small mistake in making the side panels (in that I had too much fabric at the top), so that it looked more duffle-like. However, some pleating easily took care of that mistake and made it look nicer.

Untitled

For the lining, I bought some matching apple-green fabric from JoAnn's at the same time. It was about yard. I also took some of the leftover "cuttings" from the Carnivale fabric to make internal side pockets and sewed it to the lining.

These internal pockets (which I don't have photos for) are sized for all of the things I need on a somewhat fairly regular basis: my purse/wallet, phone, tablet, knitting kit (stitch markers, crochet hook, etc), pen, keys, etc.

And there's a huge internal compartment for my knitting.

Semi finished bag

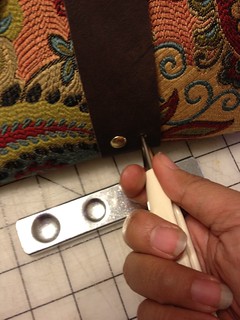
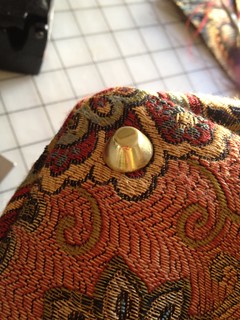
I had nearly all of the hardware, but I did pick up "purse feet" for the bottom of the purse so that the fabric wouldn't be wholly sitting on the ground. They were very easy to install.
Untitled


It just took a simple awl to make a non-invasive hole. An awl lets you make a hole without punching it out, but rather by "parting" the fabric. If you were to pull the awl out, the fabric would (more or less) come back together. Once I had my opening, I simply slid in the feet and opened up the prongs. My set had a nice solid backing in addition to the prongs.

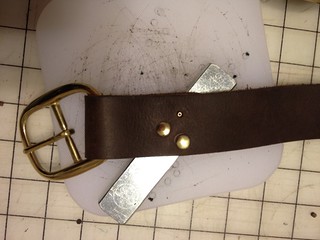
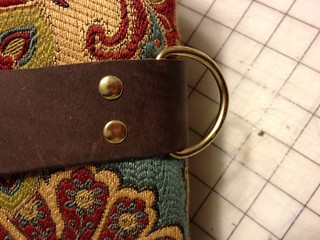
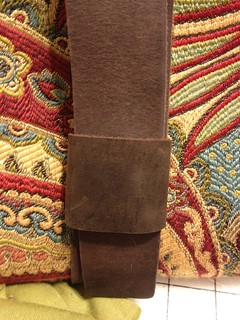
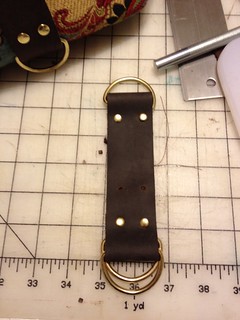
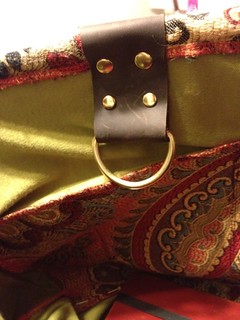
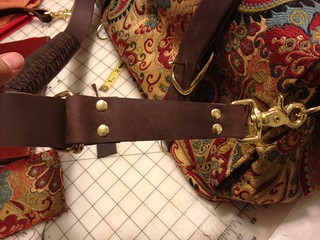
However, as I neared completion, I realized I didn't have the correct sized buckles for it. I had been trying out different sized leather straps to see what was best proportionally -- 3/4" (too small), 1" (too small), 2" (too big).

I pretty much determined I needed 1.5" straps, but the only buckles that I had available were 3/4", 1", and 2". Bugger.

So, for now, my poor bag is in a holding phase until I can get to Tandy Leather on the weekend to purchase the correct size buckles. At that point, I can add the straps and buckles, then attach the lining, and finish the edges.

The finished size? 18" length x 10-12" high x 10-12" wide

Tuesday, January 22, 2013

Love at First Sight

I'm in love with some fabric.

It was love at first sight. Although, I wasn't intending on falling in love. I had simply walked into JoAnn's to buy buttons for my niece's owl hat. (See, super cute.)


Untitled

And, as I walked past the cutting table, I saw it. The roll was simply standing there, all alone. I felt my heart skip a beat. The vibrant colors, the pattern...and, oh, the paisleys!!! And, it was oh-so-soft. It was 60" wide...and 60% off. And when I went to look at the name of the fabric, it was called "Carnivale"....everything was just perfect.

Fabric Love

Seriously, how could I not? I had no idea what to make with it. In fact, I'm supposed to be on a fabric diet. But..oh, my! I couldn't help it. I had to have a little bit of it. So, I got 1/2 a yard.

Here's an photo that shows the scale of the pattern. (My glove measurements are Small-Medium).

Fabric Size

I'm currently considering what to make. So far, I am debating making myself either a carpet bag or a Steampunk apron (like the one I made for my SIL).

I also realized that I didn't get enough. So, I went back...and got 2 yards of it.

Seriously...in love.....

Monday, January 21, 2013

Figures

It's funny. The day I cured my "Start-itis", I went over to my LYS for knit-night, and the girls said that the book I had ordered had arrived. (Actually, they couldn't remember who had ordered it, and was mentioning the book to me when I said, "Ooh! It came in!")


Figures doesn't it? Now, I have the pattern and the yarn, but I can't work on it until I finish up the sweater I just started, which is fine. I'm not in a 100% rush. Plus the yarn for the sweater is bulky, so it should be (theoretically) a fast knit.

And, the sweater I want to knit? St. Brigid's pullover that I'll be modifying into a cardigan. Here's one Raveler's version of it.

mini-IMGP0117
©chaika6


Oh, and my Sweater Itch seems to be cured.

Friday, January 18, 2013

Start-itis Cured?

I've been infected by that dreaded knitter/crocheter disease...."start-itis". For some fiber artists out there, the disease is primarily a need to start a new project without the desire to finish it...or just to have something "new". Sometimes, the disease manifests itself and the affected person ends up starting multiple projects.

In my case, my disease is primarily because I have this ITCH to start a new sweater, but I didn't have  the appropriate yarn for what I wanted to do, I had to special order the book from my LYS (and not yet received it), plus not the money to purchase said yarn quite yet. Consequently, my Sweater Itch manifested itself as Start-itis.

(Also, since I was caring for Blue, I wanted something small that I could put down with ease. So, I thought I could suppress the Sweater Itch by just doing small projects).

I found myself wandering the depths of my Stash and, looking at all of the different yarns I have and not necessarily being particularly being inspired BUT wanting to knit. I surfed Ravelry looking at different patterns looking for inspiration.

Consequently, I started a two small projects to try and satisfy the Startisis from Sweater Itch, but to absolutely no avail. I started and finished two hats --- one for me, one for my Eldest Niece. (She has a thing for owls)

Blue's Hat Untitled

Oh, and then, because I've always wanted one, I started a crocheted ripple blanket, which I know is going to take me forever to finish, because I'm using left over worsted weight yarns from previous projects...and I have to stop frequently because crochet'ing for long periods of time hurts my hands.


Ripple Blanket

And you know what? It still hasn't satiated my Sweater Itch.
 
The only thing that will satiate a Sweater Itch? Realizing that you actually DO have enough yarn for a sweater...just not the sweater you want....and starting your gauge swatch....
 
Swatch
 
(Oh, and realizing that this very sweater was already in your Ravelry queue...and the stash yarn earmarked for this sweater....DOH!)

Monday, January 14, 2013

Blue's Roses

This is my cat, Blue. I took this photo back in 2006.

  Blue in Repose 

Ain't she pretty?

About 1.5 years ago, she was diagnosed with kidney issues, and the vets warned me that she would eventually suffer renal failure, but they couldn't tell me when. This past week, DH & I have been back & forth to the vet office & home with Blue, who went on an IV regiment. She had stopped eating, and her kidney values were off-the-scale.

She'd stay at the vets during the day, then come home at night. She showed a tiny bit of improvement. While she rested, I fretted, and did what every knitter would do....knit. So with needles in hand, I knit while watching her sleep, in between giving her food with a syringe, and subQ fluids.

Unfortunately, none of our care helped. We took her home for the weekend for hospice care. If she made it to Monday, we would do one final call to the vet. In the meantime, she got plenty of pets, loving, and we kept her as comfortable as possible.

She never made it to Monday. She passed on Sunday @ 5pm. She was 19 years old.

An hour before she passed, I finished the last touches on the hat I was making. I've named it after her. It's the Lucy Hat from Knitscene, but in Blue's honor, I've named it "Blue's Roses"

  Blue's Hat Blue's Hat 2


I used the following crochet patterns:
and a green button for the red rose.

Monday, January 7, 2013

On Again. Off Again. My Relationship with Crochet

I have a love-hate relationship with crochet. I've been crocheting on & off since I was a small child. My grandmother taught me to crochet at a very early age, and I was surrounded by many brightly colored crocheted blankets and blankets. They were on the sofa, bedspread, and other places where you could cozy up. All my aunts (my grandmother's daughters) crocheted, and it was a way to pass the time while watching t.v. on the couch.

For myself, I didn't really crochet until I was in college, and I made friends with an artist & a crafter. We crocheted small bags, and I even crocheted a cloak for myself. However, it wasn't something I did all the time, but merely something in the arsenal of crafting skills.

It wasn't until 2007 that I discovered amigurumi -- the Japanese art of crocheting stuffed animals. And I fell in love. I started crocheting small stuffed animals for myself and for my neices and nephews. I was buying acrylic yarn (from Big Box Craft Stores) to make them (I didn't know any better yarns...)

The smaller animals took a mere few hours to complete. It made my heart sing to finish these up quickly. I made pigs, frogs, foxes,...even dead rabbits.

Amigurumi Fox 1 Dead Bunny

I couldn't get enough of my amigurumi animals.

Amigurumi Totoro

As I delved into amigurumi, I found wonderous Japanese crochet patterns that made crochet less 70s-kitsch and a bit more fashionably. I even made a granny hexagon afghan (from some very nice yarn...)

Hexagon Blanket (3)

As time wore on, I started to realize the crocheting made my hands hurt, especially if I was crochet'ing for long periods of time. I already have nerve damage in my hooky hand, and I don't want to damage it even further. So I would back off crochet'ing (and started to learn how to knit, which didn't hurt my hands). And occassionly do another amigurumi animal or maybe a granny square as they were small projects that could be quickly finished.

Final Brain slug


And admittedly, I love projects that are quick to make.

However, I find myself longing for those large ripple blankets and colorful pillow cases that my aunts and grandmother used to crochet. You just can't get that look from knitting. It also doesn't help that I've been reading the blog, Attic24, for quite some time (which everyone should read if you love crochet). I very much want Lucy's house with all of it's crochet-loveliness and goodies. It makes me want to pick up my hook and crochet all of those wonderful things....except that it hurts my hands.

Why love-hate relationship?
Well, I love crochet. I hate that it hurts to do it for long periods of time. So, for now, it's on & off again relationship, and I'll just pine for all that crocheted lovely goodness.

Friday, January 4, 2013

First Project for 2013

Every year, I look forward to the first project of the year. (I've already finished one small sock project, but I started it in 2012, so it doesn't really count.)

Last year, I started a sweater for the first project, but this year, I'm starting small and began a fingerless glove project. The first glove took only about a day to finish because I wasn't sure how I wanted to do the stripes.

Fingerless Gloves

I'm using Frog Tree, Pediboo (sport weight), which I am LOVING. It's soft, squisy, and makes a very nice fabric. I've had this in my stash for a while. I was originally planning on using it for a hat, but had to frog it because the pattern wasn't working out as I had hoped. But, it's an awesome yarn, and I'm thinking that this would make for a really nice sweater. :-)

For the pattern, I'm using my vanilla-fingerless glove pattern (I make fingerless gloves like people make vanilla socks). My hands are always cold, so this is a nice stylish way to keep them warm.

The stripe pattern is as follows:

  • Ribbing for 1.25 inches in Color A
  • The first stripe: 7 rows of Color B
  • 2nd stripe: 7 rows of Color A
  • 3rd-4the stripes: 5 rows each of Color A/B
  • 5th-16th stripes: 3 rows of Color A/B
  • 17th-18th stripes: 2 rows of Color A/B
  • Final ribbing for 1.25 inches in Color B

My next project? Definitely a sweater. I'm currently jonesing for one on the needles.

Thursday, January 3, 2013

Finished Objects: Part 3: Weaving

2012 was the year I started weaving very simple projects (mostly scarves & bags), but it was definitnely something I wanted to learn

My First Weaving Project. The warp & weft are exactly the same
Red Marl

This piece was an experiment in trying a tartan, and was turned into a "bag" for my shuttles & dents
Blue Plaid

This one was turned into a purse, and made into leftovers from other projects.

Weaving Experiment

My first houndstooth
Green Houndstooth

A Hawaiian Tartan using Cascade 220. It's a bit too wide for a scarf and is more of a "sash".
Hawaiian tartan

This one I wove with handspun & some matching commercial yarn, and it turned out lovely.
IMG_0650