Friday, September 21, 2012

Cigar Case

 
My entire house is one large crafting room that just happens to have a kitchen & bedrooms attached to it. A good of mine keeps telling me it's like an atelier's workshop -- at any given moment you can start any given project and have most of the materials at your disposal.
 
She's got a very romantic way of putting things.
 
Me? I see a house that needs seriously cleaning up.
 
The reality is probaby somewhere in between. The house IS a mess and I can start nearly any project I want (within my realm of interest) almost immediately.
 
Take for instance, this particular project. I have a wonderful humidor (that's for cigars) that very good friends gave to me for my birthday one year. It holds about 3-4 cigars and is just Fricking COOL. It's more portable than my travel humidors, but I needed a carrying case for it for places like the Renaissance Faire. (Yes, I smoke cigars on occasion. It's a guilty pleasure.)
 

So, one night, I had about 1.5 hours to spare, so I grabbed some scrap pieces of leather that were from my Chinese armor project, my leather awl, and got to work. I used the scrap leather and figured out how much to wrap around to make a tube.

Carrying Case for the Humidor
 
Then, it was a matter of making a cover to go over the tube, and making a belt hook. I made some leather cord from more scraps so I can use it as a closure for the belt hook.

Carrying Case for the Humidor 2
It's a bit rustic looking, and I can probably make something better, but it's not bad for 1.5 hours worth of work. The longest part was handsewing through the leather with a leather awl.

Carrying Case for the Humidor
The finished product kinda looks like a cigar itself, doesn't it?

Thursday, September 20, 2012

Casting On!

I appear to be on a sweater kick. Okay, who am I kidding? I've been on a sweater kick for some time now. Some say, maybe addicted to sweaters. Because ten minutes after attaching the last button to the previous cardigan, I was starting to swatch for the next sweater. (How sad is that I haven't even finished weaving in the ends of the previous sweater?)

DH even took immediate note of it, asking "Is that a different color yarn? Are you knitting a new sweater?!?"

What can I say? I'm addicted to having sweaters. They are warm, fuzzy, and even in the warmer weather, it's good to have in our office (where they turn up the A/C to icy cold!)

And I'm really liking vest-type sweaters as they work nicely as layers. So, now I am working on the Adam's Ribs Hoodie by Carol Sunday. I saw this on Ravelry and fell in love with it. I love the tunic length and the wavy lines. Plus, I'm fond of hoods even if I never use them.

The recommended yarn was out of Carol's own line, but I wanted to start it immediately (as I knew I would be soon finished with the Raspberry Cardigan). So, I took a look at a bunch of different yarns on Ravelry trying to find something that would match in both yarn weight and about the same yarn grist. (Using my SpinU lessons for this!)

Eventually, it came down to a few yarns, and luckily, my LYS was having a sale on one of them (Dreams in Color Classy) but they didn't have enough for a sweater and I was unsure about how the varigation in the color would work in the ribbing. After consulting with the owners and a few knitters that was there, it was determined that the Cascade Eco Cloud would be one of two alternatives that would work best (the other being Frog Tree Meriboo). Consequently, I went with the Cascade Eco Cloud (in a beige-ish/coffee with milk color) because I loved working with it and I was familiar with its characteristics.

I swatched using US 6 needles, which after washing and blocking, came out at gauge -- 24 stitches/4 inches (in the ribbing).

IMG_1161

So far, so good. The ribbing pattern is actually pretty easily memorized; it took me about half the swatch to get it ingrained in my head. I also tried a few different types of increases, because I didn't like the hole the suggested increase left in the fabric.

Currently, I am about 2" into the body of the sweater. The ribbing pattern is engaging enough to make me pay attention, but mindless enough to not have to pay "too" close attention to it.

Monday, September 17, 2012

The Never Ending Sweater

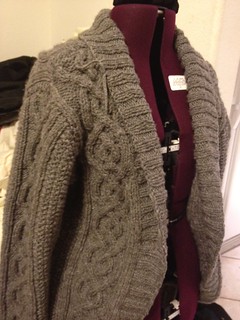
I have been knitting on my cabled sweater since...well...July, and I've FINALLY finished it last night. I've renamed it the NEVER ENDING SWEATER, because it's taken forever to finsih.

Around the beginning of September, I finally finished the sleeves. About 3/4ths of the way through BOTH sleeves, I knew that I was creating the sleeves MUCH too big, but I continued to press on in the hopes that it'd get better. It didn't. When I tried on the finished sleeve..well, it was about 3 inches too wide.

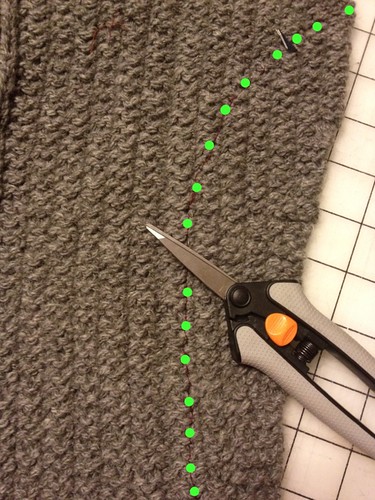
The finished sleeve was supposed to be 13.5" wide...this was nearly 17. I finally decided to check gauge, and discovered that I was WAAAY off, despite using the same exactly needle that I used to knit the body (which fits perfectly, BTW). Luckily, all of the increases were at the edges of the sleeve, which the Costumer in me said, "We'll just cut off the excess fabric, while the Knitter in me is screaming "OH HELL NO..."

So, after DH helped me check for fit, he pinned the seam line, and I ran it through the sewing machine with a good bit allowance. Then I pinned the sleeve together loosely on the new seam line (using locking stitch markers) and pinned it to the armscye. It fit perfectly so I added unpinned it and ran it again through sewing machine with a zig-zag stitch, used Fabric Tack to ensure there was no additional unraveling, and then cut the excess fabric off.

Seam Line for cutting

Yes, you heard that right. I CUT my knitting. 
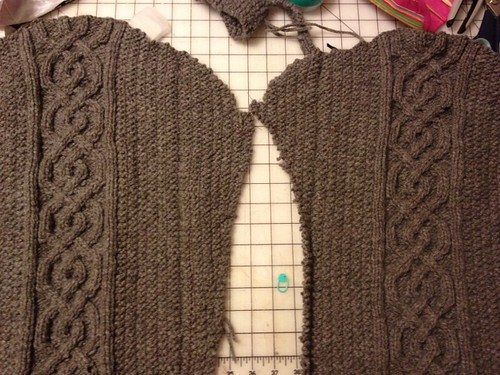
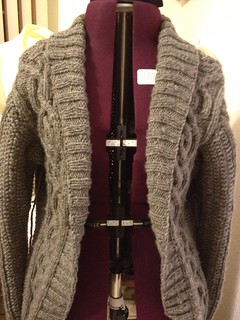
Here's the Before & Aftershot.

Before and after shots of cutting down sleeves


I figured it this way: if this didn't work, I would have to completely REKNIT both sleeves, which was going to take a Very Long Time. Plus, I still had a ton of yarn left over, so I wasn't too worried about not having enough. I would try with one sleeve and see if it worked. If it didn't, I'd frog the 2nd one and reknit.

Consequently, I attached the armscye and sewed up along the new seam allowance, and it worked perfectly. So, I started on the second sleeve. This saves me a TON of work having to reknit the whole thing.

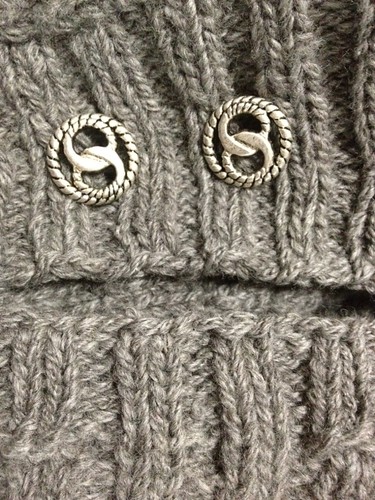
Now, I was concerned about the shawl collar, which other knitters promised is going to take as long as the whole sweater combined. So, I picked up 400 stitches, knit the shawl collar while adding the button holes. It took about a week to fully finish the shawl collar, because it had short rows along the neckline, but it worked about beautifully.

I even had the appropriate buttons that worked well with it.

Untitled

The sleeves are a teeny bit long, but can be easily pushed up. And it's got about 2 inches of ease, so I could probably wear this as an outer sweater in the winter. But it's DONE and it's WARM, and I need to take better pictures of me wearing it...when it's not 80 deg F outside.

Raspberry Cardigan 2 Raspberry Cardigan 3

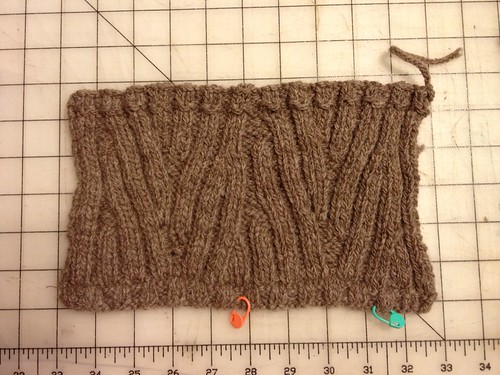
Oh, and yeah, I started a gauge swatch for a new sweater about 10 minutes after attaching the last button.....