Monday, August 25, 2014

Han Solo Costume: Making the Pants (3)

This past weekend, I finished 98% of the pants (I still need to do hem the pants and add a stirrup so that it doesn't bunch up when I put on boots.

I am really pleased at how it turned out, and it's very comfortable to wear. I think I might reuse this pattern to make better pants for my Melinda May outfit because her cargo pants are pretty form fitting (unlike commercially available versions)

Here's the back view that I based on my existing pair of jodhpurs. I added two belt carriers at the back waist.


And the front of the pants with the pintuck and the front belt carriers. I miscalculated when placing the bloodstripes. I wanted them to start just slightly above the waistband, but ended up being a little bit more than what I wanted. As "perfection is the enemy of the done", I opted to just leave it as is. The belt, gun belt, and vest will cover this part of the costume.


And the final set of pants with the full bloodstripe.
I made the pants longer than necessary (about 4" longer than my legs) because I wanted to have extra length when I did the bloodstripe, just in case the machine screwed up slightly and I needed to cut a few stripes out.

Tuesday, August 19, 2014

Han Solo Costume: Embroidering Bloodstripes (Pants 2)

Before family & friends arrived, I started working on the bloodstripes for my Han Solo outfit. As I mentioned before in a previous post, Amiee Major had kindly put up the embroidery file under a Creative Commons License in her blog post.

I downloaded the file, and marked out the areas to put down the stripes.

I made a couple of test pieces, just to check the thread tension, and placement, etc. Then I set up my machine to do the full thing. I used:

  • Guterman thread in their 410 red colorway. It's a bright red that contrasted well with the blue denim that I had chosen. 
  • Tear-away stabilizer suitable for denim. (Make sure to get the RIGHT type of stabilizer otherwise, you will have problems!)


The front & back of the bloodstripes.

It took almost two hours to embroidery one panel for one leg. I did one panel one evening and another panel on a separate evening. (While babysitting the first panel to ensure that nothing went horribly wrong, I got a lot of knitting done!)

Because the file is made for a 250 x 150 mm hoop, you can only do a certain number of stripes at a time and have to move the hoop down after each section was completed. Once a section completed, I had to carefully line up all of my marks to do the next part of the panel. I would have modified the file to do a larger hoop size, but unfortunately, I hadn't installed the embroidery software on my (newish) computer and I didn't feel like dragging out the disks to install it.


It took 1.75 spools and nearly 4 bobbins of thread to complete both stripes. (I'm really glad that I bought three new spools of thread just for this project!) The stripes came out very nicely with only minor issues, which I can fix by hand.


After each panel was completed, I had to take my small sharp scissors and a pair of tweezers to snip all of the connecting threads. (It was a lot of snipping.)


I snipped threads on one panel while the machine worked on another.

Now, I can start sewing the rest of the pants.

Monday, August 18, 2014

Three FO Weekend

This weekend was a "Finished Object" weekend, with THREE knitting projects cast-off and photographed! (happy dance)

I had friends and family in town for the weekend, so I knew I wasn't going to get much sewing done, so I made sure to have some simple projects handy for me to work on, while visiting with them. I haven't had much time to really knit, so this was a welcome respite from the massive amount of costuming/sewing that I've done over the past few months.

First, I finished up some holiday knitting, by completing a hat that my youngest nephew requested. He wanted a red beanie with orange stripes.
(Strib pattern using Cascade 220 superwash, because I like my SIL).

Next up, I finished grafting up a pair of vanilla socks using the Fish Kiss Lips heel. (I only had the decreases left on the toe.) It was knit with Paton's Kroy superwash sock yarn, which I used previously and really liked.


Then I picked up a long standing UFO, my Denver Cowl, which only needed about 6 rows before casting off. It's a lovely cowl using Miss Babs worsted yarn, but the Daisy Chain stitch used on the cowl is very hard on my hands (a lot of folks had trouble with the stitch upon reading everyone's Ravelry notes). I made the cowl half the size as prescribed by the pattern, and it's plenty wide & long enough for me to wear comfortably.


Also, because the Miss Babs YOWZA skeins are pretty generous, I have enough to make a matching hat! Now, to figure out what to start next.

If I finish three projects, I can start three new ones, right? :-)

Friday, August 15, 2014

Han Solo Costume: Making the Pants (1)

With the shirt done, the next most difficult part was going to be the making of the Han Solo pants. There are a few good resources that I looked at:
For the pattern, I opted for McCall's M6610 pants.

'
From Aimee's post and embroidery file, I knew the bloodstrip was one inch wide. I made the bloodstripe pattern piece three inches wide to accommodate a french seam.


As I mentioned before, I tend to always copy out my patterns so I can make modifications as necessary. Because I had used a McCall's pattern for the 10th doctor (and Simplicity & McCalls are the same company), I felt I could make the modifications prior to making a first mockup of JUST the pattern. (Yeah, that didn't go over so well....but keep reading...)


Han's pants have a riding seam. I took out my actual riding jodhpurs and used those as a guideline for modifying the pattern. (This is the original pattern with the cutting line for the riding seam. At the same time, I knew that the bloodstripe piece was going to be three inches wide, so I removed a little bit from the outer seam of the back pattern piece to accommodate the bloodstripe width with French seams.


Here's the two new pieces that I re-drew with the added seam allowance.

The front pattern piece had very little modifications, except for removing the bloodstripe amount from the front.

For my mockup, I used carefully marked out the bloodstripe piece and used a highlighter to make stripes. This way, I could tell where the stripes were and make the mockup accordingly.


Unfortunately, my first mockup didn't quite fit all that well. It was too tight. The riding seam was perfectly aligned as was the bloodstripe, but it was a half size too small for me to wear comfortably. After making two more mockups, my final pattern had 1.25 inches added to the back pattern piece seam and 5/8 inches of fabric to the front pattern piece.

Remember when I said that Simplicity & McCall's was now the same company? Apparently, they don't use the same sloper. I SHOULD have made the pattern as-is, THEN made the other modifications. I would have had to make only two mockups instead of the three.

Now, it's time to make the full set of pants, starting with embroidering the bloodstripe....

Friday, August 8, 2014

Han Solo Costume: Making the Shirt

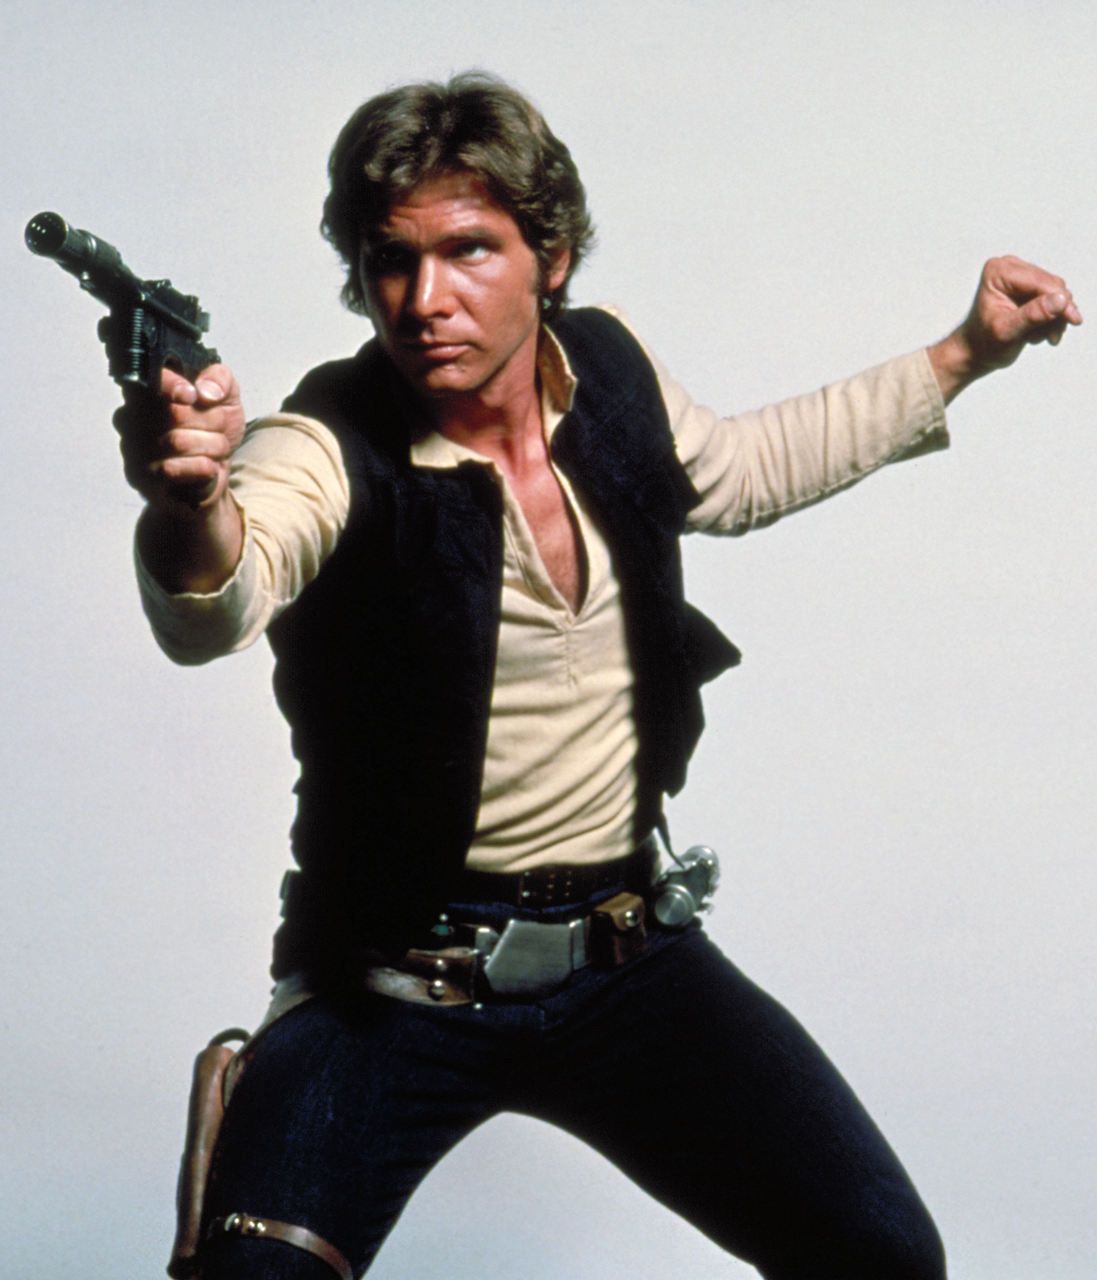
Han Solo's shirt is a simple v-neck placket shirt with a short mandarin-like collar and set-in sleeves There's been some debate on whether the fabric is a stretch knit fabric or woven fabric. It's a bit hard to tell (although I think it's the stretch knit), so I went with a woven fabric (i.e. muslin) because I have plenty of it. There's no need to buy fabric when I have a perfectly good substitute.


I didn't think I needed to make too many modifications. Although his shirt gapes a little bit more than what I would be comfortable wearing, so I wanted to change that slightly for me.


Men's shirts haven't changed much over the ages, so I decided that I would use an existing pattern that I owned because I thought it would be easier. I would use a combination of elements - the short mandarin collar of "The Last Quarter" with the V-neck placket of the "Highlander". There would be some additional modifications, like set-in sleeves and no cuff. It would save me the hassle of drafting my own pattern.


However, I discovered that this pattern wasn't going to cut it -- it didn't have set-in sleeves and used a sleeve gussett, so I went back to the drawing board and drafted out my own pattern using my generic sloper. (And used the placket pattern from the Tailor's Guide pattern.)


My back sloper piece is for one side of the back. For this pattern, I opted to make a single back piece so I made the pattern piece to be on the fold.


I also drafted out the sleeves accordingly, although I did have to make a small gusset piece for under the arm for it to fit correctly. I decided to live "dangerously" and make my mock-up the final shirt if it turned out well. Why? Because I have already made outfits using my sloper and I know it fits so I didn't feel the need to make two shirts.

It took me about four hours to finish the shirt, including drafting out the pattern, which isn't too bad. The completed shirt looks pretty darn close.  I used a roll hem for the shirt bottom. I still need to trim down the placket on the inside, but that's a minor fix.


And here's the required cat shot; Pharaoh helping me draft out the pattern.


And now I can move onto the harder pieces!

Thursday, August 7, 2014

Planning for the Next Cosplay: Han Solo

Now that SDCC has come and gone, I had a chance to relax a little bit (before going to a weekend RenFaire the weekend following SDCC).

I started planning for the next convention (coming up in late September, Convolution 2014) before SDCC, but hadn't started sewing yet because I was too busy working on the 10th Doctor cosplay.
Earlier this year, a friend of mine had made some cosplay suggestions, and one was to cross-play some of the original Star Wars characters. Naturally, I chose Han Solo (aka Hannah Solo) wearing his icon costume from the first movie, "A New Hope". He has other outfits, but this costume is his most iconic.


His costume is relatively straight forward. I didn't want to deviate too much from the original, except to change the cut of the clothing to be more flattering to a female figure.

Luckily, there are numerous images of Han Solo wearing this outfit and a lot of other costumers have recreated it over the years. So, there is a lot of existing source material that details his outfit. The Rebel Legion has a checklist of items needed for Han's outfit.

My primary goals are to make the following:
  • Shirt
  • Vest
  • Pants with the Corellian blood stripe

I already had some patterns that could be modified to fit what I needed. And I believe I have the other elements:
  •  my Viking (I think) has a gun belt that is of the appropriate style
  • I have a black belt in the same style (although 2 holes versus 3 holes). If I have time, I will make a more accurate belt
  • Black leather knee high boots
Time to get sewing....