Friday, January 31, 2014

Quilting, Yet not Quilting.....

I know that a lot of people quilt, as evidenced by the many independent quilting stores and quilting departments within fabric stores. However, the whole process has never appealed to me, although I am quite fond of the finished objects. (I'm a fan of blankets).

The mother (M) of a dear friend (D)  is a quilter, and she does it rather well. D (my friend) has some amazing funky quilts at home that I covet. I told her as much, and she mentioned it to M. Surprisingly, M offered to make ME one, in exchange for a pair of socks. I was a bit surprised at that, because M is also a knitter, but apparently has never made socks, finding them a complex animal.

I struck the deal, although I felt it was somewhat lopsided in my favor, so I resolved to also give her more than just a "pair of socks". We exchanged information of favorite colours, styles, and the ilk. As M was back East, we became "penpals", and sent each other letters & postcards with updates of our respective projects.

I made her a pair of socks, which kinda looked like these (except, these are mine out of leftover yarn); I forgot to take photos of her socks before I sent them off.

 Houdinis

I also sent her a handwoven scarf (which she promptly entered into the County Fair, and it won First Prize!)

Red Marl

In turn, M sent me a most amazing quilt. I love it.


Untitled    Untitled
The backing
Untitled

The only problem is that it hasn't been actually quilted yet. The whole thing is basted together. M had told me months ago that she was stalled on the actual quilting portion, although the entire thing was pieced and basted together. I told her to go ahead and send it to me, because it can't be THAT hard to actual quilt the whole thing, right? (knock on wood)

Now, I just have to actually quilt the darn thing. (Sammy approves of the quilt)

Untitled

Monday, January 27, 2014

The Joy of Wearing a Finished Object

I had hoped to have finished my Knit Swirl Coat over the MLK 3-day weekend, but the best laid plans of cats and women always seem to go awry. The seaming of the coat has taken over several evenings over the past week alone. One sleeve took 1.5 evenings to complete.  Plus, there were times I had to redo the seaming in certain places so that I was happy with the results.

Also, unfortunately, the sleeves on the coat were a bit too long. I missed her Technique Tutorial on creating the perfect sleeve length on her website. However, apparently, this problem is common enough that Sandra McIvers has a tutorial for cutting down the sleeves. I had to cut nearly 8.5 inches of sleeve!

I read the instructions and decided to make a few modifications:

  1. I used Eunny Jang's tutorial on crocheted steeks. This process allowed for a much cleaner and enclosed edge, which made picking up stitches a lot easier. Plus, it gave the cut-off sleeve portion a finished edge as well.
  2. I decided I wanted a slight bell-shaped sleeve, so I picked up more stitches than necessary.

The whole process took a bit more time, but I liked the end result a lot. Now the sleeves are the correct length.(Of course, I repurposed these sleeves, which will be the topic of another post.)

I LOVE this coat. I love the colors and the fit (mostly), and just how it hangs. There are several small problems with it, but it was of my own making. I think picking this project up multiple times over the year changed my gauge or somesuch, but it's not highly noticeable.

Untitled
I wore it today to work, as the morning was cold. The sweater was cozy warm and I had already received a few compliments on it. My colleague at work mentioned that it looked very Peruvian and was very surprised that I had made it myself.

Untitled
Also, I know I think I said I would never make another one, but I love this coat so much that I just might be tempted -- maybe not now, but I think sometime in the near future, I might have to cast on for another Knit Swirl Coat. Maybe....just maybe...

Thursday, January 23, 2014

Blocking Blues

I finally finished my Knit Swirl coat just before the three day holiday (Martin Luther King, Jr day). It was relatively warm for this time of the year, so I wanted to wash and block it over the weekend. I had hoped to have this seamed by the end of the weekend. (Yeah, best laid plans and all that.....)

I re-read Sandra McIver's instructions (the designer) on blocking this coat. I'm glad I did, because there was some pre-work in finding the center back and center edge points and marking them with a locking stitch marker.

I rinsed it several times in Soak, as there was some dye in the water. It took 2-3 soaks to get the water clear. Afterwards, I laid out my giant blocking boards that I had bought previously. I'm glad for them because it took ALL of my boards, which are 24" x 24" to block this coat.

Here's the coat laid out.
Untitled

I used blocking wires (which are AWESOME) to stretch out parts of it. Otherwise, I would have had to use a bajillion t-pins. I laid it out around 10:30 am. It took about 45 minutes to block it out correctly --- matching all of the center points and pinning to the schematic measurements. My metal yard stick came in extremely handy.
 Untitled

I had hoped it would be dry by that evening, but I guess I didn't towel it dry enough, plus my itty bitty back patio doesn't get as much sun during the winter months. During the summer months, this area turns into one giant oven, which is suited to drying anything within an hour.

It was still damp by 6pm and the sun was no longer up. I didn't want to leave this outside for a number of reasons. Because this thing was so big, I didn't have adequate space inside the house where there would be no kittens helping.

Unlike previously when I laid it out on the floor:
Untitled

I solicited advice from my fibery friends on Facebook -- should I find room or use the no-heat option of my dryer to dry this sucker. The verdict? Let it air dry. One person suggested using the bed, locking the kittens out of the bedroom, and sleeping on the floor or couch. I was not about to do that, nor did I think the Viking would agree to such a thing.

I had an AHA! moment when I realized that the roof of my car (a MINI Cooper) is relatively flat, and the kittens are not allowed in the garage. With a bit of help from the Viking, we got the whole thing inside and on top of the roof of my car. (The sweater is slightly bigger than the width of my car hood. It amuses me.)

UntitledUntitled

Between the interlocking boards and the blocking wires, we could turn it almost sideways and nothing really came loose, save the sleeves, which weren't really tacked down.

By the time morning came, it was only slightly damp. We took it outside again, where it dried completely. Now, just to finish the sewing portion of it!

Wednesday, January 22, 2014

Making Domo-Kun Fingerless Gloves

My eldest niece LOVES Domo-kun. He's a mascot for a Japanese public broadcasting company. He's kinda cute.


When she came to visit, we went to Japan town, and she kinda went crazy over the various Domos you can find there. So, for her birthday, I decided to make her some fingerless gloves, ala Dom-kun. Luckily, Ravelry has everything and I found a few patterns. However, the pattern uses worsted weight yarn, and I was using sock weight yarn. Because I tend to make a lot of fingerless gloves AND her hand size is a bit smaller than mine, I just used my "vanilla" fingerless glove pattern.


  1. Cast on 40 stitches.
  2. Knit 2x2 ribbing for 1.5-2 inches
  3. Knit stockinette until it reaches where you want a thumb
  4. Make thumb gusset

Then came the actual turning the brown gloves into Domo-kun. First, I cut out a rough template based on the size of the glove.
Untitled

I picked up some red & white felt at Joann's; they are about $0.40 a piece.
Untitled

Then pinned the pieces to the glove and sewed them onto the glove using embroidery thread.
Untitled

To give the mouth a more 3D effect, I crochet'ed a single chain of 50-51 stitches, and wrapped it around the mouth.
Untitled

Then used some yarn to sew on the button eyes. They don't look "quite right"
Untitled

But look fine when you put them on your hands.
UntitledUntitled

Monday, January 20, 2014

How to Keep Your Project from Turning into a Gremlin.

In one of our previous podcasts, Sandy & I discussed mogwai projects. Mogwai projects are seemingly harmless projects that can wreck havoc with your crafting life, if you don't follow some basic safety precautions. (Of course, there are always projects that will wreck havoc no matter what!)

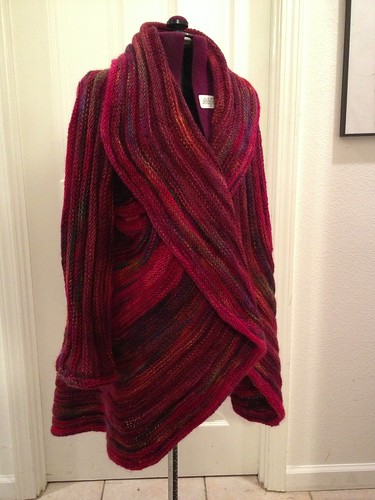
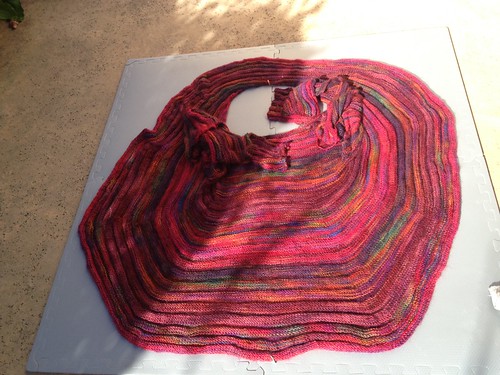
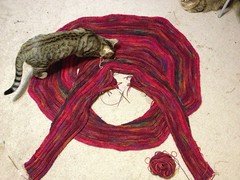
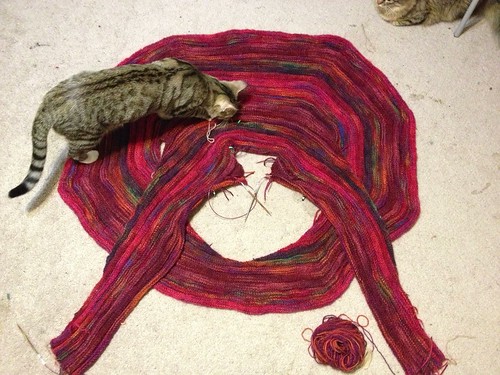
In this particular case, I've been working on the Knit Swirl Coat of Many Colors for quite a number of months (nearly the year), and I've been wanting to finish it. I'm about 80% done, and I've already had some gremlin moments with this project whereby I had to rip back many many rows  -- and with a mohair blend yarn no less!

I've taken to handling this project carefully, reading through sections of the pattern thoroughly, writing down detailed notes, and checking off completed rows.

In this particular case, I finally finished one section, and was reading through another part of the pattern before I started knitting. I was confused by the pattern's written instructions, so I started counting the number of decreases & bind-off, which did not add up to the final stated stitch count for that section.

I redid the calculations. It didn't match.
I re-read the instructions. It still confused me.
I looked on Ravelry for helpful tips from other users. There was nothing that matched my problem.
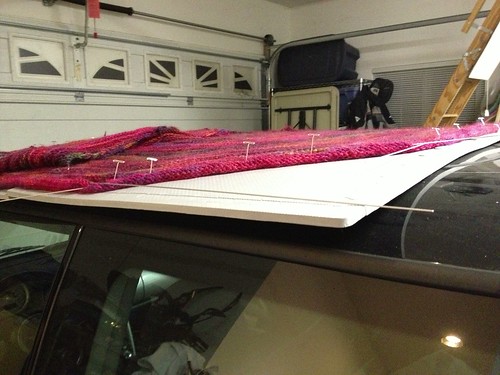
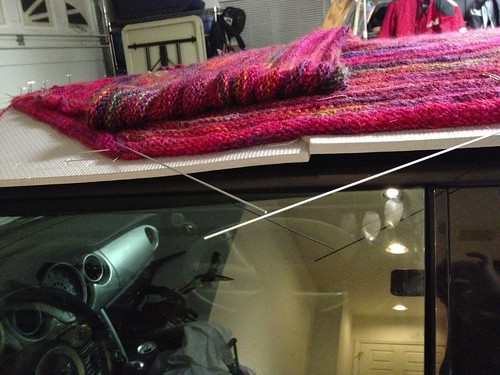
I searched through the Ravelry forums for Knit Swirl fans. NADA. So, I made a NEED HELP post on one of the Knit Swirl forums (and even took a photo of the coat as a visual aid).
I looked at the errata. I had all the changes for my pattern.

Untitled

I was becoming very frustrated.
Then, I looked at the clock. It was slightly past midnight, and I realized how TIRED I was, and that maybe, just maybe, rest would be more fruitful. So I put down my project, and went to bed. Nothing could come any good out of continuing to bang my head in frustration. My lovely coat would have become a gnarled mess of a gremlin quickly.

Eighteen hours later, I started re-reading the pattern and calculating stitch counts. And the pattern instructions STILL confused me and my calculations were STILL off.

After taking a deep breath, I remembered that this part of the pattern had a chart. It is a complicated chart, but after 5 minutes, I finally realized what the written instructions weren't as clear as they could have been, and the chart provided a much more succinct summary of the bind offs & decreases that weren't wholly apparent in the written version.

So, now I'm back on track with the Knit Swirl coat. I might even get this finished before a year has passed. Here are some of the things I learned: * I'm very glad that I was trying to figure this out logistically and wasn't knitting on this project, because it would have been easily have turned into a gremlin very quickly. So, reading a complicated section of the pattern and making sure the numbers added up adequately * Taking a step away from a project can really help bring clarity to the project * Always look at the schematic/chart alongside the written pattern. One can give you additional insight into a problem.

Thursday, January 9, 2014

Beading with Purpose

Every year, when we visit family for the Winter Holidays, my SIL and I bead jewelry. I bring up my beading supplies and many of the pendants, beads, etc., I've purchased throughout the year, and she lets me dive into her massive stash. We usually take over the dining room table a few hours on the dining room table, talk, and bead. It's a time that I greatly enjoy spending with her.

This year was no different.

When I make jewelry, I like to match beads on what I think of as the theme of the pendant.

I had two Chinese dragon pendants -- one bright bronze and another aged bronze.  I wanted pearls for the flaming pearl and jade (for the Chinese dragon. She also has some colored pearls the same tone as the either pendant
  Chinese DragonDragon

At a previous beading show, I had picked up amber beads in a wonderful color array of dark reds to light yellow. It reminded me of the different reds of the sun. So, naturally, I paired it with a bronze lion pendant. It's gorgeous in its simplicity.

Lion

Here's another shot of it, taken under different circumstances.
Untitled

This ouroborous pendant matches some earrings that I had picked up the previous year. I decided that this one need garnet and amber beads.

Oborous Snake Pendant
I've had this shark tooth since I was a kid when I visited Hawaii one year. It's wire-wrapped in gold and only used to be on a simple black cord. I tried several times to couple it with various things but with no success.  My SIL had some interesting beads so I decided to make something completely different than my normal jewelry creations. I like it.
Shark Tooth Necklace

I purchased this whale tale some time ago; I don't remember. But much like the shark tooth, I couldn't quite figure out how to use it. I knew I wanted some blue for the ocean and white pearls.

Some dark lapis served for the dark blue of deep waters and the lighter turquoise for shallow water. I also had some dark blue czech beads that I used for the main body of the necklace.
Whale Tale

I also made a necklace for the Viking so he can wear it to the various Faires we attend. I wanted something chunky that he could wear. I found a turtle pendant made out of cow-horn that I knew he would like.

I took apart a necklace that I had made previously (the ones with the shells) because I found I wasn't wearing it as much as I thought. I coupled it with some green jasper (for the color of sea turtles) and some lapis to signify the blue of the ocean.
Turtle