Monday, October 27, 2014

FO Wrap up!

I'm a bit behind on my blogging activities as of late, mostly because I've been knitting and have managed to finish a few projects that have been languishing on the needles. I'm also still working on my quiver, but I'm missing some hardware that I need to buy, so that project is languishing now until I can get to the store.

First, I finished my Ribby Cardigan by Bonne Marie Burns using Cascade Greenland (discontinued). It came out lovely. I added grosgrain ribbon to the edge, but have not yet put in a zipper because I can't seem to find one in the right size or appropriate color (either matching or contrasting). However, I have worn it a few times without it as I tend not to close my cardigans.

Scotch Moss Cardigan - full

I also finished a hat, but it's for a gift for someone who reads this blog, so I can't post it here. In addition, I've been working on socks, and used my cat as a prop for a photo of the finished object.


Of course, when he woke up, he was like, "What is this? SOCKS? Nom nom nom!"

(He actually didn't hurt the socks, but it was a cute photo.)

Wednesday, October 15, 2014

Archery Leads to Leatherworking (Part 3)

Once the quiver had been stained appropriately, it was time to turn the flat piece of leather into a tube to hold arrows. Leather stitching is a bit of a tricky animal at times, but one of my go-to books on the subject is very helpful.


I had punched holes into the leather for stitching and lacing prior to making it into a tube. However,  trying to wrangle the leather into a tube was fairly difficult until I managed to get a third of the way. And then it was smooth sailing. (This is when I find myself wishing for several sets of arms to help)


Once I was done, the patterning on the stitching looks like this:

Once the tube was completed, I added the bottom stopper to the quiver, which was a royal pain in the arse to attach to the tube despite having lined up the holes on the quiver and the stopper. It took about 2 hours to finish.


Afterwards, I laced the top of the quiver with a "Single Loop Lacing".


Here's the final quiver.


Now, it's a matter of putting on the appropriate hardware so that it hangs correctly at my side or on my back. (To be continued.... Additional posts about this topic can be found here.)

Tuesday, October 14, 2014

Gift of a Shawl.

It's not that often that I get any hand-crafted gifts. It's not that I don't want them, but I know how much time and effort it takes to create something and my friends/family are busy with their own schedule and projects. Consequently, whenever I get a handcrafted gift, it makes me super happy, pleased, and just extremely grateful.

This past weekend, a friend's mom (another knitter) sent us whole bunch of knitted shawls, and cowls via her daughter; sending an array of items that she thought we might like. All of us oooh'ed and aaaahh'd over the workmanship (each person being a maker herself) and picked out what suited her the most.


I picked out a shawl, Spellbound, designed by Boo Knits, in a lovely gold merino / silk blend. Let me tell ya...the workmanship is gorgeous. She knitted it with beads! (Something I have not yet had the gumption to do). And it's blocked beautifully.


For each knitted piece, she included a card with the name of the design as well as the fiber type of the yarn. I developed a love for shawls when my office got too cold, but where it was too warm to wear a sweater, except that I hate knitting shawls -- all the miles and miles and miles of stitches. But, this shawl is perfect.

And let me tell ya, getting a knitted gift like this shawl is just all sorts of amazing awesomeness. It kinda makes me wish I had more friends that knitted me gifts. :-)

For those interested, she has her own Etsy shop.

Monday, October 13, 2014

Archery Leads to Leatherworking (Part 2)

After doing a lot of research -- pouring over some of my design books and looking at the Internet -- I finally decided on a simple, yet (IMNSHO) elegant design of a dragon.

Dragon, you say? A bit cliche, I know, but hey, I'm a geek that loves Sci-Fi / Fantasy, so you'll just have to deal. :-P

I made a test of the design I wanted to use.


I had some issues with it, mostly because I just starting with leather carving. I had to modify the pattern a bit -- enlarge the wings, etc. -- to make it easier for me to carve it on the final piece.

Once I traced the final pattern onto the leather, I started cutting and beveling. When you carve leather, you have to get it wet (called "casing"). Carving is a bit tedious and slow going, and I had to stop and rest, but I really liked the end result.
("Casing" the leather)

Because you have to get the leather wet in order to carve it, the leather gets dry. An application of neetsfeet oil removes the dryness and darkens it a little bit.


Then it was a matter of applying the leather stains (black & brown) to the leather, painting the dragon, then applying a clear finishing coat to protect the paint and stain. This process requires a bit of time (several days) for the leather to dry in between coats of stain/paint/finishing.


Unfortunately, I forgot to snap some in-progress photos of the process, but here's one finished photo.


Once the flat quiver was completely dry, it was time to start lacing it into a tube.

To be continued.....

More posts about this topic here.

Sunday, October 12, 2014

Archery Leads to Leathercrafting (1)

Recently, I took up archery, because it's one of those things I've always wanted to do. (Not to mention that Huntress probably influenced me "slightly" as a kid, followed closely by Green Arrow.) Plus, honestly, archery is COOL.

I've been at it for about a month and not doing too badly.


However, the one thing that taking up a new hobby is that it allows me to learn a new crafty skillset! (For The Win!!!)  Archery has a few accessories that have often been made from leather -- quivers and armguards. I already know the rudimentary basics of leatherworking, but, I didn't want a plain quiver, I wanted a design on it, which meant I needed to learn a bit of leather carving.  I felt that leather carving was a complimentary skill set to my rudimentary leathercrafting skills.

First, I did a whole bunch of research on the Internet for quivers, because I needed to figure out what type of quiver I wanted and how to make it.  (For those interested, I have a Pinterest board for leatherworking ideas.) While I researched quiver patterns, I started practicing leather carving.

I stumbled across a Flickr album for a hip quiver class where folks were learning leather carving, which had good enough photos to make my own pattern. They were kind enough to include dimensions for their quiver, which I used as a guideline to make my own pattern.

Hip Quiver Pieces

I used poster board and painters tape to make a mockup of the pattern.


I liked it, so it was time to cut out the leather.


I had some suitable veg-tanned leather lying around (as you do), and got started. I also made a bottom stopper for the quiver, which would fit inside the quiver.


To make the bottom stopper, I cut out the leather, got it wet, then formed it over an appropriate sized plastic container with rubber bands. When it dried, it was the appropriate shape.


Now that I had the leather quiver cut out, it was time to tool (i.e. carve) the leather with a pattern that I picked out.

(Additional progress posts can be found here.)

Friday, October 10, 2014

Han Solo Costume: Making of Han's "A New Hope" Outfit

For Convolution 2014, I wore the outfit I had created as the Masquerade entry along with a friend, where we did a cross-play skit with Han & Leia (or Hannah and Lee, if you will).

I LOVE love love this costume, and will probably be wearing it as a hall costume at multiple conventions. I even bought a Wookie backpack to wear it around for the evening (which was great for holding my knitting projects! (Plus, he's super cute...and well, WOOKIE BACKPACK!


Our Masquerade skit at ConVolution went off a smashing success, and we got the award "Judges' Choice: Funniest Presentation", which pleased us to no end. A video of the full masquerade is available on YouTube; we are at about the 20 minute mark as we were the "finale" to the masquerade.


Our skit is at the 20 minute mark.

I wanted to write a summation post about Han's outfit, which included what I learned and reality vs. expectation so that it might help other costumers create their own version.

From the onset, Han's costume looks relatively easy, but there are some complex considerations, especially if you want to make something that would pass the Rebel Legion's specification (if they allowed cross-play).  Certainly, a lot of these costume pieces can be purchased; there are many places where you can purchase pre-made Han Solo costumes, but I wanted the satisfaction of making it myself.

As mentioned in my preliminary post, I wanted to use / re-use as much as I could (i.e. fabric from my Stash, items I already had, etc), and spend as minimal as possible, but I also wanted to make the parts I was creating as screen accurate as possible within the timeline I had.  I already had the following: the black leather belt, the black leather boots, the gun holster. So, it was just matter of making the rest.

It took me about 6.5 weeks to make the costume working on it a few hours each week and some dedicated hours on the weekends -- starting a week after SDCC (end of July) to 2 weeks before ConVolution 2014.

Good luck! If you have any questions, feel free to email me or leave a comment.
And may the Force be with you.


Costume Summation

The following is a summation of each of the posts, along with resource links and suggested patterns. I'll be slowly adding to and modifying my Han Solo outfit -- making a more screen accurate black belt, getting better boots, etc., I'll post about those as I come to them and update this post when I do.

Making the Shirt

For the shirt, I created my own pattern, because I didn't like the initial pattern I intended to use. However, there are a number of  commercial patterns that can be easily modified to create the shirt. As I already had plenty of muslin lying around, there was little cost in making this piece.

The Rebel Legion has the following guidelines for this shirt: "White or cream color long-sleeve shirt with placket v-neck and short mandarin collar." So you have plenty of lee-way in creating it.
  • Post: Making the Shirt
  • Suggested Patterns: Simplicity 1286. You'll need to modify the collar. 

Making the Pants:

For this piece, I purchased 5 yards of navy blue denim (100% cotton) fabric using one of their 50% coupon. I spent about $40.00 on the fabric and $10.00 of Guterman regular red thread for the embroidery machine (you don't need "specific" embroidery thread). The pants pattern was about $1.00 on sale at JoAnns; I suggest waiting for one of their pattern sales that they have on a regular basis.

The Rebel Legion guidelines are: Dark blue or navy pocketless pants with accurate red Corellian bloodstripes. But when you add the riding seam, pintuck, and embroidered stripe, you have "formal" Han Solo pants per the Rebel Legion specifications.

The riding seam was fairly easy to add as was the pintuck. However, I recommend having another person help you align the pintuck correctly after you have created your mockup. Make sure to make a full (or nearly full) mockup to ensure that the fit is correct with the pintuck, riding seam, and blood stripes. 


Making the Vest:

For this piece, I modified an existing pattern I drafted. In addition, I already had a medium weight black cotton/denim twill, so there was little monetary cost. However, it took quite a bit of time to ensure that the pockets were correct AND to scale on my body. I had to remake the pockets twice to get the right "depth". For me, this vest took the longest to get it to look right.

I highly recommend making a full mockup out of muslin before working your fabric.


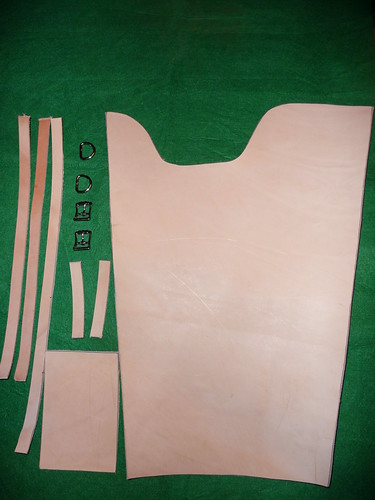
Modifying the Blaster & Holster

The toy blaster from Amazon cost $10 with shipping, and the spray paint was another $15.00. I already had the gun belt, but a new holster needed to be made to fit the gun.


Other Costume Elements

There are other costume elements, such as the items Han wears on his belt (i.e. droid caller, bits & bobs.) You can purchase the droid caller at Corellian Exports. I went without these elements, as I felt that the major parts I created were pretty iconic and easily recognizable as Han Solo. However, if you want to go for complete screen accuracy, I suggest getting these other elements.


Additional Resources:

The following are some additional resources that were extremely helpful to me during the making of the costume:

Wednesday, October 8, 2014

Knitting FO: Stained Glass

It's been a while since I posted any knitting entries, but I'm glad to say that I have a finished object OFF the needles.

In this case, it's a pair of finger-less gloves where I had some simple two-stranded colorwork.


The yarn:

  • Cascade Silk Heritage
  • Mano del Uruguay sock yarn
The pattern is a "vanilla" set of fingerless gloves (which I have to write-up one day), where I simply alternated strands of each yarn to make a stained glass pattern. 


It's a simple and fun knit that looks a little bit more complicated than reality. The black yarn really makes the color pop out, and the vertical stripes are a nice visual element.