Thursday, October 19, 2017

A Purrfect Costume: Debut of Catwoman (Part 9)

Cats have 9 lives, and this cosplay diary has 9 parts. The Con went well. I debuted the outfit by helping to host a WorldCon party --- the BatRave at the BatCave --- with the Dynamic Dodos...err...Duo cosplay outfits made by my wonderfully talented friends.


They even made the party drinks in Catwoman's honor --- the Catwoman Cooler and Milk&Cookies --- which I have to say were pretty darn tasty, both made with rum.


Overall, the costume wore really well for the evening. I still wasn't 100% happy with the collar, and decided that I would remake it AFTER the convention, but everyone loved the outfit. I took special care to ensure I got the appropriate silhouette with the hair and ears and it worked well.


I had a couple of problems with the ears & braided hair during the party, --- the hair kept pushing the ears up so I used a couple of bobby pins to prevent it.  After the party, I decided that I needed to attach the braid TO the ears so it would be easier to wear for the next time. Luckily, I had brought my repair kits with me and took some time to whipstitch the braid to the ears.

 Just prior to the convention, we also decided to enter the Masquerade contest, because all of us are costumers and want to support the masquerade. I quickly put together the music before the Convention and outlined the entire skit.

MC's Introduction: At the Gotham Jewelry Exchange, a certain felonious feline decides to make a withdrawal.
Cue Music: Janet Jackson's Black Cat
Presentation: (All in time with music) Catwoman prowls onto the stage in time. She shushes the audience and takes a "diamond" bracelet and places it on her wrist. She turns to leave only to see Robin. She twirls the other direction only to be faced with Batman. She takes a swipe at Robin who avoids with a twirl, then at Batman. She takes another swipe at Robin, then at Batman...all twirl and end up doing the Batusi dance. At the end, she gives up and they lead her off stage.

We ended up with this little prize at the end of the masquerade, so not bad for a last minute entry.

Here's the official photos from the contest.


And close-ups of the final costume.

And now, I'm going to go take apart the collar and do a final more tweaks to the costume to make it much more screen accurate when I'm wearing it. For example, the belt kept riding up to my waist instead of staying put around my hips so I'm definitely adding hooks and eyes to keep things in place!


The Batusi!


Read the other parts of this Catwoman Dress Diary!

Thursday, October 5, 2017

A Purrfect Costume: Finishing Touches to the Catsuit (Part 8)

The last part of a costume...the final finishing is often making sure little things that make or break the costume or help make the costume easier to handle. In this costume, there are two small unseen finishing techniques.

The Necklace

Julie Newmar and Lee Meriweather both wear the necklace around the neck. However, Eartha Kitt wears it on her shoulders. This is physically impossible unless you have a little help because the weight of the main pendant drags the chain to around your neck.


I had no photo proof that they had some attachment to keep it in place, but Julie Newmar used eyes & hooks to keep the belt firmly in place around her hips.


(Side note: Now, I did not add eyehooks to my belt or the catsuit. I had found a belt that was pretty form fitting and sits right at my hipline without moving while I was wandering the house wearing the outfit for a test run. I might change my mind later, but for now, it's unnecessary.)

I'm sure that the costume designer did similar for the necklace, but I wasn't sure how they did it. I took the simplest route and added hooks to the shoulder seams so I could hook the necklace around it.

(I reduced the contrast on the photo so you can see the black hook on the black fabric.)

Now, the necklace stays IN place!

And then I found photo evidence with this image. If you enlarge it, you see that there is a "strap" or something along the back of the shoulder seam keeping the necklace in place. This is akin to the "bra strap holder" on dresses that keep bra straps from creeping out.

I don't know if I'll actually add this little bit of detail in this costume. The eye hooks work for now and are less visible from all angles. 

The Zipper

Now, getting in and out of a costume with the minimal amount of  help is one of the things that I try to build into every costume, especially when you have to go to the bathroom.
  • Cosplay Problem #20 -- Getting in & out of your costume by yourself or with minimal help.
  • Cosplay Problem #20a Corollary -- Being able to go to the bathroom while wearing your cosplay.
I think being able to go to the bathroom is a very important thing to build into ANY costume. I don't know about other cosplayers, but I do not have a camel's bladder.

With catsuits, the most important thing is to be able to unzip yourself out of it any any given moment. For that, I like to add long zip pulls to my zipper so I can easily get in/out of them.


Here's what I did:
  1.  Added a jump ring to the zipper head. As hair is going to be covering my back, I decided on gold to match the necklace.
  2. Add a bead so that it slides over the gap.
  3. Get some cording/shoe lace and tie a bowline knot which won't slip.
And that's it! The entire cosplay is basically complete. Now, it's on to the Convention! I'll be posting photos of our finished group cosplay next week.


Read the other parts of this Catwoman Dress Diary!

Wednesday, October 4, 2017

A Purrfect Costume: Collaring a Cat (Part 7)

This was the part of the costume that I had been procrastinating on for several weeks -- and making all the Catwoman accessories instead!

When I first started the catsuit, I drafted several different collars to try and get that "ruffled" look worn by Eartha Kitt. The other Catwomen had fairly straight forward collars, which would have been easy for me to replicate.


I drafted out at least 4 collars and tried basting them onto the catsuit with little success at recreating the look. Lets just say that there was plenty of frustration and swear words being thrown around. I was pretty sure that there was a super simple solution that I was totally missing, because collars aren't normally this hard!


I tried no interfacing and I tried using  various types of interfacing, from muslin to this one that is specifically for stretch knits -- the interfacing stretches as well. (I eventually used this one)

My Viking pointed out to me that the look was probably achieved by cutting the collar on the bias of the 2-way stretch material used. I was using 4-way stretch --- no bias --- so this was going prove a bit difficult to do. However, I was still convinced that the solution was easy and I was being obvlivious.

He also pointed out to me that the Con was fast approaching. I could get "close", but not screen accurate, but be FINISHED or I could go for perfection and not finish. (cosplay problem #22 --- Finish in time or get it perfect?!????)

Perfection is the enemy of the Done.

I went ahead and opted for close enough. My collar does have a ruffle to it, BUT, it's not quite the same as the screen version.

There was also some very interesting finishing work in the collar. It looked like piping  had been added to the collar, along with some stitching to secure the piping in place.


I'm guessing here, but from many of the photos, there is a distinctive line between the collar and the catsuit. So, I took some cord and sandwiched it between the catsuit and collar.


And then, I stitched it into place.

I'm still not 100% happy with the collar, but it looks fairly decent and with only a few days left until the Convention, I shall call it done, and perhaps re-make it at a later time.

If I had more time, I would re-do the collar. For now, you'll have to trust me that it looks okay. I'll post photos from the convention, as the collar doesn't look all that good unless I'm wearing the outfit.

Read the other parts of this Catwoman Dress Diary!


Monday, October 2, 2017

A Purrfect Costume: Ears & Hair (Part 6)

Yes, I'm still procrastinating on finishing up the collar for the bodysuit. Luckily, there are a lot of accessories for Catwoman that I can make! In this post, I'll be talking about the cat ear headband and hair pieces that Eartha Kitt wore.


Have I mentioned that I love creating a cosplay so close to Halloween? There was really everything I needed in a given store!! I bought a relatively inexpensive pair of cat ears at the Halloween store that I planned on re-using. I took the fabric off the ears and planned to reuse the armature to make my own set.
I took the original ear and resized up to make it more inline with Catwoman's ears. I cut out two pieces of the stretch fabric and a piece of felt (left side) or added stability and to give the ears an actual feeling of heft. The finished ear is at the top.


Here are the complete set of ears.

The Julie Newmar and Lee Meriweather versions of Catwoman wore the ears like a headband. However, Earth Kitt's version wears them more like a tiara. I re-oriented the ear wire accordingly.

I tried on the ears for a test run, and they seemed to work well enough.

Here's the finished piece. I wasn't too happy with them, but they seemed to work just fine...at this point.

In addition to the ears, I had to recreate Eartha's hair. The braided part was going to be easy --- I was going to make a fake braid using hair extensions and clip it into my own hair. The look of the ponytail? That was harder. I considered any number of options on how to make my own long hair do that and experimented for a few nights on achieving that look -- with much frustration. I am not an hair expert by any means, relying on mostly wigs to accomplish that cosplay look that I want, but as I couldn't get my hair to do that, I would have to get extensions or a fake hairpiece.


When I went to Sally Beauty Supply to buy extensions for the braid, I showed one of the girls what I wanted to do, she led me directly over to this little beauty! It's a fake pony tail that you wrap around your own hair when it's in a bun. I tried it at home, and it worked PERFECTLY. (Unfortunately, you don't get any photos at this point, but sufficed to say, it matches the look exactly). Thank you hair experts!

For the braid, I bought the longest braid extension I could find in my hair color --- a whopping 52" long. It costs maybe $3.00USD for this Kanekalon braid. (Human hair is much much more expensive.)


I measured my head, and needed only about 16" to go around the crown of my head. I took the whole 52" and started braiding to the correctly length, but this resulting braid was too thin (about 1.5 inches thick). I undid the braid, folded the 52" in half and made a much thicker braid. I'm using a simple 3-plait braid.

I secured the ends with a flat elastic (5/8") to secure the ends. You can use anything here that is stretchy, like t-shirt material. I sewed a large wig clip to that fabric. The wig clip would allow me to attach
(I actually re-did this section so that the fabric would completely cover the end of the hair)

This is the thicker braid with the ears. The look is nearly spot on (given that my hair is a mess) At this point, I was having an issue with the headband. It kept wanting to "pop" up and wouldn't sit correctly with the braid.

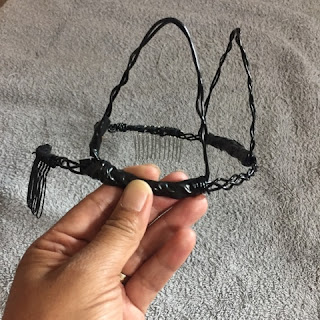
I was unhappy with how it looked, so I decided to re-make the armature completely. I picked up some wire from the craft store -- 2 packs of 14 guage and one pack of 16 gauge. I would have preferred a thicker gauge but they were sold out.


And some hair combs --- they also ran out of black, so I picked up a silver one. It'll be buried in my hair and covered.

Instead, I braided the gauge for some strength and then attached the combs using heavy thread.

I made the ears out of the heavier gauge. I doubled it up for added strength.
(Note -- the third hand is an awesome accessory to have around. I've used it multiple times for this cosplay outfit and will be using it more in the future!)

This is where I forgot to take more in-progress photos, but here's the next few steps:
  1. Attached the ears to the headband using the thinner gauge wire.
  2. Used vinyl electrical tape to add wrap any sharper edges on the headband.

I used the same exact fabric pieces from the original headband. In addition, I tacked down the very bottom of the ear with 2-3 stitches so that it bends the light, giving a shadow appearance to very black fabric.

And here's the final ears along with the mask. I'm fairly pleased with how this costume is turning out!

Now, I didn't quite make them exactly like the original ears. For one, the headband is also covered in fabric as you can see of this closeup of one of the above photos, but I figure that the headband should be hidden behind the braid, so I saw no point. I might add them at a later date, but for now, it's good enough.


Read the other parts of this Catwoman Dress Diary!

Sunday, October 1, 2017

A Purrfect Costume: Clawing Gloves (Part 5)

I'm still procrastinating on getting that collar done on the costume, so I'm making use of my time to create more of Catwoman's accessories!

Another accessory that the 1960's Catwoman had were her clawed gloves. These were made of a completely different material than the actual catsuit, which would make it easy for me. I purchased some long gloves from a costume store with the intent of re-creating those gloves.


In addition to the gloves, I bought some long fake nails at the Halloween Spirit Store. One of the joys of cosplaying so close to Halloween is the amount of things you can currently purchase in-person. each pack comes with 10 nails. I bought two packs, just in case, as they were fairly inexpensive.

All 20 were spray painted gold. There were two coats of gold and two coats of a clear finishing lacquer. My Viking has a small paint spray booth that we used. This is set atop a lazy Susan so I don't have to touch the nails.


I took a page out of another cosplayer's dress diary and picked up brass finger picks. These are often used by banjo players and can be resized to your fingers. They cost about $15.00 for a 12 picks. I went to my local guitar store and tried a few. They have them in different thicknesses.
PRO TIP: Once you size all the picks to your fingers, make sure to mark which hand/finger each pick corresponds. It'll save you time and effort later!

The nails also came in different sizes, so I matched them up to the approximate size of my hand. The pinky (right most) gets the smallest fake nail. I used E6000 to glue the nails to the picks.

E6000 requires 24 hours to completely cure. The hardest part of costuming is waiting for paint or glue to dry! (Cosplay Problem #5)

Here are the final set of claws. I can move in them fairly well, although picking things up is a little tricky.

After the claws were fully cured, I carefully seam-ripped the tip of each glove so I could slide a claw through it. I didn't want to cut off the fingertips as I couldn't tell from the photos whether you can't see her actual fingers.

Addendum: I actually found a photo where you can see the actress' fingers through the gloves! Yes, it's not Eartha Kitt, but I see no reason why they would make the gloves different for each actress. My gloves do a similar look. It's near impossible to have the fingers not show unless you build custom gloves for this outfit with a special pocket that holds the nails.


Once I slid the claw through the slit, I sewed down the raw edges and seamed up the sides as much as I could. This process took a while as I worked on each finger separately.

As a side note, the gloves are a bit tight to wear, especially if they were going to be worn over the catsuit. I did some additional modification to the gloves --- mostly re-doing the side seam. The left glove had enough excess fabric to allow me to add some width to the forearms, but the right glove did not. Unfortunately, these gloves (along with many commercially made satin gloves) are "one-size fits-all" and they use somewhat stretch fabric to achieve that effect. If I had more time, I might have considered making custom gloves, but I highly doubt that the costume designers & wardrobe crew of the Batman show would have gone to the trouble of creating custom gloves on their budget.

Here are the final gloves! I'm very happy with how they turned out.

(Dean really liked getting scritches with the claws. 
Sam, however, attacked them when I tried petting him with them!)

I'd like to do one final modification on these gloves and use some conductive thread on the finger tips so I can use my phone while wearing said gloves, like I did for Shego!


The gloves are fairly comfortable to wear, but it's difficult to pick up anything "delicate" with them. I had trouble picking up my keys, but big things are easy. I could easily pick up the cat statue, but I had to grab my SDCC medal with the pads of my fingers.


Read the other parts of this Catwoman Dress Diary!