Our brains normalize light that our eyes see so most people can't tell the difference in the quality of light. Most people can only tell when it gets dimmer or lighter, or natural light from artificial light. But did you know that light has color and can cast different shades of color?
In order to take good photos, you need to do is to train yourself to see the actual differences in light, especially if you're taking product photos of your handmade products. You want to portray accurate colors!
Once you begin to "see" light and see the color of light, you can make adjustments and take better photos.
Natural Light
Let's go over natural light first. There are a lot of proponents who claim that natural light (aka sunlight) is the best form of lighting. There are also people who claim that chocolate is better than vanilla or strawberry. It comes down to personal taste, choice, and how well you understand light well enough to replicate results you want repeatedly. (There are many photographers who can trick you into thinking their artificial light is sunlight).Not all sunlight is equal. Sunlight at noon (esp. during the summer) is very harsh, striking very short and very crisp shadows. We've been told to try to stay out of the sun during the high hours of noon because that's when the sun is at its highest peak and the strongest. Because the sun is at its zenith, the harsh shadows come out. (There are photographers who refuse to take photos during the mid-day sun, and often with good reason.)
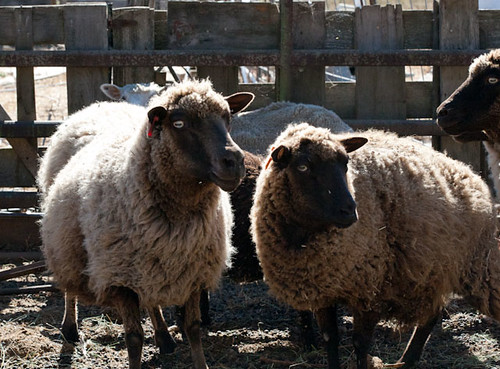
This photo was shot in the bright noon day sun. It's not a bad photo, but you can see that the shadows are rather short (right under the sheep) and they're pretty sharp and crisp. You can see that the sunlight is directly above the sheep (given the glare off of their wool).
Whereas the sunlight at dawn and later afternoon (towards the evening) is much softer, and you get long fuzzy shadows.
This photo of my cat, Blue, was taken in the early morning hours. Our room gets a lot of lovely sunlight in the morning, and you can tell that the light is "softer" and not as harsh. In fact, in this photo, you can see a lot of texture in her fur, but not as much for the Shetland sheep above.
The shadows in this photo (taken just before sundown) are elongated and much softer than the one above. The sun is at an angle, and the light is "elongated". You can tell that the sun is coming at an angle due to how the shadows are falling.
Now, interesting enough, the color from the sun "changes" in our perceptions, depending on the time of day, your location on the globe, the season, clouds, haze, etc. It's why you'll sometimes see a pink or orange sky. The above photo shows a yellowish hue while Blue and the Shetland photos don't.
But generally, you can consider sunlight as having a "blue" cast to it (it's why the sky is blue!)
Artificial Light
Artificial light is an interesting animal. It changes depending on what kind of light bulbs that you have. (YES! It's true!) But our brains and our eyes automatically adjust these hues to "white".You'll have to learn how to see the cast of light in your home, studio, or wherever you're taking photos, because the type of light might affect the color of your project! (Ever take a photo of your yarn, and the photo of the yarn isn't the same color as the yarn in real life? This is why )
- Fluourescent lights give off a green tinge,
- Incandescent (regular) lightbulbs (aka tungsten) give off a yellowish cast.
- Daylight bulbs give off a blue cast
- The flash on your camera will always give a blue cast.
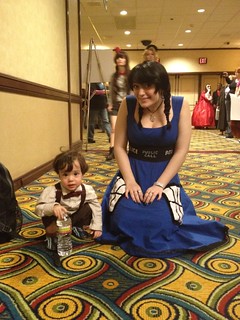
This photo was taken inside a hotel with predominantly tungsten lighting. You can see the yellowish tinge of the lightbulbs.
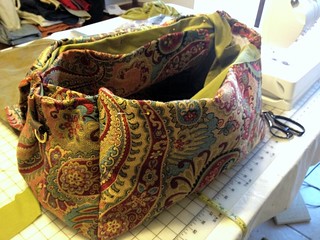
In addition, you might even be using different type bulbs in the same room, or maybe you'll use a flash when you have tungsten lighting in the room. See this photo below? Sunlight was streaming into the room (from the right) giving a blue cast, but I had the overhead lights on (which are tungsten).
So the left side of the photo has a yellow cast and the left has a blue cast. You can't accurately get a good feel for the colors in this bag, can you? The colors are muddied. It's because of the different and competing light sources. It would be difficult to "fix" this in a photo software, like Photoshop (not impossible, but it would take some work). And frankly, I'm more of a fan of getting it right the first time.
(But as this photo was an "in-progress" photo, I didn't much care about the color cast.)
Now, color casts aren't necessarily a "bad" thing. You might want a color cast (like the above photo of the masked person). A color cast can add mood to your photo. But when you're taking a product photo of your handmade items, showing true and accurate colors is going to be your primary goal so ensuring you understand the hows and whys of light casts a color is good to understand.
The Purpose of Seeing Light
As I've mentioned above, the ability to see light allows you to understand what's going on, and thus be able to modify light to make it better for your purposes (but that will be the topic of another discussion).
Eventually, you can compensate for these color casts in your camera, in a photo software program, or through modifying your light sources OR you can choose to keep the color casts for a specific effect, but for now, it's good to learn how to see the color of light.
Since photography is all about light, I highly suggest that you start watching light to get a feel for the different types of light in and around your home or where you want to take photos.
LOOK at the light bulbs in your house. What type of bulbs are you using? Can you see the color being casted?
WATCH how sunlight comes into your house and yard (or wherever you want to take photos). If you want to use sunlight to take photos, then notice the WHEN, WHERE, for HOW LONG the sunlight comes into your house or backyard, and WHAT SEASON you're recording this light ---- Write these times and locations down. (Trust me. Don't rely on your memory.)
- Maybe the early morning sun comes in through your living room.
- Maybe the afternoon sun hits your backyard porch just right around 4pm and is a wonderful golden glow?
- Maybe you get a lot of light from 1-3 in your backyard in the Winter, but then it shifts 2-5 in the summer?
In my craft room, the light comes in through a sliding glass door, but I only get the best light between 2-3:30pm (from spring to summer). At that point, the sun moves and my neighbor's house blocks the sun. So I know that I can take some nice sun lit shots during these times and in this location.
Once you start looking and watching light, you can pick a spot in your home or other location that has good lighting that will make good photographs for your handmade crafted items. You won't have to second guess, and knowing allows you to do some pre-planning.
Next time, I'll discuss how to correct for color casts......
If you really want to get more lesson about light & photography, I HIGHLY suggest this book, Light: Science and Magic: An Introduction to Photographic Lighting
If you would like to see some of my photography work, please take a look at my Photography website - WyldFire Studios.
Questions?
Let me know. I'd be happy to help you answer any questions.


No comments:
Post a Comment