Monday, November 18, 2013

Sewing Flannel Night Shirts

In addition to the different cotton flannels that I picked up at JoAnn's, I also found these fabrics as well. These are pretty thick versions of cotton flannel -- much thicker than the ones I had bought for my pajama bottoms.
 

I remembered that I owned an old cotton flannel night shirt from Mervyns that I think I "borrowed" from my mom when I was a kid (and never gave back). I had worn the poor thing absolutely to the bare threads; it's how much I loved it. It was falling apart. I think one more washing would have ended it for good.

I wanted to recreate the general look and feel of it, but I didn't want to have the pockets or the buttons.

So, I traced out the relative dimension of it on my pattern paper. The garment was simple: Front, Back, Sleeves, and Facings. Everything is fairly "oversized" (four inches of ease) so I didn't have to worry about fitting the garment to my specific measurements. And even the sleeves had no easing. (I hate easing sleeves.)

It was a nice change of pace. Here's the night shirt laid out on the dining room table. I traced around each piece, then added a generous seam allowance. I used a V-neck opening to make things simple. This is probably the simplest pattern I've recreated.

I even had a helper who supervised my drawing and cutting out the pattern.

This time, I did make a mock-up of my pattern (as it was not tried and tested). And I made a few adjustments in different places. I marked locations for a "long" and "short" night shirt. I made two: one in read and the other in the plaid. I also did some stylistic variations between the two. It only took about 2.5 yards of the fabric with plenty of fabric left over.


Now, DH wants one too. I test drove the red one for a few days. And me tell you, these are really comfy! I need to make more.

Thursday, November 14, 2013

Sewing up a Pajama-jam!

With all the sewing I did for the Goblin Ball, you'd think I'd be done with sewing for a while, but apparently not!

Several weeks ago, I was looking for some fun pajama bottoms at various stores, and didn't find anything to my liking. But, when I was perusing JoAnn's looking for lining fabric for my ballgown, I discovered that they were having a 60% off sale on their cotton flannels. So with the coming of winter, I thought to make myself some flannel jammies.

It's not very often that I sew more utilitarian clothing, but I thought, "What the heck?!?" Plus, they were having their $0.99 sale on McCall's patterns and I found this pattern. (I opted to make the long pajama bottoms.)


Between their sale on flannel and their patterns, I felt the Universe was trying to tell me to go ahead and make pajamas. So, I picked up a traditional plaid.


But I wanted to have some FUN sewing. I found these nifty fabrics as well. They suit my taste. I can even forgive the pink in the skull & crossbones fabric.


(I really love the monsters one!)

I washed all of the fabric in hot water to help pre-shrink and pre-soften the fabric. (Cotton gets softer with washing. And flannel tends to shrink.) Then, I started sewing.

The pattern was fairly easy to follow, and took very little time to make. Once all of the fabric was cut, it only took an hour to assemble each pajama bottom. The only change I made to the patterns was to shorten the legs a bit to fit me. Otherwise, I used the pattern "as-is". Heck, I didn't even bother with a mockup! (I'm living on the edge...I know. LOL.)

However, I did serge all the edges of the cut fabric as flannel tends to fray quite a bit.


And comfy jammies are the result.

I probably spent more time shoo'ing the kittens off the fabric as they tried to "help" me cut the fabric or pinning things together. (Apparently, they love laying on flannel -- or any other fabric for that matter!)

I think I'm set for winter. (Not to mention the Pajama-Jam-Jam at Purlescence Yarns....)


Tuesday, November 12, 2013

Sweing for the Ball: Ball Gown Inspiration

On the podcast, I mentioned some of my inspiration for making my ballgown. From the HBO show, Game of Thrones, Cersei Lannister has some beautiful outfits that I just absolutely adore. I think they are beautiful, elegant, and simply stunning. They remind me of a cross between Asian clothing and something more Elvish. I especially love this red outfit.

Speaking of Elvish, my other inspiration came from some of the various elvish costumes from the Lord of the Rings. (I had previously made an Elvish inspired gown based on Arwyn's Blue & Red gown for a "Nazzgrrl - the Jilted Brides of Sauron" cosplay.

These are two shots from one of the costume books of Elrond's outfit. I love the sleeves.

So, I opted to make a cross between these two.
Unfortunately, I don't have shots of myself in the gown, because I totally forgot to take photos of myself IN them. I'm currently awaiting some friends to post some of their photos of me in my outfit.

Tuesday, November 5, 2013

Sewing for the Ball: Purse

Yes, we're back from ConVolution. And no, I don't have photos of the ballgown yet, because I forgot to take photos of me with the ballgown on during the actual Ball. However, many of my friends did, and I hope to get those photos relatively soon.

For now, I'll just discuss the accessories I made, and eventually, get to the actual ballgown images as well as a report on ConVolution, so forgive me for now.

No ballgown is really complete without a few accessories here and there. Because I found myself with finished a bit ahead of the Ball, I went ahead and made a matching "petal" purse to go with my outfit.

I find small purses are very easy to make, and really complete an outfit, especially one that matches in fabric or texture. Petal (or tear-drop) purses are relatively easy to make. It's simply four pieces of fabric. When you put the purse on the ground, the bottom flattens out so that it stands up.

First, I made an approximate template of a pattern and make a quicky mock-up out of muslin. I was relatively happy with how it looked, so I took the leftover fabric and cut out my pieces.


And did the same for the lining. Each side is simply sewn together to every other side. (You stop at the bottom of the "petal". ) When you've added all four sides, hem along the top of the purse.

I had originally made some frogs for the ballgown, but they didn't seem to work with it.

So, instead, I used them on the purse. I made a Pipa button combined with a Three-Flower Knot. Instructions can easily be found on the internet.

I also made some straps out of the leftover lining fabric. Luckily, I had some ribbon in the correct color and width to add a bit of "flare" for the purse. When I folded over the top of the purse to sew, I simply added the straps to the inside. And, viola! A purse!

And here are the cats being very curious about my Chinese knotwork buttons. :-)

I promise to have pictures of the Ballgown AND from the ball very very soon! I need to get all of the photos from the evening in one location.

Thursday, October 31, 2013

Sewing for the Ball - Gold Accents

I love the color "gold", and it pairs very well with burgandy. I think it gives a wonderful accent. I found a faux silk dupioni (i.e. rayon) on sale at Joanns that I thought would work well. I bought the last 6 yards of it.

I needed a good chunk of it to act as a psuedo "godet" for the bottom of my ball gown. For added "flare" I did some simple knife pleats at the top and sewed those down before attaching it to the rest of the gown.


The gold also made a nice accented collar.

I even took the time to add some decorative stitching to help "stiffen" the collar up considerably, and add a bit of nice finishing touches.

And, of course, the obligatory kitten photo. Sammy is taking a nap while I work on some sewing.

Monday, October 28, 2013

Sewing for the Ball - Interlining and Lining

I've been sewing like a madwoman lately, and haven't had much of a chance to blog. Consequently, many of these next few posts about the ballgown are a bit behind.

One of the things that needed to be added to my costume is interlining. Interlining can provide more "body" to light fabrics or insulation for "thin" fabrics. In my case, I wanted interlining to provide some support structure to the costume without adding too much bulk.

You can get some forms of interlining at big box fabric stores -- usually fusible interlining.  However, fusible interlining can change how fabric feels. It definitely has its uses, but in this instance, it would be the wrong type.

For this purpose, I prefer a woven fabric --- similar to "horsehair" interlining used in men's suits or coutil (used in women's corsets and waist cinchers).  It is sewn to the fashion fabric and treated as one piece.


The interlining is primarily to provide structure to the exterior of the garment. And because there will be an "inset" of fabric, it will also provide some support for that as well.


Here's what it looks like on the mannequin with the interlining. It looks relatively "smooth. The extra "wings" that come out of each armhole will hold onto the sleeves to help support and give it shape, as there is no shoulder seam for this dress.


And here's the lining portion.

And of course, the gratuitous photos of the cats as they sit on exactly what I'm working on instead of the huge expanse of table available to them.

Monday, October 21, 2013

Sewing for the Ball - Velvet

This past weekend, I finally got sewing on my ballgown for the Goblin Ball. I was originally intending to sew it out of silk dupioni, but after looking at various pricing for yardage, it was a bit more than I wanted to spend. After some consideration, I decided to make it out of some velvet I had in my Stash. It wouldn't have the same "sheen" as silk, but it would still be a rich fabric good enough for a fairy ball.

The velvet is a deep dark burgandy, and is absolutely beautiful. The front and back are cut from a single piece of fabric that is about 5 yards long. Because the pattern pieces are so long, it requires a bit of planning.
My dining room table sits about 8 people and wasn't quite long enough for all of the fabric, so it required some finagling. I didn't quite fancy laying out all of the fabric on the floor and crawling around to pin and cut.

(It also required that wait until the kittens were otherwise napping to avoid any "help" - can you imagine velvet and kitten fur???)


After all of the pieces were cut, I used the serger to overlock all of the edges to make them nice and neat, as velvet tends to really fray at the edges. I love my serger, but if you don't have one then you can use pinking shears or an overlock stitch or zig zag stitch on your sewing machine to help keep your velvet fraying to a minimum. (If you've never worked with velvet before, check out this website for some tips and tricks.)

The kittens eventually did wake up and came over to help supervise. I gave them my mockup to use as a temporary bed while I pinned and sewed together the shell for the body.

More to come later....

Thursday, October 17, 2013

Katwise Gloves

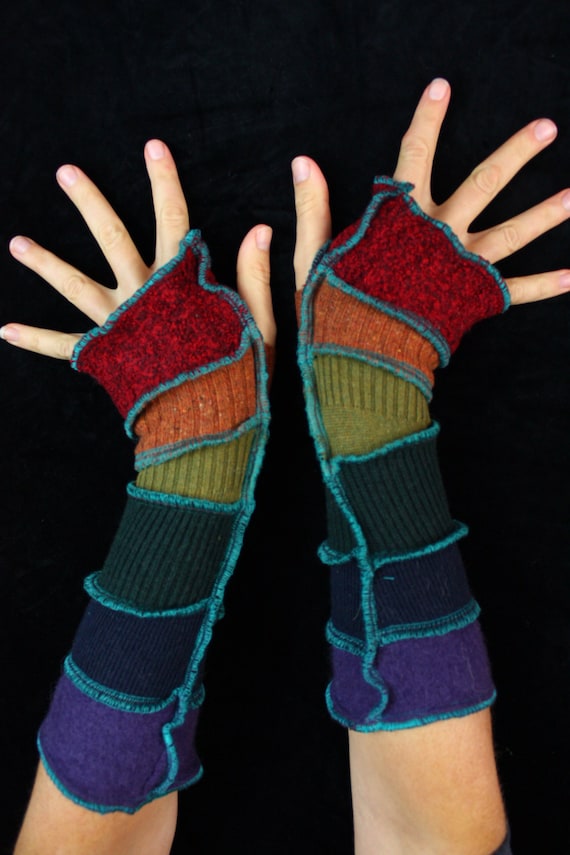
I have been extremely busy with a bunch of different things (including a new job), so I haven't had much time knitting-wise. However, I did finish a set of gloves that were inspired by an amazing artist, Katwise, who creates a variety of upcycled sweater items (like other sweater coats and arm warmers).

I've admired her creative work for a while now. The following image is one of her gloves that she sold on Etsy.
©Katwise  -- Upcycled Armwarmers

So, I decided to maybe create my own version of her gloves using a three of my handspun yarns that were approximately in the same tonal ranges:

From left-to-right/top to bottom:
  • Silk Cashmerino - from Frabjous Fibers
  • Merino Silk - from Chasing Rainbows
  • Merino - I think this is also from Frabjous Fibers, but I got it at a Yarn/Fiber swap so I'm unsure of its fiber content.

Untitled
UntitledUntitled

I mimicked the serger effects by using Cascade Venezia Sport (in turquoise) as a "break" inbetween each color and making a few rounds of reverse stockinette before using a different yarn.

Untitled 
The pattern is my own, taking measurements of my arm along the forearm, mid forearm, and wrist so that I could decrease appropriately. I used a variety of textures to make each section slightly different: stockinette, 1x1 ribbing, slip stitch, moss stitch, linen stitch etc.

I didn't care where the colors fell as I wanted something a fairly organic in look.

Untitled
I think I succeeded. Hopefully, I will get to wear these at ConVolution 2013 as part of "fairy" outfit.

Monday, October 7, 2013

Cleaning up my Ravelry Project page

As part of my "clean-up" of UFOs, I also turned to my Ravelry project page, which is just a mess with a variety of crafty projects that have been completed, but never photographed.

I'm such a lazy photographer. LOL. I really didn't want to take out my photography equipment, so instead I took my phone camera, some blank wall space, and started snapping a few images, JUST to get the page cleaned up and DONE!

So, here are some of the old Ravelry projects that needed finishing with just the photos.

1) A beaded scarf that I knit on the knitting machine back in 2011.
Untitled

2) A knitted hat out of handspun completed back in 2011
Untitled

3) A vest made out of handspun, also from 2011
Untitled

4) I finished this cowl shortly after my time at SpinU, out of some of the handspun I made during SpinU. In addition to the photo, I also forgot to add it to my project page.
Untitled

5) And one of the final projects was a woven handstooth scarf made out of a combination of handspun (remainders from the vest above) and some Cascade Venezia that I wove this year. 2013
Untitled

I have a few more that I need to backfill, but some were gifts given to others, and I don't have photos, so I will just have to suffer the incompleteness of those projects.

Friday, October 4, 2013

Finishing UFOs

As I noted before, I'm working on finishing up some works-in-progress (WIP) projects, which makes me less antsy about the number of projects I have on the needles. (And I don't feel so guilty about starting new ones!)

This is a relatively simple pattern that eats up any yardage of handspun and shows off a lot of variegated yarn. It's knit in the round so there isn't any need to purl. (I need to write up this simple pattern one day.)

Untitled

I had started this earlier in the year and then put it aside. I had almost forgotten about it, until I was digging through my knitting basket and found it. I had only a little bit of my handspun left, so I simply knit until all of the yarn was gone.

Untitled

Here's how it looks up close.
Untitled

Thursday, October 3, 2013

Finishing a Knitting Backlog of WIPs

As I was cleaning out my large knitting basket, I discovered that I had a few too many projects on the needles. I tend to get a bit antsy at how many works-in-progress I have at any given point. Normally, I don't like having TOO many project on the needles, and now I currently had seven WIPs, whereas my comfort limit is about five.

I took a look at few WIPs and some were nearly complete, like a Scott Pilgrim hat. I had actually gotten really tired of knitting it; it was comprised of a series of welts. BUT, it was half-way done to being complete. I didn't want to frog it, but I also dreaded the idea of knitting all of those welts to actually finish the hat.


It's knit out of leftover Cascade Eco+  as well as some Lionbrand Homespun that I had been gifted. I discovered that the Homespun was much too slippery even on my wooden needles and I really disliked knitting with it. (Hence why it languished.)


However, I discovered that when I put it on, it was perfect for a slouchy hat. I just needed to start the decreases, so I did! Within two welts and some aggressive (and imperfect decreases), I was basically done. And the hat is surprisingly soft.

HatUntitled

I'm going to try and get some headway into my current WIPs and see if I can't get it down to a more manageable size before I cast on something new.