Sunday, July 30, 2017

Building a Suit for SDCC: Lazarus

Now that SDCC is over, I can finally reveal the cosplay that I had been working on two months leading up to SDCC.

Our group was doing a tribute to David Bowie at the SDCC masquerade, and I was going to be his final incarnation, Lazarus, from the Black Star album.


It's not your typical cosplay outfit, but one that I enjoyed making. I'm a big fan of David Bowie and making this outfit was somewhat cathartic.

Insofar as costumes, it's not the most difficult one I've ever made, but it was time consuming...as three-piece suits generally have quite a bit of tailoring. An added benefit is that I'll be able to wear this outfit outside of any convention.

In addition to his suit, there were a few other things that I needed to create --- his hair as well as the blindfold.

The hair was a bit of a challenge since Bowie's hair is shaved along the sides. I thought some of that could at least be mitigated using the blindfold. I purchased a lace-front wig from Arda Wigs and did a bit of styling -- mostly to have the hair standup along the crown.


The blindfold was a bit trickier only because I needed to be able to SEE well enough on stage to walk around and perform without falling over. I found some light weight gauze at the fabric store that I cut into a long strip.

After wrapping my head while wearing the wig, I marked out where the "eyes" should go that would look about "right" but still allow me to see well enough on stage.


The last thing I needed was the Black Star "bible" that Lazarus carries around.


It looked to be about the size of a trade paperback. So, I took one of the books on my "To Read" stack and drew out a paper template, and traced it on some leather that was in my Leather Stash. My intent was to make a book "cover" that I could use for any book the size of a trade paperback.


I used some matte board to stiffen the sides, and used BARGE glue to attach it to the leather.

After making the book cover. I drew a perfect 5-pointed star, transferred it to suede leather, and attached it to the front of the book.


I'll have a few more posts on our group, video, and other photos.

Saturday, July 29, 2017

Building a Suit for SDCC: Button Down Shirt

The last piece that I made for this cosplay was the button down shirt. Now, you may ask yourself, "WHY did you make a button down shirt? Couldn't you have just bought one?"

Well, yes I could, but I wanted to be able to say that I made a full three-piece suit for myself. It's just my sense of crazy.


I made a simple mockup out of muslin, which fit fairly well. I had to do a few alterations, primarily to the sleeves and armscye, which are my primary problem areas.


One of the things that I changed was to have a French cuff instead of a simple sleeve band. This particular cosplay "appears" to have unfolded French cuffs.


The final shirt, sans buttons.

For a complete list of elements for this outfit:

Building a Suit for SDCC: Jacket

SDCC has come and gone, and I really need to catch up on these costuming posts. I'll have a full write-up on SDCC soon.

Insofar as THIS cosplay, I'm really enjoying making outfits I've made before. You don't need to re-tailor, re-work, or fit the piece to you because you've already done that work. You can just cut the fabric, sew, and you're done!


I tend to save all of my mockups, because you never know when you need to remake an outfit or create another. Plus, it's helpful to understand how costumes are put together. Here's my bedraggled mockup from the previous costume.


I tried it on, and it still fits perfectly, so I proceeded to cut out all of the fabric pieces and begin immediate assembly.


I had very little issue with making this coat again, except for getting the sleeves eased into the coat.

.
It's also very hard to take a photo of the black fabric of the costume.

Here's the nearly finished coat.

You'll see the final coat in the upcoming posts.

For a complete list of elements for this outfit:

Wednesday, June 28, 2017

Building a Suit for SDCC: Slacks

In previous posts on this topic, I've already mentioned that I had already made this particular pattern for a different cosplay outfit, but the base can be used for this cosplay as well. After all, pants are pants are pants, right?

I took out my previous two mockups --- I had made the slim and average fit of this pair of pants. I consulted my notes written on the pattern, which told me the slim fit was a bit more tailored to fit me than the average fit. (My current self is pleased with my past self on all the copious notes that she took.)

I tried on the slim fit mockups again to be sure, and they still fit me well. It was then a matter of cutting out the fabric and creating them per the instructions.

However, this time around, I also wanted to line my pants to give it a better flow and to provide reinforcement. Also, if you've never worn linen before, I will tell you that linen ITCHES until it softens enough through a multitude of washing. I didn't have time to wash the linen a few dozen times (not to mention the wasted water), so I opted to line these pants.


I watched a few YouTube Video on lining pants to better understand how to do it. It was relatively easy and will help the longevity of said pants.(And act as a barrier for that aforementioned itchiness)

While I was making these pants, I was very much reminded that my grandfather wore black linen pants much like what I'm making currently. It was a surprisingly nostalgic moment.


I'm happy with how it turned out  and I'm pleased with the fit.

For a complete list of elements for this outfit:

Monday, June 26, 2017

Building Suit for SDCC: Waistcoat

In planning this costume out, I thought that the smallest piece of the suit --- the waistcoat --- would be the most straightforward to sew first. After all, I've made myself several different waistcoats and they all follow the same patterning. It was just a matter of tailoring it to my measurements.

For this character, I needed to make a waistcoat with lapels. I decided to use a pattern I've used before, except I had made the versions without lapels.


Previously, I had already copied the main pattern pieces out to brown butcher paper and needed to copy the patterns for the lapels and collar.


I decided to make a mockup so I could better understand the collar and lapel structure. I played around with different lapel sizes to find a size preference.

In the course of following the pattern instructions, I realized that the pockets in the front of the pattern were FAKE! I was severely disappointed by this fact and decided to turn the faux-pockets into real welt pockets.

Once the fashion shell of the front half of the jacket was completed, I cut out a suitable pocket lining and drew the welt lines on it. Basted down the welt flap to the fashion shell.

Added a suitable pocket lining and redrew the lines. 

Sewed along the drawn lines and then CUT in between.

Pushed everything through hole I cut and then sewed the edges of the welt along the side. I was left with a 3.5" deep pocket. (On the inside, I sewed the edges and bottoms of my pocket fabric)


If you want to learn how to make a welt pocket, check out this tutorial. Mine is slightly different, but the concepts are the same.

Here's the final waistcoat. I still have to add buttons for it, but I want the buttons on the jacket and waistcoat to match so I'm going to wait until the jacket is also completed so I can just do a production run of buttons.


For a complete list of elements for this outfit:

Thursday, June 22, 2017

Building a Suit for SDCC

It's nearly time for San Diego ComiCon, and I've been working diligently on my latest cosplay outfit for the Masquerade. Much like previous years, it's a SOOPER SEEKREET project, but I can give you details without giving away the surprise.

This costume is going to be a change for me, because unlike previous cosplay outfits, I will be able to wear this outfit on a regular basis, even for work. Additionally, I don't have to do a lot of extra custom work because I've already made parts of this outfit for other costumes, which means no unnecessary mockups and I just need to follow the pattern instructions and my own notes.

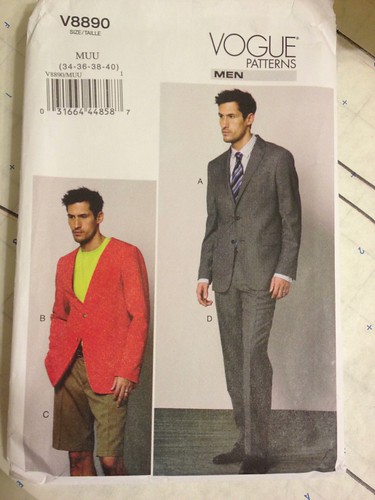
FIRST, the costume: The "costume" be a three-piece suit, which won't be quite matching in style, but I'll be using similar and matching fabric. Photos of the character seem to indicate this is the case.

SECOND, the patterns: As mentioned previously, I've already made much of this suit for other purposes, so I don't have to actually do much in terms of mockups, custom alterations, etc.  I will have to sew 1.5 items that I haven't created before, so there will be some work to do.


For the waistcoat, I've previously made the non-collared version of the pattern, but for this new one, I'll be adding the lapels. The only pattern I haven't yet made is a button-down shirt. I'm using this McCalls pattern for it.


LAST: the fabric! For this particular outfit, I'm going with a linen blend, because photos of said outfit appear to be linen. However, I chose a linen blend because I hate ironing linen --- it wrinkles if you look at it wrong.  Also, I'm choosing two different types of black linen because photos of said character show a slightly different texture/light reflection between the coat and pants.

For the jacket, I've chosen a black hopsack linen (55% linen / 45% rayon). Hopsack is a type of weave that looks like basket weave, and is not as "formal" as a plain weave. It's used for more "informal" blazers and jackets especially light summer blazers.

The next fabric is for the pants and waistcoat, which is a 53% linen / 47 % rayon, which I'll be using for the waistcoat and matching pants.

The last bit of fabric that I'm going to be using is for the shirt:


I've already washed it twice in hot water and it's turning into a very soft fabric and will make a lovely shirt.

MORE TO COME....

Thursday, June 8, 2017

Completed Katarina

Within the course of a week, I finished two projects! It feels so good to get things completed and to have two in one week feels doubly good.

This time around, I finished Katarina by CocoKnits out of Cascade Greenland, which is a discontinued yarn, but of which I have at least 3 sweater's worth in my Stash. I love Julie Weisenberger's aesthetic, and this sweater is no exception.


There's a seamless version of this sweater, but I chose to knit the seamed version. I don't mind seaming and I knit this in pieces as a substitute for my sock knitting at work. Because I did it piecemeal, it  meant that I could finish it a bit faster as it was always accompanying me to different places. (I also prefer having a bit more structure to my knitted garments that seaming affords).

While the body of the sweater took very little time, the garter stitch shawl collar took forever to finish and was fairly boring to knit. I also did some short-rows along the collar because I wanted the collar to have more substance and to stand a bit taller.


Consequently, I ended up working on the Viajante instead or reserved the Katarina for mindless t.v. knitting whenever we binge watched on Netflix or Hulu. However, I'm very pleased with how the collar turned out.


Here's the final sweater on me. It fits perfectly.

And the Greenland softened up considerably after washing it. I didn't quite block the sweater, but rather threw it into the dryer. It handled the dryer very well and didn't lose any of its shape.

Tuesday, June 6, 2017

Completed Viajante!

It's been a long time since I finished a project that wasn't sock related. I took on two big knitting projects and have been somewhat faithful to just knitting on them (except for my ever-present sock projects).

So, I'm glad to announce that I finally, finally finished the behemoth that is the Viajante that I started back in March, and I love this "shawl". Okay, let's be honest here....the Viajante really isn't a shawl but more of a fancy poncho. And I've discovered that I really like ponchos, especially in the frigid climate that is my work office.

As a recap, I used Miss Babs Katahdin, which is 1750 yards / 397 grams of wool. I used nearly all of it. I think I might have 40-50 grams left.

I also discovered that I like to add beads to things, despite it adds a multitude of time to finish a project! Because this was my first time beading a project, I didn't know what size beads to use. Consequently, I ended up using two sizes of beads: 2/0 clear-esque beads for the stockinette portion of the beading and 6/0 for the lace. For the larger 6/0 beads, I found some that perfectly matched the yarn.


The beads & lace look great, and I even bound off with beads.

Despite beading bits of this poncho, the vast majority of this project is a lot of stockinette. This poncho is huge and served as a 'blanket' while I was working on it. The neck opening is about 13" wide and the "tip" of the poncho/shawl is very long.


When worn as a poncho, it reaches down to the floor.


It can also be worn as an actual shawl when you double over the fabric, which makes it warm and toasty

I love this thing. This project definitely fell under the "project knitting" aspect versus the "process knitting". I really wanted the Viajante for use in the office, travel, and I think it's elegant enough to wear for evenings out, etc.

I'm actually contemplating on making another, but out of sport weight yarn just to cut down on the amount of time that it'll take to complete. And the next one will be out of a more solid or kettle dyed yarn.


Tuesday, May 23, 2017

Taking a Break with Legos

This weekend was super extra busy, but not in a fun way. My Boys somehow got fleas (either it being piggybacked on us or a friends who have visited), and it was time to wash and treat the house accordingly. I'm pretty sure we caught it early enough. (Un)Fortunately, my little Dean has a fairly sensitive flea allergy so ANY flea bit will cause him discomfort whereas the other two could care less.

(Dean unhappy at being at the vet)

However, one morning, I decided that I very much needed to take a break from all of the de-flea-ing of our house and break into a Lego pack that I had been given. It was Wonder Woman and given that the new movie is coming out very soon, how could I resist?!?


Unfortunately, I didn't realize that because this a Dimensions set, all of the instructions for assembly were online as part of the Lego game, which I don't own. There were a lot of little pieces...mostly clear...for the invisible jet.

Fortunately for me, I've been playing with Legos a very log time, so I used the photo from the box to put together WW's invisible jet!
Sufficed to say, it was nice being to take a break and have a little bit of fun during an otherwise super busy weekend.