Friday, September 21, 2012

Cigar Case

 
My entire house is one large crafting room that just happens to have a kitchen & bedrooms attached to it. A good of mine keeps telling me it's like an atelier's workshop -- at any given moment you can start any given project and have most of the materials at your disposal.
 
She's got a very romantic way of putting things.
 
Me? I see a house that needs seriously cleaning up.
 
The reality is probaby somewhere in between. The house IS a mess and I can start nearly any project I want (within my realm of interest) almost immediately.
 
Take for instance, this particular project. I have a wonderful humidor (that's for cigars) that very good friends gave to me for my birthday one year. It holds about 3-4 cigars and is just Fricking COOL. It's more portable than my travel humidors, but I needed a carrying case for it for places like the Renaissance Faire. (Yes, I smoke cigars on occasion. It's a guilty pleasure.)
 

So, one night, I had about 1.5 hours to spare, so I grabbed some scrap pieces of leather that were from my Chinese armor project, my leather awl, and got to work. I used the scrap leather and figured out how much to wrap around to make a tube.

Carrying Case for the Humidor
 
Then, it was a matter of making a cover to go over the tube, and making a belt hook. I made some leather cord from more scraps so I can use it as a closure for the belt hook.

Carrying Case for the Humidor 2
It's a bit rustic looking, and I can probably make something better, but it's not bad for 1.5 hours worth of work. The longest part was handsewing through the leather with a leather awl.

Carrying Case for the Humidor
The finished product kinda looks like a cigar itself, doesn't it?

Thursday, September 20, 2012

Casting On!

I appear to be on a sweater kick. Okay, who am I kidding? I've been on a sweater kick for some time now. Some say, maybe addicted to sweaters. Because ten minutes after attaching the last button to the previous cardigan, I was starting to swatch for the next sweater. (How sad is that I haven't even finished weaving in the ends of the previous sweater?)

DH even took immediate note of it, asking "Is that a different color yarn? Are you knitting a new sweater?!?"

What can I say? I'm addicted to having sweaters. They are warm, fuzzy, and even in the warmer weather, it's good to have in our office (where they turn up the A/C to icy cold!)

And I'm really liking vest-type sweaters as they work nicely as layers. So, now I am working on the Adam's Ribs Hoodie by Carol Sunday. I saw this on Ravelry and fell in love with it. I love the tunic length and the wavy lines. Plus, I'm fond of hoods even if I never use them.

The recommended yarn was out of Carol's own line, but I wanted to start it immediately (as I knew I would be soon finished with the Raspberry Cardigan). So, I took a look at a bunch of different yarns on Ravelry trying to find something that would match in both yarn weight and about the same yarn grist. (Using my SpinU lessons for this!)

Eventually, it came down to a few yarns, and luckily, my LYS was having a sale on one of them (Dreams in Color Classy) but they didn't have enough for a sweater and I was unsure about how the varigation in the color would work in the ribbing. After consulting with the owners and a few knitters that was there, it was determined that the Cascade Eco Cloud would be one of two alternatives that would work best (the other being Frog Tree Meriboo). Consequently, I went with the Cascade Eco Cloud (in a beige-ish/coffee with milk color) because I loved working with it and I was familiar with its characteristics.

I swatched using US 6 needles, which after washing and blocking, came out at gauge -- 24 stitches/4 inches (in the ribbing).

IMG_1161

So far, so good. The ribbing pattern is actually pretty easily memorized; it took me about half the swatch to get it ingrained in my head. I also tried a few different types of increases, because I didn't like the hole the suggested increase left in the fabric.

Currently, I am about 2" into the body of the sweater. The ribbing pattern is engaging enough to make me pay attention, but mindless enough to not have to pay "too" close attention to it.

Monday, September 17, 2012

The Never Ending Sweater

I have been knitting on my cabled sweater since...well...July, and I've FINALLY finished it last night. I've renamed it the NEVER ENDING SWEATER, because it's taken forever to finsih.

Around the beginning of September, I finally finished the sleeves. About 3/4ths of the way through BOTH sleeves, I knew that I was creating the sleeves MUCH too big, but I continued to press on in the hopes that it'd get better. It didn't. When I tried on the finished sleeve..well, it was about 3 inches too wide.

The finished sleeve was supposed to be 13.5" wide...this was nearly 17. I finally decided to check gauge, and discovered that I was WAAAY off, despite using the same exactly needle that I used to knit the body (which fits perfectly, BTW). Luckily, all of the increases were at the edges of the sleeve, which the Costumer in me said, "We'll just cut off the excess fabric, while the Knitter in me is screaming "OH HELL NO..."

So, after DH helped me check for fit, he pinned the seam line, and I ran it through the sewing machine with a good bit allowance. Then I pinned the sleeve together loosely on the new seam line (using locking stitch markers) and pinned it to the armscye. It fit perfectly so I added unpinned it and ran it again through sewing machine with a zig-zag stitch, used Fabric Tack to ensure there was no additional unraveling, and then cut the excess fabric off.

Seam Line for cutting

Yes, you heard that right. I CUT my knitting. Here's the Before & Aftershot.

Before and after shots of cutting down sleeves


I figured it this way: if this didn't work, I would have to completely REKNIT both sleeves, which was going to take a Very Long Time. Plus, I still had a ton of yarn left over, so I wasn't too worried about not having enough. I would try with one sleeve and see if it worked. If it didn't, I'd frog the 2nd one and reknit.

Consequently, I attached the armscye and sewed up along the new seam allowance, and it worked perfectly. So, I started on the second sleeve. This saves me a TON of work having to reknit the whole thing.

Now, I was concerned about the shawl collar, which other knitters promised is going to take as long as the whole sweater combined. So, I picked up 400 stitches, knit the shawl collar while adding the button holes. It took about a week to fully finish the shawl collar, because it had short rows along the neckline, but it worked about beautifully.

I even had the appropriate buttons that worked well with it.

Untitled

The sleeves are a teeny bit long, but can be easily pushed up. And it's got about 2 inches of ease, so I could probably wear this as an outer sweater in the winter. But it's DONE and it's WARM, and I need to take better pictures of me wearing it...when it's not 80 deg F outside.

Raspberry Cardigan 2 Raspberry Cardigan 3

Oh, and yeah, I started a gauge swatch for a new sweater about 10 minutes after attaching the last button.....

Thursday, August 2, 2012

Throw me a Lifeline

(or ...Too many AT THE SAME TIMES...)


Last night, I was working on my Blackberry Cabled Cardigan, which not only features cabling and double moss stitch (for my version), it also has a LOT of the dreaded phrase, "at the same time" .

There's neckline shaping/decreases AND AT THE SAME TIME with bust increases, then neckline decreases AND AT THE SAME TIME armhole shaping, then the knitter moves onto THREE "at the same times" of neckline decreases and AT THE SAME TIME armhole shaping and AT THE SAME TIME shoulder shaping.

It's enough to make a knitter want to grit her teeth and swear... a lot. However, this is where lifelines help, because everytime I hit a milestone where it's long enough to start the AT THE SAME TIME....I throw down a lifeline.

Of course, I almost didn't at one point, when I finished working on the left armhole shaping and was about to start the shoulder shaping, because, I had thought, "NAW, I'm on a roll! I got this!" (But the nagging part of my hindbrain kept arguing until I got out the brown sock weight yarn I normally use for lifelines and threaded it through the stitches on my needle, which took less than a minute.)

Oh, boy am I glad that I did, because about part way through I realized that I had forgotten to continue working on the neckline decreases AT THE SAME TIME as the armhole shaping AND the shoulder shaping WHILE maintaining (quoting the pattern) the "cable ....pat as best as possible throughout neckline shaping".   (You know things are going to get iffy when the pattern designer has to say "as best as possible....")

(Of course, the nagging part of me turned into the smug-I-told-you-so-me....)

Oofda. So I had to rip back, luckily to the lifeline (a mere rows back) and do all of the AT THE SAME times. Here's my lifeline, which you can't see all of because of the purl stitches on the cabling, but it did save me a ton of frustration and annoyance.

Untitled

But lesson re-learned. A few moments adding a lifeline can save you TONS of heartache later.

Tuesday, July 31, 2012

Slugs on the Brain

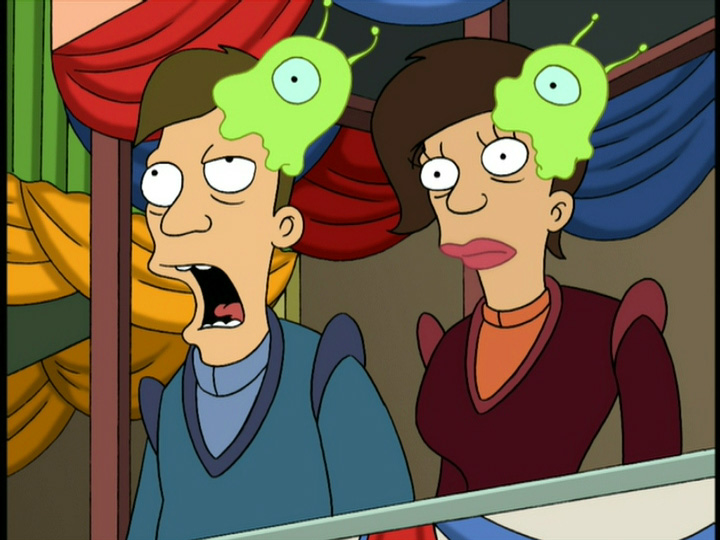
If you're a fan of the show, Futurama, I'm sure you're familiar with the brain slugs. As DH is a big fan of the show, he said he wanted one of these to wear for conventions or the ilk, when he didn't quite feel like wearing a costume.

So, obviously, I had to make it for him. And what better way to do it than crochet amigurumi. First, however, it was getting the necessary colored yarn. I had thought to use just Lion Brand acrylic, because, it's a) cheap and b) I usually like making my toys out of acrylic yarn. 

However, they didn't have the right color, so I just went with Cascade 220 in Apple Green (which was approved by DH).
Picture 002 

I took a look through Ravelry at some of the patterns, but many of them seemed way too large or I didn't quite like how they looked, so it was time to improvise. I'm particularly fond of amigurumi and no stranger to creating such toys. This one was rather simple. But, first I made a small prototype to see if it'd work;


Prototype 

The initial prototype was a bit too small, and DH didn't like the ruffles, as he felt they were too doily-ish. This one fit my head a little bit better than DH's head (which is a big head in the literal sense). So I increased the size by about 20%, made the ruffling a little bit uneven, then sewed together a felt eye (using the tutorial I posted), which was then attached to the body with needle & thread.

Final Brain slug

To provide a little "depth" to the eye. I crocheted a chain long enough to go around the eye, and sewed it down. Then, DH placed the iris, himself, and it was just a simple matter of glueing it down in the appropriate spot. It was then stuffed with some scrap yarn that I had recently cut off my loom.

It took an evening to create the prototype and then the final brain slug.

Monday, July 30, 2012

Leather and then Some

Sometimes, I want to do something a little different from the norm. In my opinion, it's good to have a wide range of skillsets ...especially when the zombie apocalypse should occur. And it's even useful to create things that you need on a daily basis.

In my case, I wanted a new belt to match my blood red shoes. Luckily, I had some leather and belt findings lying around.

Belt Blank


Leather Belt 1

After some quick use of my hand-dandy leather tools (all conveniently placed in a single toolbox) and using a favorite belt as a generally template, I had a brand new belt to use for tomorrow.

Finished Leather Belt


Leather Belt Finished

In addition, I still had some left over leather from another project, so I created a belt hanger for me to use at various Renaissance Faires. Simply put, a belt hanger hangs from your belt and can hold a variety of things, from small bags to tankards. At Ren Faires, I primarily hang my tankard. These things cost anywhere from $10 - $20.00 a pop. The left over leather cost me nothing, but the lovely Kells Dragon conch only cost me $3.00.

Belt Hanger

Belt Holder

Wednesday, July 18, 2012

Reverting to Paper Patterns

Despite all my work on the various UFOs that had been languishing in my knitting basket, I was jonesing for casting on a sweater. I don't know when I turned into a sweater knitter, as the year before, I was all about knitting socks.

But now, if you look at my finished Ravelry projects, I've finished four sweaters this year, which isn't too bad, all things considering.

And I just started a new sweater, involving cables and double moss stitch. I was dutiful and made a cabled gauge swatch. Normally, I knit loosely and have to go down 2 needle sizes from the recommended needle, but as this involved cables, I tried the recommended US 7. However, I didn't like the resulting fabric too much as I felt it was too dense, so I went up to a US 8 and got gauge.
  Raspberry Cardigan Gauge Swatch 

The swatches were washed & blocked, and I started knitting on the sweater. But I had to frog the beginnings of it once over, because I couldn't get the cabling correctly, because the front starts with a partial cable and as you increase stitches, you work the cable pattern. And my poor brain couldn't wrap itself around the concept, nor could I visually see how this was going to work.

I had re-written the pattern to work the sweater as a single piece (instead of having to seam panels), and my Excel spreadsheet was ACCURATE. However, it didn't take into account the visual aspects of the chart (although my iPad displays the chart easily enough.)

I had redid the cabling on both sides...frogged just the cabling...redid the cabling...then eventually frogged back to before the cabling started. sigh.

Then I hit on a simple solution: PAPER

My pattern is digital on my iPad, and my PDF reader has a nifty feature that allows me to highlight notes and some charts, but sometimes you need to have something in front of you that is visceral.

I printed out the cable chart and went through the pattern line-by-line with highlighter and pencil in hand, and marked out where increases happened and where it was the cable pattern for the Left Side. Then I repeated this exercise for the Right Side. Now I can clearly see how the cabling is going to look on the sweater.

Colored Charts
Hopefully, this trick will help me get this patterning right.

Oh, don't get me wrong. Using my iPad for reading patterns is awesome. I love it. And I will continue using my iPad. But sometimes, it helps to mark up a paper pattern just for notes. (I'll still be using my excel spreadsheet to refer to as I knit, however.)

Monday, July 16, 2012

ComiCon - a Love/Hate Thing....

Ah, Comic Con has come & gone. I have not yet gone to San Diego Comic Con, which some claim is the mecca of all geeky-ness. Although, I have attended similar, but smaller events, like San Francisco's Wonder Con.

I have many friends who go, but it is something I have yet to attend. In fact, I have a love / hate relationship with ComicCon.

Love:
  • a lot of geekyness can be had there.
  • Some of my favorite stars, authors, and show producers/directors attend
  • There are show previews and lots of swag
  • Stuff that you only see at ComiCon. (Not that I need stuff, but it'd be interesting to SEE)
Hates:
  • It's HUGE...50,000+ of your closest friends
  • Lines. You stand in line to get in line, for the line of the panel you want to attend.
  • You might only get to 1-2 panels the WHOLE weekend
  • It's turned very commercial
I WANT to go AND, simultaneously, I have no desire to go :-(

It's a conundrum, I tell you.

But, perhaps one day, we'll make the trek to go to Comic Con, then to just say we had.

Friday, July 13, 2012

FO: Blue Steel & Granite

Shortly after July 4th, I finished my UFO shawl-ette that I apparently had started in September 2010 (according to my Ravelry page)! I hadn't realized it had been that long.

I had put it down with only 3 inches left to finish. I have no idea why I put it down, but it feels good to finish it. And I really love how it looks striped. The yarn coloration worked out well.


IMG_1043

Thursday, July 5, 2012

Finished UFOs...

I've been on a UFO kick -- as in finishing up some unfinished objects. I had been feeling ennui on starting anything new, and I was cleaning up some of my knitting and came across some UFOs that I thought, "What the heck? Let me finish these up."

1) I started knitting on a UF shawl object (Age of Brass & Steel) that I started a while ago out of my handspun, Targhee.
Age of Brass & Steel Targhee 2ply


I have no idea why I put it down. I was about three inches from finishing. I'm currently working on finishing this project now.

2) I also managed to salvage a cardigan that I thought had to be frogged, but I procrastinated because it is knitted from pure alpaca and that is a royal pain to frog.

This particular sweater (started in '09) was the first cardigan I had attempted to knit, and had put down several times. I was nearly finished -- I had blocked the body pieces, seamed them together, and had added a hood. But the sleeves didn't work with the body, although I had followed the pattern exactly. I finally went back to Ravelry and read the comments --- a lot of people had issues with this pattern, esp. with things 'lining' up (heck, the body pieces didn't line up correctly and I had to do a lot of easing to make things work).

I had given up on the sweater and thrown it into the basket for a 'time out' because I was thoroughly frustrated with it. However, now that I had knitted several sweaters under my belt, I looked at the project with new eyes. I tried on the body and it did fit; it wasn't too badly off. The armscye was a little large, but a sleeve cap would help with that issue.

The sleeves were unusable w/o re-knitting them both. I could have picked up stitches around the armscye and knit 'after-thought' sleeves, but that would have been too much work and something I couldn't face doing considering how long this sweater had languished. So, I thought to myself:

"Self, why not turn this into a vest? You've done several already, and this would save your time".

And myself agreed. :-)

I picked up 87 stitches around each sleeve and knit several rounds of 8 roundseed stitch to form a sleeve cap (decreasing by 4 stitches total). Then I added a button & an i-cord button loop. About 1.5 hours later, I had a finished sweater vest, which pleased me mightily, as I really thought this project was a lost cause.
Salvadged Cardigan Salvaged Cardigan 3 Salvaged Cardigan 4
I still have a few UFOs still lazing about. We'll see if I get any more done after I finish the shawl. Although I have to say, it feels REALLY GOOD to get finish a languishing project.

Thursday, June 28, 2012

Ravelry v. USOC

I'm sure a lot of you by now have heard the kerfuffle regarding the US Olympic Comittee and their very insulting cease & desist letter to Ravelry.

In case you haven't, here are the pertinent links:

  • the cease & desist letter from the USOC legal council, which included terms like "disrespectful" and "denigrating" about our fiber arts
  • this letter led to an outcry from the Ravelry community regarding the tone of their letter on the USOC FB, twitter, and webpage. Places like Gawker picked up on the news.
  • The outcry led to a non-apology apology by the USOC Public Relations director, saying that it was a boilerplate letter and not meant to be insulting. There was another outcry from the Ravelry community about this non-apolgy apology. NPR picks up on the news.
  • FINALLY, an actual apology is finally given. (And apparently, their use of "denigrating" and very insulting tone IS boilerplate for the USOC.)

As an athlete (and former Olympic hopeful), I was deeply saddened & angered by the actions of the USOC. I wrote them a letter from the POV of an athlete and a knitter decrying their behaviour.

However, I have to say, that as a fiber artist, I was very proud of the Ravelry community for sticking together to defend its honor. It's really truly worth while to know that this "grass-roots" community embodies much of the Olympic spirit -- to work together and triumph together for the good of the whole.

This amusing Comic by Worsted for Wear pretty much sums up the initial letter:

Tuesday, June 12, 2012

I can haz gloves?

My neice & nephew love asking me for knitted gifts. This year, during our annual trip with our in-laws, my Youngest Nephew saw that I was wearing a pair of fingerless gloves.

Green Apple Mits

Because of our busy schedule, DH & I forgot to stop by the store to pick up a birthday present for him (the beginning of july) and bring it with us. I figured that I could just mail him a gift card (which he loves getting) instead.

But, just like last year, my nephew surprised me by asking for a pair of fingerless gloves for his birthday (which he again reminded me was coming up). And then he specified the colors he wanted. LOL. I had him try on my gloves, and while a little bit big on him, would at least last 1-2 years before he outgrew them.

Not wanting to be outdone, his older brother & sister immediately also asked for gloves too, but I told them that their brother would be getting HIS first and they'd get theirs for the holidays.

Now, I just to go pick up the appropriate color yarn from my LYS!

Sunday, June 10, 2012

Steampunk Rocket Launcher

Rocket Launchers are cool. And for steampunk? Even cooler. I think there's a lot more interesting cultures around the timeline of Steampunk (if you think mid 1800s-early 1900s), and more interesting technologies than just "steam". So, when I thought about my Steampunk Mulan outfit, I thought of rockets. The Chinese have had a long history of rocketry and combustion. They had portable rocket launchers in the Ming Dynasty (14-17th C). Plus, in terms of firearms, the same time frame saw automatic pistols, howitzer cannons, gatling guns, and the ilk.

  • http://www.chinahistoryforum.com/index.php?/topic/32533-the-ming-dynasty-rocket-arrows/
  • http://www.richardwindley.co.uk/series-4-rocket-ballista.html
  • Now, imagine if they continued to evolve their rocketry science! (This is historical based fantasy after all.)

    I decided to keep it simple however, because of time restrictions (about 1.5 weeks to finish), and went with the simple Chinese Rocket launcher, based on these plans.

    The rocket launcher had to be light, portable, and the right size for me to sling across my back and swing to the hip when needed. The arrows I had picked up from the Sporting good store were about 26" long, so the launcher had to be of an appropriate size.

    The trip to Michaels didn't yield enough balsa wood of the appropriate size, but it did give me a base starting point for the width. We decided that making it out of thick foam core board was an acceptable substitute (and save us time from having to run around even more looking for balsa wood). As soon as I got home, I made a prototype of 1/2 scale out of posterboard and masking tape.

    IMG_0941

    Having tested the general shape, I started cutting out the foam core board -- top width of 4.5", bottom width of 3.6 inches, and 27.5" long. It came together easily enough, although I had a bit of a hassle making the inner support structures that would hold the arrows in place, but eventually I got it.

    IMG_0942

    The whole thing was taped together with industrial strength tape. Then, it was modge-podged Sunday night, lightly sanded, then I added a coat of primer, and then the final coat of paint. (This took several days to ensure it dried well enough.)

    I also made some harmless "rockets" to attach to the arrows out of red thick paper, but I'm did consider using confetti poppers instead (and attaching a long string down each one to allow me to pop each one individually...)

    I found a very nice dragon stencil that I transfered over to a stencil film so that the outside could be decorated similarly to the actual Chinese launchers.

    IMG_0944IMG_0945

    Then, it was just a matter of making the straps & the backstrap to fit it. Of course, on hindsight, I should have made the straps before putting on the stencil, so that the straps wouldn't cover it, but ah well. It still looked pretty awesome.

    IMG_0962

    Friday, June 8, 2012

    Fourth Sweater of the Year

    I had been working on the Chic Knits Basic Hoodie since April 2012. Using some purple tweed of Cascade 220, it's been a really good knit. However, I did put it down a couple of times, especially to work on my Mogwai project that became my "popcorn" knitting (my own design).

    I finally managed to get it done at the beginning of June. It took me nearly a full evening to hand-sew on the grosgrain ribbon on both button bands, as well as sewing on the wonderful hand-made wood buttons I had bought on Etsy.

    I was trying to figure out how best to add the grosgrain ribbon onto the buttonhole side of the button band. I made a couple of different attempts, but I think I have found a solution that's not-so-elegant, but seems to work well. It involves grosgrain ribbon, pinking shears, and fray check. But before I write-up what I did, I want to see how well it holds up to a few wearings.

    And, of course, I finished this sweater just in time for the hot weather to hit on our area. Ah well....

    IMG_0996IMG_1001IMG_0999

    Thursday, June 7, 2012

    Chinese-esque Robe

    As part of my Clockwork Alchemy costume, I had to create a Chinese-esque robe that would work with the leather armor. Again, pictures are worth a thousand words, and help cut back on the amount of writing I have to do :-)

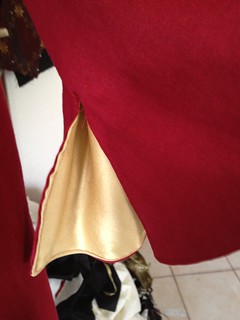
    I used some red linen with a inner gold lining.

    And I found some matching red trim at JoAnne's Fabrics. I had to go to 2 different stores and ended up with 17-18 yards of trim. I had two requirements for this trim: a) it had to match the fabric b) I had to be able to machine-sew the trim (some trims need to be hand-sewn onto a garment due to its shape.)

    IMG_1005

    17+ yards of trim was barely enough to line all of the edges.

    IMG_0940

    I wanted to add Chinese frogs for closures, but I couldn't find anything commercially that would work as most stores only sell black or white frogs. So I opted to make my own using some gold trim we had in our Stash. I found an excellent online tutorial for the frog closure I wanted.

    IMG_0970

    It was fiddly at first, but I got the hang of it.

    IMG_1007
    Sufficed to say, I got some nice compliments on the outfit, and it worked really well with the leather armor.

    Thursday, May 17, 2012

    Leather Armor

    I've gotten minimal knitting & spinning done, because I'm trying to get my costume ready for Clockwork Alchemy. The leather leg guards have been completed. It’s not very heavy, and very wearable, except that you can’t really “sit” with it on, as its based on cavalry armor. However straddling a chair or a stool? Completely comfortable.

    Overall, it’s been relatively easy to work on, except that it did take some time to complete, because this particular outfit can’t be just “sewed”....parts of it had to be molded to fit my body, which meant getting it wet, then letting it dry in the specific shape I wanted. Plus parts of it had to be glued down ...so that just takes time waiting for it to dry & cure.

    Here's a pictorial essay, because, photos are much better than words:

    Mockup

    Sample scales


    Templated Cuts

    Scales

    Molded Leather

    Molded scales v flat scales

    Riveted Together

    Leather leg guards

    Bound Edges

    Leg guards bound

    Grommeted Belt

    Belt grommet

    Completed Set

    Legs flat

    Right now, I'm working on the fabric portion of the costume, and have been sewing for the previous nights. I'll have photos of that later on when I get farther along.

    Monday, April 30, 2012

    Mogwai Project

    Mogwai Projects

    If you have listened to the podcast, Sandy & I talked about mogwai projects turning into gremlins, and how it can be avoided by following some simple advice:
    1. Don't feed them after midnight --- ie. Don't start a project after midnight, or when you're tired
    2. The light of day burns any gremlins into the ground --- ie. Waiting until the morning will put things in clearer perspective.
    This was my mogwai project that could have easily turned into a gremlin.
    It started with my Stained Glass handspun. I thought I wanted to weave with it (and even bought a warp yarn for it) but it's far too nummy to wrap onto a shuttle. I wanted to feel the yarn with my hands...hence knitting with it.
    Untitled
    In addition, I had some other criteria for it:
    •  it needed to be a form of neckwear, in particular, a scarf...and I HATE knitting scarves...but I wanted a skinny scarf to wear anywhere with anything that wasn't a "winter" scarf. * it had to show off the wonderful colors of the handspun.
    •  it needed to incorporate some form of lace -- not a lot, just enough.
    •  it should be a quick, easy knit --- preferably in the round and not involving garter stitch So I perused around Ravelry.
    It seemed that a "tube" scarf might do the trick, but I wasn't overly happy with just knitting stockinette stitch. I saw a couple of diagonal or bias knit scarves (like the Clapotis), but it involved flat knitting and not conducive to a skinny scarf. I looked at one of the patterns that was close to what I wanted, and started knitting a few rounds, then not like what I had done. However, it was "close" to what I wanted. So, I ripped the whole thing out, and using the spirit of the pattern, I sampled a few more times.....And I frogged the project several times over because I either:
    1. didn't like the width or
    2. didn't like how I was turning out.
    3. all of the above.

    Eventually, I managed to get something that was exactly what I wanted, but it took the better part of 2 hours to get to that point. If I had started this project shortly after midnight, I would have been up for that length of time, TRYING to get it right and getting frustrated because I was tired.

    Instead, I waited until the next day to cast-on, and give myself plenty of time to figure out the pattern while I was fresh. Now, it's turned into my "potato-chip" knitting. The colors of the handspun are working up really well. And it's soft and squishy to the touch.

    I've had to put aside my Basic Hoodie sweater to work on this scarf, because it's been so addicting to knit...and I don't normally like knitting scarves!


    Mogwai project

    So, disaster averted! My wonderful cute little Mogwai project could have turned into a nasty, ugly gremlin if I had not paid attention to the rules.