Monday, March 14, 2016

Designing My Own Cowl

After Stitches West, I got a hankering to knit myself up a cowl with the scrumptious cashmere/silk that I picked up from the Miss Babs booth -- Sojourn -- 65% cashmere / 35% silk. The colorways are "Pretty Wreckless" and "Bare". While "Pretty Wreckless" is definitely in my color palette, Bare is not. I had originally wanted to get a charcoal grey to mute the colors of "Pretty Wreckless", but they had sold out. :-(

The "Bare" natural color was a second choice, but it really makes the vibrancy of the colors pop!

Scrumptious yarn!

I knew that wanted something with a bit of colorwork and lace. I looked on Ravelry I wasn't 100% happy with many of the existing patterns, especially given my yardage. So I decided to design my own.

I went through a few of my stitch dictionaries and found some very simple lace patterning that didn't require too much mental effort to memorize.  I started off with a bit of lace, then moved on to some minimal strand work and stripes.


It started well enough, but then I would become unhappy with a section and have to frog.


And re-knit a section again. I couldn't make up my mind whether I wanted asymmetrical patterning or something that was relatively balanced


I ended up frogging quite a number of times. I was pleasantly surprised at how well the Miss Babs Sojourn held up to lot of frogging. A small halo developed, but it's cashmere, so I wasn't too surprised.

I read on Ravelry that many people had issues using Sojourn on metal needles, but since I use wood needles, I didn't have any issue.


I lost count of how many times I had to frog and re-knit sections. It took nearly two weeks to finish the knitting!

I haven't quite blocked it yet either, as it has been cold, so I've been wearing it instead.  Can I just say how SOFT and lovely this yarn is? I'm in love, and I have two more skeins of different colorways to use.


I have the pattern written down, which I need to complete and get it ready to put on Ravelry.


Wednesday, March 2, 2016

Stitches West 2016 Wrap-Up

In February, Sandy & I headed off to Stitches West in Santa Clara. We saw a LOT of fiber arts from knitting, to crochet, to felting. As always, there were a lot of very nerdy & geek themes abounding, like this felted R2D2 and Toothless dragon


And dinosaurs.

And Star Trek transporters.


I wore my 3-in-1 sweater from Atelier Alfa, which got a lot of compliments and knitters stopping me to ask WHAT sweater I was wearing.

During Stitches, I ran into Jasmin & Gigi from the Knitmore Girls podcast, who told me about the Podcast host meetup in the hotel bar. So, I went. And the bar was FULL of knitters, which was all kinds of awesome.


I met BostonJen from Down Cellar Studios, Twinset Jan from the Twinset podcast,  Jen from the Knitting Butterflies, Laura from the Knotty Girls Podcast,...and a whole slew of others.

In Stitches, they had an awesome design challenge for Knitted Knockers, an organization that knits breast prosthesis for women who have undergone mastectomies or other procedures to the breast (from their website).
A bunch of designers, such as Nicky Epstein, Lily Chin, all created knitted knockers. Some where true to life (kinda sorta)


While others were more ornately decorated.
It's a worthy cause, so please check out the link above!

Of course, Stitches is about the classes (which I didn't take) and the SHOPPING (which I DID do!) Because I had recently organized my Stash, I didn't feel like I needed much, but I did come away with some goodies.

I love hand-thrown mugs, especially one that has something to do with cats and yarn. (Plus it can hold about 12 oz of liquid).

I hit Miss Babs for some Yowza yarn (enough for a sweater) and discovered Sojourn -- a 65% cashmere & 35% silk blend, which I absolutely LOVE (more on that later....)


There might have been some self-striping yarn as well.

In addition, I picked up this special knitter edition pack, Knitters Against Swatches,  for the card game, Cards Against Humanity (CAH) from Slipped Stitch Studios. If you have played CAH, you should give it a try. The game is FOR adults, HAS R-rated language, can be quite "DIRTY", but is a helluva lot of FUN to play with the right people -- as their website says, "It's a card game for horrible people."


I can't wait to add this pack into the game and play with some fiber artists!

All-in-all, it was a most excellent time, and much shopping was had. I loved meeting all the new people and can't wait until next year.

Wednesday, February 24, 2016

DIY Geeky Pillow Cases

There is an often a dearth of practical geek goods that don't cost you an arm and a leg, like bedding. There are some out there, but they are often made for child size beds. The adult size geek bedding is often made out of crappy fabric --- I'm looking at you ThinkGeek and your polyester bedding! And I've been longing for my old Star Wars, Batman, and Holly Hobby ones (hey, don't judge...:-P)

(Edited to add: Someone just pointed to PotternBarn Kids, where they have QUEEN size sheets of the old Star Wars prints!! http://www.potterybarnkids.com/products/star-wars-sheeting/)

I've been wanting to remedy the situation for myself. So I was at the fabric store the other day and found some geeky type fabrics in the remnant bin of soft cotton flannel with each one was about not-quite 2 yards in length. I knew the perfect projects for them, and they only cost me $5.00 per remnant.

So I got to serging and sewing.
Since standard pillows measure 20x26, the amount I got was more than enough to make a good size pillow case. Plus, as pillow cases are rectangular, it took a total of 20 minutes to make two pillow cases.

The following diagram shows the dimensions I used for the pillow case.
 

(Note: This is a quick and dirty tutorial. There are more elegant ways to make a pillow, and certainly one with more construction effort. However, this is what I did.)

  1. WASH and DRY your fabric first before you start sewing. So, you know how much you actually will have before you start sewing. It'll be tragic to sew your case, then have it shrink in the wash.
  2. Measure & cut your fabric per the diagram.
    • I simply folded the fabric so I would have less sides to sew. However, you can also cut out two pieces of fabric instead.
    •  Pinking shears are your friend!
  3. (Optional) Serge all of the edges or use an zig-zag stitch (on your regular sewing machine)
  4. Fold over the fabric, as shown in the diagram, and measure accordingly.
  5. Pin the wrong sides together along the longer side. Sew both the long sides.
  6. Turn the Top Hem by 1" all around the edge. Pin in place then sew. (You can have a bigger top hem than what I did with mine. I was just constrained by how much fabric I had.)
  7. Turn right side out.
Viola! Finished pillow case!

I love flannel fabric. It's so soft and warm. Even one of the Boys helped me test drive it.


Monday, February 22, 2016

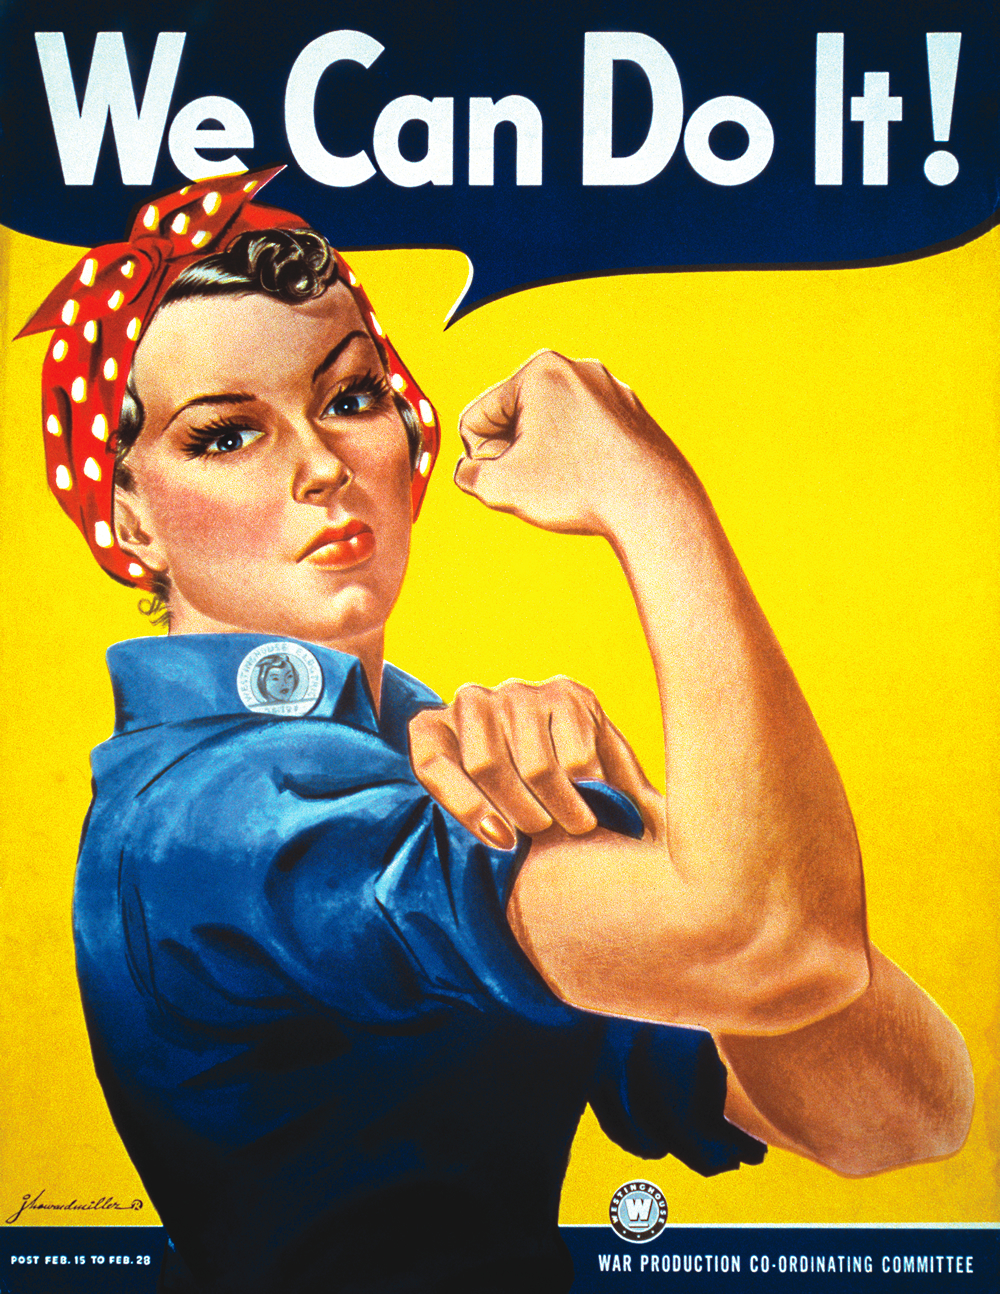
Rosie the TARDIS

I've always wanted to do a TARDIS-inspired outfit, but unfortunately, there are a bajillion versions of the TARDIS outfit, including a lot of commercially available TARDIS dresses and patterns, which are pretty cool-looking, but not unique to me.

From Her Universe.com From Simplicity Patterns

I wanted a different take on my TARDIS outfit. The idea finally came to me while I was prepping for the  world-record for a thousand Rosies that was being held in Richmond, CA. 


I was unable to actually attend the event, BUT, the idea stuck with me. Rosie wears a dark blue work coverall, which are close enough to TARDIS blue; the official Pantone color is 295CC (despite there being a number of different hues of the TARDIS over 50 years). I knew it'd be an easy costume to create. I could use the coveralls that I had purchased online for the event and re-purpose them into a most comfortable hall costume.


I took the extra POLICE BOX sign that I had created for my TARDIS messenger bag.


And sewed it to the back of the coveralls. I also made some "windows" for the back. I made different versions of the windows to see which one would work well.


First, I thought about just using fabric paint, but ended up using an applique stitch. (I ended up using the 3rd from the left.)

I took some of the patches that I had purchased previously and added them to the front -- because who doesn't have Doctor Who patches lying around? ;-)


Also, to simulate the Union pin on Rosie's collar, I added a Gallifreyean pin that I had purchased while at the convention.


Luckily, I already had a Dr. Who themed bandana to wear with it! I had made it back in August 2015. I just love being able to re-use the things I make into different costumes.


The result? One Rosie the TARDIS...although it's probably closer to Idris the TARDIS.
From one TARDIS to another

Rosie wears workboots in her poster, and I thought it appropo to wear the 10th Doctor's Converse shoes as a contrasting point for the outfit.


The outfit was utterly comfortable to wear around all day. AND, it had POCKETS so I could stick a plethora of Con-gear into them -- hotel key, wallet, phone, small knitting bag, fan, etc., Plus, it was a big hit amoung the other costumers as it was a completely different take on the entire TARDIS costume. I got stopped for photos quite frequently. My Dear Viking joked that next year at Gallifrey, we would see more Rosies.

Friday, February 19, 2016

GallifreyOne 2016 - ConReport

Earlier this month, I attended GallifreyOne, the Doctor Who convention, in Los Angeles. It's always held at the LAX Marriott hotel, and the hotel, itself, really gets into the swing of things.


There are some pretty amazing costumes at Gallifrey, like this Davros.


There were folks in "older" Doctor Who.

And new Doctor Who, and as evidenced by the photo, the same people cosplayed different eras of Whovian characters.

As always, there are some pretty creative fiber artists who make their costumes accordingly.

And some very creative takes on iconic pieces, like this Dalek Fez.

And some pretty awesome mashups -- like this 10th Doctor Jedi

There was even a T-Rex carrying around a small little TARDIS that she would occasionally spit out. :-)


I was on a couple of panels, including Doctor Who Crafts -- a panel for crafters that love Doctor Who. Topics ran from how to manage your crafting to how to make money from your crafts. I'm considering writing up an article about that for the blog.

I also was on a panel for Cosplay Diversity, which was also pretty interesting. My co-panelists were from different walks of life and we covered a range of topics at a fairly high level.


This was my first year doing panels at GallifreyOne, although I've done them for years at other conventions. I had a good time and met some pretty amazing people on them.

The guests were amazing. Sir John Hurt was one of them, and the crowds to listen to him being interviewed were huge. My DH Viking got Sir John Hurt's autograph on an ALIEN chestburster, because, well...that's just how he rolls.


I, of course, cosplayed throughout the convention, but only managed to get a few photos of me in them. One of them was my "comfy" costume, Rosie the TARDIS (which I'll post about later, including the making.)


Overall, it was a most excellent convention, and one that we're looking forward to attending again next year.