Have I mentioned that I love creating a cosplay so close to Halloween? There was really everything I needed in a given store!! I bought a relatively inexpensive pair of cat ears at the Halloween store that I planned on re-using. I took the fabric off the ears and planned to reuse the armature to make my own set.
I took the original ear and resized up to make it more inline with Catwoman's ears. I cut out two pieces of the stretch fabric and a piece of felt (left side) or added stability and to give the ears an actual feeling of heft. The finished ear is at the top.
Here are the complete set of ears.
The Julie Newmar and Lee Meriweather versions of Catwoman wore the ears like a headband. However, Earth Kitt's version wears them more like a tiara. I re-oriented the ear wire accordingly.
I tried on the ears for a test run, and they seemed to work well enough.
Here's the finished piece. I wasn't too happy with them, but they seemed to work just fine...at this point.
In addition to the ears, I had to recreate Eartha's hair. The braided part was going to be easy --- I was going to make a fake braid using hair extensions and clip it into my own hair. The look of the ponytail? That was harder. I considered any number of options on how to make my own long hair do that and experimented for a few nights on achieving that look -- with much frustration. I am not an hair expert by any means, relying on mostly wigs to accomplish that cosplay look that I want, but as I couldn't get my hair to do that, I would have to get extensions or a fake hairpiece.
When I went to Sally Beauty Supply to buy extensions for the braid, I showed one of the girls what I wanted to do, she led me directly over to this little beauty! It's a fake pony tail that you wrap around your own hair when it's in a bun. I tried it at home, and it worked PERFECTLY. (Unfortunately, you don't get any photos at this point, but sufficed to say, it matches the look exactly). Thank you hair experts!
For the braid, I bought the longest braid extension I could find in my hair color --- a whopping 52" long. It costs maybe $3.00USD for this Kanekalon braid. (Human hair is much much more expensive.)
I secured the ends with a flat elastic (5/8") to secure the ends. You can use anything here that is stretchy, like t-shirt material. I sewed a large wig clip to that fabric. The wig clip would allow me to attach
(I actually re-did this section so that the fabric would completely cover the end of the hair)
This is the thicker braid with the ears. The look is nearly spot on (given that my hair is a mess) At this point, I was having an issue with the headband. It kept wanting to "pop" up and wouldn't sit correctly with the braid.
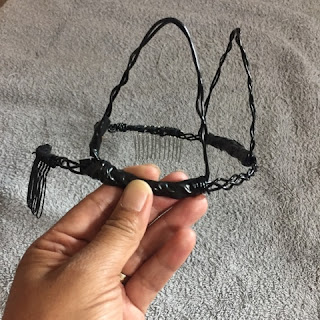
I was unhappy with how it looked, so I decided to re-make the armature completely. I picked up some wire from the craft store -- 2 packs of 14 guage and one pack of 16 gauge. I would have preferred a thicker gauge but they were sold out.
And some hair combs --- they also ran out of black, so I picked up a silver one. It'll be buried in my hair and covered.
Instead, I braided the gauge for some strength and then attached the combs using heavy thread.
I made the ears out of the heavier gauge. I doubled it up for added strength.
(Note -- the third hand
is an awesome accessory to have around. I've used it multiple times for
this cosplay outfit and will be using it more in the future!)
- Attached the ears to the headband using the thinner gauge wire.
- Used vinyl electrical tape to add wrap any sharper edges on the headband.
I used the same exact fabric pieces from the original headband. In addition, I tacked down the very bottom of the ear with 2-3 stitches so that it bends the light, giving a shadow appearance to very black fabric.
And here's the final ears along with the mask. I'm fairly pleased with how this costume is turning out!
Now, I didn't quite make them exactly like the original ears. For one, the headband is also covered in fabric as you can see of this closeup of one of the above photos, but I figure that the headband should be hidden behind the braid, so I saw no point. I might add them at a later date, but for now, it's good enough.
Read the other parts of this Catwoman Dress Diary!


No comments:
Post a Comment