Wednesday, December 24, 2014

Making My Own Tardis Bag (Part 2) - Embroidering the Sign


After I made my test embroidery piece, I sized it on my mockup bag to determine how wide I wanted the final sign. It turned out that including the seam allowances, the sign would be approximately 5 inches (12.7cm) wide and 16 inches (40.64cm) long.


Here's how it looks on my machine.


Here's the final piece on black denim. The hoop is 360 x 150 mm. I used a stabilizer on the back of the fabric. It required a bit of babysitting (mostly to prevent the cats from jumping up to see what was happening).


Unfortunately, I had to make two signs. On the very first version, the "X" of box got mangled when the bobbin thread managed to "catch" somehow. I managed to fix it, but it wasn't quite perfect, so I opted to make a second version. Luckily, the second version had no issues.

(The first version of the sign)

I made the piece about 18" x 5" to give me enough of a seam allowance to create the front flap.

Next up...making it bigger on the inside.....adding pocketsess!

You can also find more posts about making this bag by searching on TARDIS MESSENGER BAG or click on the following links:

Tuesday, December 23, 2014

Making My Own Tardis Bag

I love bags, especially messenger bags, backpacks, and small daypacks. I also love Doctor Who, and decided that I needed a Tardis messenger bag, especially to carry around at conventions (especially Gallifrey One -- the Dr. Who Convention!)

I took some measurements of one of my favorite messenger bags that I wanted to emulate, and sketched out how I wanted my Tardis bag to look like, including the inside pockets.


I was pretty much prepared to create the pattern from scratch, but then I found this pattern (for sale at JoAnns for $0.99), which I would use as the basis.


I made a mockup using this pattern, and while it was approximately the correct size that I wanted, it had a few things that I didn't like (how the pockets were arranged, how the gusset was added, and a few other nitpicks). However, the mockup helped me figure out the placement of all of the pieces (such as the Police Box sign and the window pieces). Also, by making a mockup, I opted to change some of the pocket designs around a little bit to be more usable for me.


For the fabric actual bag, I decided to use: 
  • navy blue denim  -- leftover from Han Solo pants
  • black denim twill -- leftover from my Han Solo A New Hope Vest
  • a planetary cotton print that I found at Joanns -- I was looking for something that reminded me of the Time Vortex, but this worked just as well.


As part of my Tardis bag, I needed the iconic sign that read:


I could opt to make this piece by using fabric paint and a template OR I could embroider it. And as my sewing machine has an embroidery feature, guess which I decided to use?

After doing a bit of checking, I discovered that the official font from the BBC is Gill Sans, but, unfortunately, that font requires a purchase. However, I found a close enough (not really, but it looks good) font called London Tube.

Unfortunately, I had some issues with my embroidery software -- I had to reinstall it and it no longer recognized the software "dongle" that is used as a license. I opted to simply digitize the font (which didn't require the license), and then use that font and create the sign in the machine. However, because I didn't have full use of the software, it meant I couldn't actually add the phrase, "PUBLIC CALL" in the sign. So, I simply opted to have POLICE BOX instead. (In the meantime, I have a support email to the software company to help diagnose my issue with the dongle.)

My font digitizer did a decent job translating the font. I made several different sizes (1.5", 2", 0.5", etc) to test. For my first test run, I used 1.5" font size, which worked out well.


So, after some additional testing, I got to actual sewing the bag.

You can also find more posts about making this bag by searching on TARDIS MESSENGER BAG or click on the following links:

Monday, December 22, 2014

Catch-Up Post: Knitting Start-tosis

Wow, it's almost the end of the year, and I realize that the past two months I have not been writing as much as I should be, all things considering. However, as these two months coincide with the holidays, it's not surprising that I've been busy.

Of course, with being busy, I've also had a lot of bouts of start-itis ...or is it start-osis...over the past two months.

Despite not having finished my 3-in-1 sweater (although I am working on the sleeves), my Unleaving shawl (called the Scottish Thistle), and my Portland Fall socks, I started two new projects because I couldn't help myself.

In the beginning of November, I received in the mail two balls of amazing hand dyed self-striped yarn from Stray Cat Yarns (in New Zealand).  They are superwash merino (75%) and nylon (25%).


The yarn came in these wonderful little boxes. (Presentation is a definite 10!) The colors are amazing, and I just absolutely had to start on knitting socks right away (even though, I hadn't yet finished my Portland Fall socks yet).

(Colors: Milly Molly Mandy & Electric Avenue)


I cast on a pair of socks out of the Milly Molly Mandy, which apparently is a children's book series that I didn't know about. I love the colors, and the yarn is a lovely knit. And best of all, each series of 3 stripes is nearly one inch, which makes determining the length of the sock really very easy!


In addition, during the Thanksgiving holiday, I cast on a shawl (Eagle Twist) using Dream in Color Smooshy in red & gold. I love how the shawl looks. However, it does contain a lot of short rows (and I dislike short rows).


Have you ever noticed that you tend to like patterns where you're not particular fond of parts of the construction? I don't like short rows, and yet here I am with two relatively large projects that have short rows (this shawl and my 3-in-1 sweater). Go figure.

The Dream in Color Smooshy yarn is wonderful to use and is taking a beating with some frogging that I had to do (because I couldn't count). I'm really liking it, and will probably acquire more in the future.

The other project hasn't quite made it to the actual start stage as of yet. However, I did have all of the skeins wound up into balls, bought the pattern, AND gauge swatched. I'll post more on that later.


Wednesday, December 10, 2014

Holiday Beading

For the holidays, we go to visit our family and spend a few days with them. It's a time of joy, eating a ton of food, and spending time with our loved ones.

It's also the time when my SIL and I sit down and play with beads! The day after Thanksgiving, she brought out all of her bead boxes and we set to play! I brought my own beading supplies with me, but hers are far greater than mine.


Unfortunately, we didn't get a whole lot of time to bead too much, but I did get some lovely pieces done. I had a few pendants in my beading box that needed to get strung and beaded.

I purchased this bronze cast dragon a few years ago and had unsuccessfully made anything with it.
The Asian dragon is often depicted chasing the pearl of wisdom, so I used bronze coloured pearls. The jade stones represent Asia. The red stones are horn. The red beads added enough character to make this necklace work. I had previously tried using all jade or all pearls (and various combinations), but it wasn't until I added the red beads that it all came together. I primarily used the red horn because it is very light and durable, and helps offset the weight of the bronze dragon.

Pendant: Bronze cast dragon.
Beads: jade, pearl, and horn.

I had bought the silver pendant from a museum store and it sat unworn for quite a number of years. The Ancient Egyptians often used carnelian and lapis in their necklaces as well as a form of powdered quartz beads called "faience". My SIL had some glass beads that reminded me of faience (but not quite), so I intermingled the two along with silver spacer beads that had an Egyptian-esque feel to them.

Pendant: Ancient Egyptian goddess, Sekhmet
Beads: Silver, Carnelian, Lapis, and Glass

This piece had been sitting for quite some time. I bought it while I was in Venice, Italy. The heart was a hand-blown Murano glass, but it had been strung with cheap plastic beads and the whole piece was quite ugly & gaudy, but I had fallen in love with the heart pendant. I had bought some 'matching' red glass beads from a store and set up about to re-make it to show case the lovely "heart" and remind me of our vacation.
Pendant: Murano Red Glass
Beads: Czech glass and pearls

Monday, December 8, 2014

Sewing: Project Bags Galore

I've been trying to get back into sewing, but between the holidays, time constraints, and other projects, I haven't been able to really dive into any new larger projects. So, in lieu of larger sewing projects, I've been working on small project bags that only take about 20 minutes to make each one. It satisfies a quick need to just make something small without a lot of effort. It's the basic pattern I've used to make small project bags.

Also, I participated in a knitting swap for the Savvy Girls Podcast (Swapetition 2), so I also made some project bags for my secret swappee. I think it's a nice personlized touch.

I found some lovely remnant fabric at Joann's Fabrics that were just enough to make a project bag or two....

(My swapee received a project bag big enough for socks)

...including this lovely print of Disney Villainess. It made a nice medium size bag that is big enough for a sport-weight shawl project.

I had this fabric in my StashTM that I purchased from the LA Garment District. If you look closely, it has tiny skulls in the middle of the fleur de lises. It made a very nice reticule for some of my historical clothing (and double as a knitting project bag).

My Boys were on hand to help supervise the making of the bags. Little do they realize that it's primarily to keep them out of my fiber!


Tuesday, November 18, 2014

Working & Knitting

At my last job, I had a fairly long commute  (minimum of 30 minutes each way) in which I had a lot of knitting time. While I was there, I got numerous sweaters, socks, and other knitted goods done.

When I got my new job, my commute dropped down to 20 minutes (walking) then 12 minutes (riding a bicycle), which was all sorts of awesome. But my shortened commute severely cut into my knitting time and, consequently, the number of finished objects I've been able to accomplish.

However, for the past couple of months, I've discovered new knitting time at work --- the dreaded meeting! I often have meetings that merely require minimal participation on my end, but that do require my attention.


I have found it an excellent source of uninterrupted knitting time where I can knit some mindless things, such as vanilla socks. I tend to have meetings that total at least 6 hours per week.

I usually knit something that is very simple and doesn't take up much room. I tend to knit just under the meeting table as to not distract anyone (so no sweaters or complicated lace). As a result, I've gotten a few simple hats and vanilla socks done! 


My fellow employees are always surprised to find me knitting (as I tend to keep the knitting under the table or from plain view). And everyone pretty much marvels how I can knit and be in the meeting at the same time. I had one manager remark at how amazed that I could knit and hold a discussion at the same time. Of course, every knitter knows that this is pretty much cake and is a good way to keep yourself attentive.

Many ask why I knit in meetings. I often point out that many people aren't paying attention by either working on their laptops or reading their phones. At least, I pay attention while knitting, which they can't dispute. And no one ever challenges me or asks me to stop. In fact, most of the managers and other bosses find it awesome. :-)

It's nice to find some dedicated knitting time during the day. While I don't like meetings (who doesn't), I tend to not dread the boredom anymore.

Friday, November 7, 2014

Aliens!

Technically, I'm supposed to be on a fabric diet, as my Viking & I have a ton of fabric already. We're only allowed a few things -- gift fabric, lining fabric, etc. But then, you see something and you just fall in love.

Case in point.....

I mean, cute little green aliens! What's not to love? And with a sale at Joann's plus a 20% off a total purchase coupon, it's even a double score! So, I picked up 2.25 yards of it to make new jammies. I washed the fabric before I left for Portland and promptly forgot about my cute little aliens.

I realized that it had been nearly 3 weeks since I last sewed anything, and I was getting the urge to make sew. But, I didn't want to completely dive into a long term project, so I decided to pull out my aliens and make myself pajamas.

(Apparently, November is the month to make pajamas, because I checked my old posts, and it was November 2013 that I made my last set of jammies for the Pajama-Jam-Jam at Purlescence Yarns last year).

I ironed the fabric, and cut out the all-too-familiar pattern I had used previously (with my previous set of modifications -- elastic waistband instead of drawstrings.)


Luckily, I have a ton of elastic. (Part of my modification to the pattern is to add 2 inches at the top of the waist to allow me to fold over a waistband to accommodate the 1.5" elastic band)


Unfortunately, I realized as I was cutting it that I did not have quite enough fabric; the pattern called for 2 5/8 yards. So, I decided to merely serge the bottom of the pajamas instead of having a fold over hem, which would give me enough yardage.

Cutting, sewing, and pressing the fabric into pajama shape was very easy and quick. (And yes, I do press all my seams, even for pajamas).


And of course, the cats found the fabric scraps enticing.....


I love the colours.


It was a quick and easy project that I was able to complete in 2 hours, and satisfied the sewing itch. Plus, it now gives me an additional pair of warm flannel pajamas to wear that goes with the motley of other jammies I made previously.

Tuesday, November 4, 2014

Knitting in Portland

Recently, I went on a trip up to Portland, OR with my DH, the Viking, and a very good friend to relax, see friends, and have fun.

If you ever have a chance to go to Portland, you should. Knitters are everywhere in Portland. It's so fiber friendly. I don't know how many knitters I ran into whilst there but I have a bunch of new Ravelry contacts now. Plus, it's almost always sweater weather in Portland. Nearly everyone had some form of knitwear, from hats, scarves, to sweaters about. (And I was no exception. I actually got to wear some sweaters there!)

Like a good knitter, I planned what knitting projects to take, because I didn't want to be without (before I even packed my clothes).
  1. A project that I could sit, knit, and talk without problems whilst hanging out at the pub with friends -- socks, naturally. 
  2. A project that I could knit that required a modicum of attention, but not too much -- a stockinette sweater with short row shaping. 
  3. A project that required some concentration for the flight there & back...or when I had some spare cycles to devote to it --- a psuedo-lace shawl.
I finished my socks about half way through the trip. They were perfect for knitting at the pub, at the movie theatre, or when riding in the car for short trips. As an added bonus, I got to wear them during trip.


We did the required stop at Voodoo Doughnuts.

I also brought some extra sock yarn with me, just in case. So once these socks were finished, I cast on another pair, and promptly got about 1/3 of the way through the sock.

While I primarily knitted my socks whilst out and about, I did accomplish other knitting.  I found that I had a few mornings to myself at the restaurant cafe, whilst DH and my friends slept in later than I did. The staff were extremely nice and helpful and let me knit unmolested for quite some time whilst refreshing my tea. This is the 3-in-1 sweater.

Knitting by Friday

In two days, I got a lot of knitting done on the sweater, even with the short rows, during my breakfasts.
Knitting by Saturday


There was also time to knit on my lace-y shawl, (Unleaving Pattern in Knitty), but mostly on the plane. However, I got a good 6 inches accomplished on it. 


A few folks asked me about the app I was using to keep track of my lace & sweater knitting. They were fascinated, and I was more than happy to tell them about the KnitCompanion app, which I reviewed last year. I highly recommend it. It allows me to carry all of my patterns and keep track of where I am in each pattern so I can switch projects as necessary.

I was very surprised at how much knitting I got done on my trip. I thought I overplanned (like usual), but it turns out that it was enough. I had a good combination of down time and activity that allowed for a lot of knitting -- which left me with a chunk of knitting done on two projects, one FO, and one new project! It was a very relaxing vacation.

However, potential tragedy might have struck my in Portland, save for the very friendly town. We watched a late night movie at the hotel we were staying at over our trip (yes, they had their own movie theatre).

While waiting at the theatre lobby for the previous movie to end (and knitting), I dropped my spare pair knitting needles and the hotel staff remembered who was knitting, and found me in the dark to return them to me!!

We saw Army of Darkness that night.

Talk about customer service and memory!

The only thing I did NOT get to do in Portland was visit the yarn shops, only because when we managed to get to downtown Portland, I kinda lost all track of time at the mecca of bookstores, Powell's Books, and by the time we left, all of the yarn shops had closed. 


I'm not sure if that makes me a bad knitter or a really good geek!

I did see a few from the outside, and they did look lovely.  After all, I didn't really need anymore yarn, right? At least, that is what I'm telling myself.

I highly recommend visiting Portland if you ever get a chance. We do have family there, and I will be returning...and next time, I'll definitely be going to the yarn shops!

Monday, October 27, 2014

FO Wrap up!

I'm a bit behind on my blogging activities as of late, mostly because I've been knitting and have managed to finish a few projects that have been languishing on the needles. I'm also still working on my quiver, but I'm missing some hardware that I need to buy, so that project is languishing now until I can get to the store.

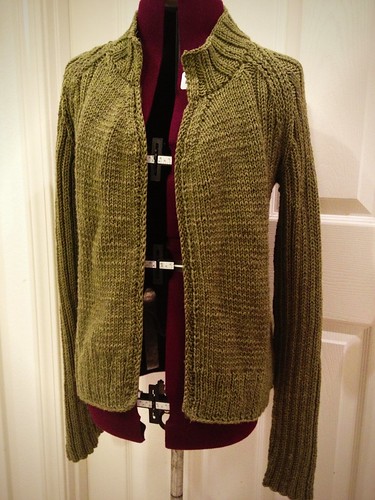
First, I finished my Ribby Cardigan by Bonne Marie Burns using Cascade Greenland (discontinued). It came out lovely. I added grosgrain ribbon to the edge, but have not yet put in a zipper because I can't seem to find one in the right size or appropriate color (either matching or contrasting). However, I have worn it a few times without it as I tend not to close my cardigans.

Scotch Moss Cardigan - full

I also finished a hat, but it's for a gift for someone who reads this blog, so I can't post it here. In addition, I've been working on socks, and used my cat as a prop for a photo of the finished object.


Of course, when he woke up, he was like, "What is this? SOCKS? Nom nom nom!"

(He actually didn't hurt the socks, but it was a cute photo.)

Wednesday, October 15, 2014

Archery Leads to Leatherworking (Part 3)

Once the quiver had been stained appropriately, it was time to turn the flat piece of leather into a tube to hold arrows. Leather stitching is a bit of a tricky animal at times, but one of my go-to books on the subject is very helpful.


I had punched holes into the leather for stitching and lacing prior to making it into a tube. However,  trying to wrangle the leather into a tube was fairly difficult until I managed to get a third of the way. And then it was smooth sailing. (This is when I find myself wishing for several sets of arms to help)


Once I was done, the patterning on the stitching looks like this:

Once the tube was completed, I added the bottom stopper to the quiver, which was a royal pain in the arse to attach to the tube despite having lined up the holes on the quiver and the stopper. It took about 2 hours to finish.


Afterwards, I laced the top of the quiver with a "Single Loop Lacing".


Here's the final quiver.


Now, it's a matter of putting on the appropriate hardware so that it hangs correctly at my side or on my back. (To be continued.... Additional posts about this topic can be found here.)