Thursday, October 29, 2015

Cosplaying Missy: Planning Stages

One of my upcoming projects is Missy from the Doctor Who series. Luckily for me, there's been a lot of research done on this costume by many costumers, including a friend, BritGeekGirl, who has been a Doctor Who fan all of her life. She created two specific Pinterest boards for the Season 9 and Season 8 version of the costumes:


Because there's been so much research into the costume --- the lines of the outift, the trim, buttons, etc., --- I can just concentrate on making the outfit without worrying too much that I'm missing "something". However, I still have to do my own legwork in finding the appropriate color wool for her outfit, a suitable left-facing cameo, and other accessories.

But, first, I have to figure out what pattern I can modify to be close to the Missy costume, which is an interpretation of a late Victorian/early Edwardian clothing. Luckily for me, I have fair number of historical patterns.

So, I went to my historical pattern bin and looked through many of them to see what would work for Missy. I came up with three possible candidates for her jacket.


All three would require modifications, but they are a good basis to start and do the modifications as needed. For now, I might start with the Truly Victorian pattern and make alterations. Why? Because the Truly Victorian patterns are really good patterns, whereas Rocking Horse & Reconstructing History patterns are often quite difficult to decipher their instructions.

For the skirt, I have a Victorian gore skirt from Laughing Moon that should work well enough with modifications for Missy's outfit.

Now, it's just a matter of creating the mockups and getting it to fit correctly and look close enough to the screen version. I still have to look for the appropriate wool for the jacket and skirt, but the mockup should fit well first. I have several months for Gallifrey to finish the outfit. It shouldn't be THAT hard? :-)

Monday, October 19, 2015

Cosplay Planning Stages

I'm starting to plan out my next set of cosplay outfits for the upcoming year. There are a number of conventions and events that I'll be attending next year, so I have an extensive list of costumes that I need to be created with specific time frames -- about 8 full costumes and several smaller costume pieces (not including props). What costumes do I have in mind, you ask? Well, you'll find out soon enough as I post my cosplay diaries. :-)

As part of my preparatory work, I started going through my fairly large collection of patterns -- both commercial patterns (such as McCalls, Simplicity, etc)...


...and speciality patterns (such as Truly Victorian, Reconstructing History, Folkwear, etc.)


I usually buy my commercial patterns from big box stores when they have their sales where patterns are anywhere from $0.99  - $2.00 per pattern.

While I'm fully capable of drafting out my own patterns, I don't like having to do it. Although I have drafted my own patterns since there was nothing even close commercially. I try to use pre-made pattern whenever possible. 


Eventually, after some consideration, I found the patterns that should work the costumes that I need to make, with some modifications.


I also dug through our extensive Fabric Stash (TM) and found appropriate fabric for use for a December event.


Now, it's time to wash and iron muslin to create some cosplay outfits!

Thursday, October 15, 2015

FO: Lava Socks!

I realized that I had been so busy posting about my cosplays that I have completely neglected posting anything about fiber arts as of late. Although, admittedly, I haven't had much in terms of a lot of finished objects. Plus, as I am knitting a lot of solid color projects, it almost seems like there's no progress on some of them.

However, for now, I shall give you this one! I finished this last month (yes, I know, I'm super late in even posting about it). I bought some self-striping yarn at my LYS. They had this colorway specifically made for them -- they wanted something with fire. The dyer came back with this beautiful colorway called "Pele" -- after the Hawaiian goddess of the volcano.

It's a lovely dark grey (for the rocks) and a variegated striped section of yellows, oranges, and reds. I love the combination of self-striping and variegated colors. Plus, the yarn is really a delight to knit.

As a precaution, I took a page out of the Knitmore's playbook, and performed a citric acid soak on the socks, as a precautionary measure. It was well worth the 5 minutes of extra time to perform this little task to ensure that the colors don't bleed, run, or fade.

Then, of course, I realized that these are also the colors of the Gryffindor House from the Harry Potter Universe.


I'm okay with that.

Yarn: Berry Colorful Yarnings - Saturated Sport, Self-Striping
Colorway: Pele -- special custom dye from Purlescence Yarns.

Tuesday, October 6, 2015

Cosplaying Hawkingbird: Best in Show

ConVolution 2015 has come and gon, and we had an awesome time. There were a few people who recognized the cosplay, but many actually confused it with the Huntress (which is another cosplay that I want to do.) It was okay, and I didn't mind the confusion. There weren't a lot of comic book fans at ConVolution. I do hope to wear it again for Fanime, where there are a lot of Marvel geeks who attend or maybe even SDCC.

Overall, the costume was pretty comfortable to wear. I wore it for the Masquerade, out to the Dance, and for some of the parties afterwards. However, I did ditch the bow for the dance and parties, just because I didn't want to have to carry a cumbersome prop around with me in close quarters....or where I could potentially lose it by setting it down and either forgetting or someone taking it. After all, I did use my real bow for the Masquerade. I'm also really glad that I opted to not carry the sword with me as well. It would have been really too much to haul ALL that stuff around.


The Making of....

The Masquerade - Best in Show

It wasn't our initial intention to enter the masquerade with our costumes, but we decided a few weeks before the Con that we would.  It was a scramble to figure out an appropriate skit -- ideas were bantered about for a while we figured out what skit we wanted to do, determine what music would be best, then record voice-overs and intros appropriately. Even then, I had to put together the audio file for the masquerade late Friday evening (as the actual masquerade was on Saturday.) My Viking acted as our physics-defying ninja, but we also had to find a willing vic...errr...volunteer to help us out on stage, merely as an extra.  Things got a bit hectic in trying to organize everything, but it was well worth it.

Our skit went off with minimal issues. First, I totally forgot to wear my gloves on stage. Then there was a few missed cues as we didn't quite do extensive practicing, but the audience laughed at the appropriate times so no one really noticed. Overall, it went about as well as to be expected, so I was happy it it overall.

We won Best in Show for our skit, Too Many Archers, as well as winning a workmanship award for Best Accessories. The presentation judge told us that he nearly fell out of his chair as he was laughing so hard.

(Photo courtesy of Baron Law)

I honestly can't wait to see the skit on video, because I'd like to see it from the audience perspective. I was too busy concerned with not screwing up any more cues so I wasn't paying too much attention.

Here are the characters that were cosplayed by BaronLaw and I.


And final photos just after the masquerade.

It's not too shabby, even if I do say so myself. I will post the videos once they are available online for anyone interested in seeing our skit.

Wednesday, September 30, 2015

Cosplaying Hawkingbird: Making Arrows

It's a couple day before Convolution 2016, and this is probably the 2nd to last project entries for this cosplay. I'll get photos of myself and my partner together.


Bow Props

As Hawkingbird is an archer -- something that I am proud to also call myself -- I figured it was going to be relatively easy to put together her archery weaponry.  I was proved wrong. I should really learn that things that appear easy, tend to not be THAT easy.

I didn't need to make any bow, because I already have a bow -- a simple Samick Sage.


The bow is pretty light, but I wanted to make a bow sling --- in purple -- for me to hold it with little effort, so I learned how to make one from paracord, using various tutorials on the web (like this Indestructible tut and others).

My prototype of the sling was made out of black & red. I made a 4-strand braid first, then added a cobra braid.

4-strand braid & cobra braid

I added some "bling" to my cobra braid by stringing the green cord and adding some large beads I found at the store.


I made a purple & black version, which I forgot to take photos of, but you get the gist. Then, it was a matter of making the leather piece for the braid. I made a quick template, based on some photos I saw online, then cut out the piece from some scrap leather that I had.


It came out a little bigger than I anticipated. However, luckily, I found a seller on ebay that sold them for about $3.00 a piece, which is a lot less than I can make it, so I ordered one.

But I still needed arrows for the costume. The arrows were easier to make than the mask or belt, but some work had to be put into it.  First, I couldn't use my REAL arrows, because they are weapons with sharp point tips and can be potentially dangerous, so I didn't want to use them. Plus, I wanted to be larger than life. (Real arrows are tiny things that you don't realize are arrows because they're small in order for them to fly very far at very fast speeds.)

Building Arrowheads

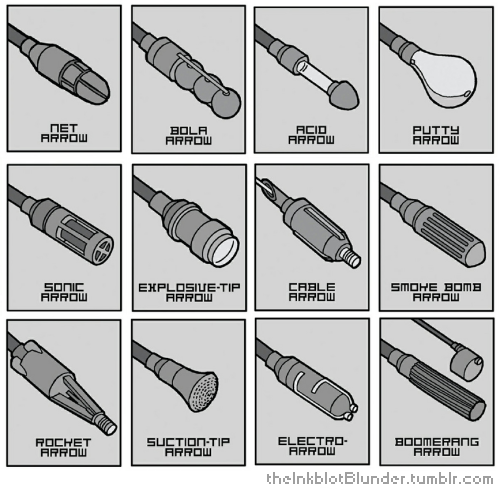
I started making arrow heads using my 3D printer at work. The "real Hawkeye" (aka Clint Barton) had his own set of special arrows.


Luckily, I found a 3D print file that let me print out some of them.


You might recall me discussing printing out cosplay props in a previous post. I printed several different types, which came out looking great.

Building Arrow Shafts

What's an arrow head without shafts?  I know that some cosplayers use wooden dowels to build their arrows. However, I had a easier source of arrows. My archery club has old unused arrows that are discarded by other archers. They told me I could use them for any purpose, as long as it wasn't for shooting.  So, I picked up a few very fat arrow shafts.

I primed and spray painted a deep dark purple, as all of Hawkingbird's outfit is a deep dark purple. Then I finished them off with a gloss coating


Fletching Arrows

All arrows need fletches, which act as stabilizers when they fly through the air. I was going to get some large feather fletchings from the archery store, but then found out that they were super expensive for what is simply a costume prop. (If I was putting them on REAL arrows, sure...but, they were $5.00 a piece and I needed about 9 of them, so no.) 

I thought, "Okay, how hard can it be to actually make my own fletchings?" The answer is....not as easy as I thought. An entire profession was once based on being able to fletch arrows. However, I did manage to make passable fletchings. They aren't suitable for real arrows, but look good enough for cosplay.

I got some turkey feathers from my local craft store for about $3.00.

I split the feather in half, cutting down the spine using an exacto knife. This is harder than it sounds. 
TIP: Start at the top of the feather instead of the bottom quill. Make a very short cut towards the top of the feather, then continue making small cuts until you reach the "quill" part of the feather.

Then I shaved down the uneven bits of the feather so that it would attach easier to the arrows.

Afterwards, I cut them into appropriate sizes for my arrows. In my case, as the arrows are really fat, I made four inch vanes.

Luckily, as an archer myself, I have a fletching jig, which helps me correctly place the feathers into place. If you don't have one, put a very thin line of super glue onto your feather and place the first one onto your arrow. Then equally space 3-4 feathers around the shaft.


I opted for three fletches because it's my preference for my real arrows. And I didn't have that many feather vanes. However, the finished arrow looks pretty darn good! 

Here's an entire quiver of arrows.


And here are my prop arrows versus my real arrows for comparison.
(left-to-right: Fake, Aluminum, Carbon Fiber)

Insofar as props, these were easier than the others, although the battle staves only required minimal effort on my part, but I really liked how they came out.

A little effort went a long way.


For those following at home:

The Making of....


Tuesday, September 29, 2015

Cosplaying Hawkingbird: Mockingbird's Mask

I started working on Kate's mask quite a while ago, and it's proving a little bit more difficult than anticipated, only because of the materials that I decided to use. I've made masks before, usually out of fabric. So my first attempt was to make this out of the same fabric as the dress.

However, I realized that masks I make out of fabric are often very much embellished with trim, which can hid a lot of the sewing seams. This did not work with the very simple Mockingbird mask. So, I had to try a different type of material instead.

Making the template is easy enough. I had my Viking take measurements of my face --
  • the distance between my eyes
  • the distance from my eye to my ear.
  • the length of my nose as well as my eyes
I measured out the distances on paper, and then sketched out an approximate look for my mask. It looks strange because the mask wraps around the face and appears elongated on a 2D surface. Because my face was relatively symmetrical, I completed the pattern on one side only.


Then traced out half of the pattern on drafting paper, because they are symmetrical and I was going to be cutting out fabric.

I cut out my first attempt on millinery fabric called buckram.

I took a look at Kate's mask on the comic book again, as well various renditions of Mockingbird's Mask, and noticed that there was a notch at the edge that isn't apparent in some frames of the comic book.


So I re-did my mask template. And started cutting out the fabric, which I attached to fusible interfacing so that it would be stiffer.

First, I tried to glue the fabric onto the buckram, which didn't look great, so I opted to sew instead, which is a pain to do, especially around the eyes. Sewing proved to be tedious and completely time consuming.


I made several prototypes trying different techniques, and most of them proved to be failures...or not quite the look I wanted. The finished masks were too fiddly to create and didn't have the stiffness that I wanted.

I abandoned the idea of using fabric, and went back to use the worbla instead. I traced out my paper template onto the worbla and cut it out. I shaped the mask to my face.

I cut out a bit more worbla for the top edge using another template


I had learned my lesson with worbla making the belt buckle, and researched techniques that other cosplayers used. I opted to use a heavy duty gesso. I taped off sections and started working on it.

The "V" portion of the mask got 5 layers of gesso, interspersed with sprayable shellac. Then the main body of the mask got 3 layers of gesso, interspersed with sprayable shellac. There was much sanding in-between layers. I also used a lot of blue painters tape.

Then it was a matter of painting the body of the mask using purple spray paint after covering the V part with the blue tape.
(Sam looking to see if he could steal Q-tips...)


Then I painted the "V" with a heavy duty acrylic paint. Then used a darker purple and black to paint the edges of the eyeholes as well as a shadow-effect between the V and main body of the mask.


After I was satisfied with my work, it was just a matter of final coat of a glossy finish. I still need to attach elastic bands to the mask...and maybe a piece of fabric (felt) to the underside), but that's fairly simple to do. Overall, the mask is done....


Overall, the mask took probably the longest time to make, just because I was trying to figure out how best to attack the problem, as you can make a mask in many different ways. Each way had its own advantages / disadvantages, and both ways (sewing vs. worbla) took a lot of time and effort to do well. 

In making the mask, I learned a great deal about what would be the best material for what type of application. For super hero masks that require more rigidity and sharp angles, I will stick with the worbla or paper maiche. For masks with softer contours, I'll probably stick with fabric.
The Making of....

Monday, September 28, 2015

Cosplaying Hawkingbird: Black Widow's Belt


Preface:  Convolution 2015 is about a week away, and I'm pretty much done with my outfit, save for a few minor bits & bobs. I've also finished writing up most of the project notes for this cosplay, which I'll be releasing over the next few days leading up to Convolution.

For those following at home:

The Making of....

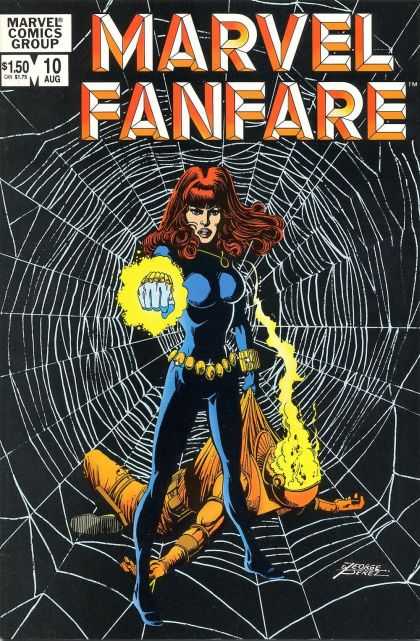
The next part of Hawkingbird's outfit was Black Widow's belt that she nabbed from a locker in the Avenger's Mansion. Well, according to the Marvel Wikipedia entry, the belt belongs to Black Widow although after doing some cross-references, it doesn't even appear to resemble her belt at all.

Example of Black widow with belt


Kate's belt.

Okay, I'm not going to sweat the details, but they don't look anything alike. I just went with the Kate Bishop version.

I didn't want to make the belt from scratch, but did notice that it had a passing resemblance to a few "stretch plate" belts from the 80s. I scoured my local thrift store and found this one for a few dollars. It didn't quite match, but it was close, and with a few modifications, it would work.


First, I had to paint the whole thing silver. I used Testor's paint and painted each "scale" individually.

Next up, I had to re-do the belt buckle to be more of a larger dome shaped. Worbla to the rescue. Using a compass, I made a couple of paper cut-outs of what would be an appropriate size dome. Then, I cut the worbla. It ended up being about 4 inches in diameter. I cut out two pieces. One for the dome and one for the backside of the dome where I could attach the rest of the belt.


Then using a heat gun and a ceramic bowl, I molded it into a "dome" like shape.

Because I needed to attach a flat piece of worbla to the back, I put in support structures on the inside so that the worbla wouldn't collapse onto itself. (As a note, do not put warm worbla on a paper towel. It will stick....)


Here's the finished worbla piece. I smooshed the two pieces together then used a leather edging wheel to smoothen out the edges of the dome.

I forgot to take more "in-progress" photos, but basically, my Viking helped me add bondo to worbla to smooth-en it, then we sanded, then sanded some more....then added bondo...then sanded some more, before adding primer and a gold metallic paint and a glossy finish.

It's not perfect, but it ain't bad. With the belt stretched out, it's nearly the perfect size. I might have to remake this at a later date.