Tuesday, October 14, 2014

Gift of a Shawl.

It's not that often that I get any hand-crafted gifts. It's not that I don't want them, but I know how much time and effort it takes to create something and my friends/family are busy with their own schedule and projects. Consequently, whenever I get a handcrafted gift, it makes me super happy, pleased, and just extremely grateful.

This past weekend, a friend's mom (another knitter) sent us whole bunch of knitted shawls, and cowls via her daughter; sending an array of items that she thought we might like. All of us oooh'ed and aaaahh'd over the workmanship (each person being a maker herself) and picked out what suited her the most.


I picked out a shawl, Spellbound, designed by Boo Knits, in a lovely gold merino / silk blend. Let me tell ya...the workmanship is gorgeous. She knitted it with beads! (Something I have not yet had the gumption to do). And it's blocked beautifully.


For each knitted piece, she included a card with the name of the design as well as the fiber type of the yarn. I developed a love for shawls when my office got too cold, but where it was too warm to wear a sweater, except that I hate knitting shawls -- all the miles and miles and miles of stitches. But, this shawl is perfect.

And let me tell ya, getting a knitted gift like this shawl is just all sorts of amazing awesomeness. It kinda makes me wish I had more friends that knitted me gifts. :-)

For those interested, she has her own Etsy shop.

Monday, October 13, 2014

Archery Leads to Leatherworking (Part 2)

After doing a lot of research -- pouring over some of my design books and looking at the Internet -- I finally decided on a simple, yet (IMNSHO) elegant design of a dragon.

Dragon, you say? A bit cliche, I know, but hey, I'm a geek that loves Sci-Fi / Fantasy, so you'll just have to deal. :-P

I made a test of the design I wanted to use.


I had some issues with it, mostly because I just starting with leather carving. I had to modify the pattern a bit -- enlarge the wings, etc. -- to make it easier for me to carve it on the final piece.

Once I traced the final pattern onto the leather, I started cutting and beveling. When you carve leather, you have to get it wet (called "casing"). Carving is a bit tedious and slow going, and I had to stop and rest, but I really liked the end result.
("Casing" the leather)

Because you have to get the leather wet in order to carve it, the leather gets dry. An application of neetsfeet oil removes the dryness and darkens it a little bit.


Then it was a matter of applying the leather stains (black & brown) to the leather, painting the dragon, then applying a clear finishing coat to protect the paint and stain. This process requires a bit of time (several days) for the leather to dry in between coats of stain/paint/finishing.


Unfortunately, I forgot to snap some in-progress photos of the process, but here's one finished photo.


Once the flat quiver was completely dry, it was time to start lacing it into a tube.

To be continued.....

More posts about this topic here.

Sunday, October 12, 2014

Archery Leads to Leathercrafting (1)

Recently, I took up archery, because it's one of those things I've always wanted to do. (Not to mention that Huntress probably influenced me "slightly" as a kid, followed closely by Green Arrow.) Plus, honestly, archery is COOL.

I've been at it for about a month and not doing too badly.


However, the one thing that taking up a new hobby is that it allows me to learn a new crafty skillset! (For The Win!!!)  Archery has a few accessories that have often been made from leather -- quivers and armguards. I already know the rudimentary basics of leatherworking, but, I didn't want a plain quiver, I wanted a design on it, which meant I needed to learn a bit of leather carving.  I felt that leather carving was a complimentary skill set to my rudimentary leathercrafting skills.

First, I did a whole bunch of research on the Internet for quivers, because I needed to figure out what type of quiver I wanted and how to make it.  (For those interested, I have a Pinterest board for leatherworking ideas.) While I researched quiver patterns, I started practicing leather carving.

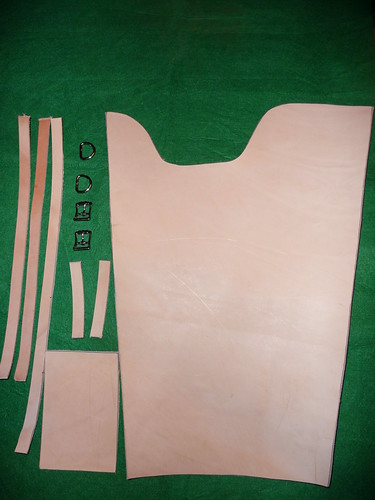
I stumbled across a Flickr album for a hip quiver class where folks were learning leather carving, which had good enough photos to make my own pattern. They were kind enough to include dimensions for their quiver, which I used as a guideline to make my own pattern.

Hip Quiver Pieces

I used poster board and painters tape to make a mockup of the pattern.


I liked it, so it was time to cut out the leather.


I had some suitable veg-tanned leather lying around (as you do), and got started. I also made a bottom stopper for the quiver, which would fit inside the quiver.


To make the bottom stopper, I cut out the leather, got it wet, then formed it over an appropriate sized plastic container with rubber bands. When it dried, it was the appropriate shape.


Now that I had the leather quiver cut out, it was time to tool (i.e. carve) the leather with a pattern that I picked out.

(Additional progress posts can be found here.)

Friday, October 10, 2014

Han Solo Costume: Making of Han's "A New Hope" Outfit

For Convolution 2014, I wore the outfit I had created as the Masquerade entry along with a friend, where we did a cross-play skit with Han & Leia (or Hannah and Lee, if you will).

I LOVE love love this costume, and will probably be wearing it as a hall costume at multiple conventions. I even bought a Wookie backpack to wear it around for the evening (which was great for holding my knitting projects! (Plus, he's super cute...and well, WOOKIE BACKPACK!


Our Masquerade skit at ConVolution went off a smashing success, and we got the award "Judges' Choice: Funniest Presentation", which pleased us to no end. A video of the full masquerade is available on YouTube; we are at about the 20 minute mark as we were the "finale" to the masquerade.


Our skit is at the 20 minute mark.

I wanted to write a summation post about Han's outfit, which included what I learned and reality vs. expectation so that it might help other costumers create their own version.

From the onset, Han's costume looks relatively easy, but there are some complex considerations, especially if you want to make something that would pass the Rebel Legion's specification (if they allowed cross-play).  Certainly, a lot of these costume pieces can be purchased; there are many places where you can purchase pre-made Han Solo costumes, but I wanted the satisfaction of making it myself.

As mentioned in my preliminary post, I wanted to use / re-use as much as I could (i.e. fabric from my Stash, items I already had, etc), and spend as minimal as possible, but I also wanted to make the parts I was creating as screen accurate as possible within the timeline I had.  I already had the following: the black leather belt, the black leather boots, the gun holster. So, it was just matter of making the rest.

It took me about 6.5 weeks to make the costume working on it a few hours each week and some dedicated hours on the weekends -- starting a week after SDCC (end of July) to 2 weeks before ConVolution 2014.

Good luck! If you have any questions, feel free to email me or leave a comment.
And may the Force be with you.


Costume Summation

The following is a summation of each of the posts, along with resource links and suggested patterns. I'll be slowly adding to and modifying my Han Solo outfit -- making a more screen accurate black belt, getting better boots, etc., I'll post about those as I come to them and update this post when I do.

Making the Shirt

For the shirt, I created my own pattern, because I didn't like the initial pattern I intended to use. However, there are a number of  commercial patterns that can be easily modified to create the shirt. As I already had plenty of muslin lying around, there was little cost in making this piece.

The Rebel Legion has the following guidelines for this shirt: "White or cream color long-sleeve shirt with placket v-neck and short mandarin collar." So you have plenty of lee-way in creating it.
  • Post: Making the Shirt
  • Suggested Patterns: Simplicity 1286. You'll need to modify the collar. 

Making the Pants:

For this piece, I purchased 5 yards of navy blue denim (100% cotton) fabric using one of their 50% coupon. I spent about $40.00 on the fabric and $10.00 of Guterman regular red thread for the embroidery machine (you don't need "specific" embroidery thread). The pants pattern was about $1.00 on sale at JoAnns; I suggest waiting for one of their pattern sales that they have on a regular basis.

The Rebel Legion guidelines are: Dark blue or navy pocketless pants with accurate red Corellian bloodstripes. But when you add the riding seam, pintuck, and embroidered stripe, you have "formal" Han Solo pants per the Rebel Legion specifications.

The riding seam was fairly easy to add as was the pintuck. However, I recommend having another person help you align the pintuck correctly after you have created your mockup. Make sure to make a full (or nearly full) mockup to ensure that the fit is correct with the pintuck, riding seam, and blood stripes. 


Making the Vest:

For this piece, I modified an existing pattern I drafted. In addition, I already had a medium weight black cotton/denim twill, so there was little monetary cost. However, it took quite a bit of time to ensure that the pockets were correct AND to scale on my body. I had to remake the pockets twice to get the right "depth". For me, this vest took the longest to get it to look right.

I highly recommend making a full mockup out of muslin before working your fabric.


Modifying the Blaster & Holster

The toy blaster from Amazon cost $10 with shipping, and the spray paint was another $15.00. I already had the gun belt, but a new holster needed to be made to fit the gun.


Other Costume Elements

There are other costume elements, such as the items Han wears on his belt (i.e. droid caller, bits & bobs.) You can purchase the droid caller at Corellian Exports. I went without these elements, as I felt that the major parts I created were pretty iconic and easily recognizable as Han Solo. However, if you want to go for complete screen accuracy, I suggest getting these other elements.


Additional Resources:

The following are some additional resources that were extremely helpful to me during the making of the costume:

Wednesday, October 8, 2014

Knitting FO: Stained Glass

It's been a while since I posted any knitting entries, but I'm glad to say that I have a finished object OFF the needles.

In this case, it's a pair of finger-less gloves where I had some simple two-stranded colorwork.


The yarn:

  • Cascade Silk Heritage
  • Mano del Uruguay sock yarn
The pattern is a "vanilla" set of fingerless gloves (which I have to write-up one day), where I simply alternated strands of each yarn to make a stained glass pattern. 


It's a simple and fun knit that looks a little bit more complicated than reality. The black yarn really makes the color pop out, and the vertical stripes are a nice visual element.

Thursday, September 25, 2014

Han Solo Costume: Crafting the Blaster Holster

Once the blaster was done, my Viking had to make the new hostler.  This first image is the existing holster. It looks big enough, but it's made for a gun that has a much smaller overall width. This section documents how he created the holster. Unfortunately, there aren't photos of each step, but I hope that it's is enough to show the overall steps of what he did.


So, using paper, he created a pattern using some reference photos that we took during the Star Wars exhibit.
Afterwards, it was a matter of cutting out the leather and crafting it appropriately.
  1. Cutting the leather to the pattern.
  2. Getting the leather wet and molding it around to the appropriate shape. A lot of binder clips and spring clamps were used to help keep it in shape.
  3. Once the leather dried to the correct shape, it was stitched together and conditioned.
  4. The pieces were individually dyed and then put together.


He dye'd the leather match the existing belt color. It looks red in this photo, but it's really a dark dark brown.


Here's the final blaster holster as well as the leg attachment.

Wednesday, September 24, 2014

Han Solo Costume: Modifying the Blaster

As it gets closer to Convolution 2014, the last finishing touches of my outfit are coming together -- the blaster and holster. Both are done, but I have yet to finish taking photos, so I will break it into different blog posts.

My Viking wanted to do the modifications on the toy blaster that I got from Amazon.com. He loves modifying guns, and I was able to concentrate on other things. The gun, while not completely screen accurate, is very passable AND it makes "authentic" pew pew noises from the movie. It was also about $10.00 USD with shipping, so overall a reasonable price for a prop.


We went over to our local craft store and picked up the necessary paints (spray paints and touch up paints) needed to transform the orange & white toy to look like a passable version of the DL-44 blaster).

First, he pried off the muzzle barrel and gave everything a black matte primer, then spray painted it a glossier black.

After he was happy with how it looked, he put the finishing touches, including painting the "wooden" grip (with aging) and the muzzle barrel silver.


It took several days to finish the gun, which mostly involved waiting for paint to dry. However the finished product looks pretty good and should be fine for on-stage usage.


However, the toy gun was BIGGER than the holster that went the gun belt I was going to use, so that necessitated making a gun holster that fit this prop that would fit on the gun belt. So, that will be the subject of my nearly last blog post on the making of this costume

Sunday, September 14, 2014

Learning How to Leather Carve

I've always been impressed by many artists who have done some amazing leather tooling (i.e. leather carving). I've done some basic leatherworking over time, but I have never done any leather tooling, so I thought I might rectify that oversight.

The Internet is an amazing resource to look up nearly everything that you want to do. There are a ton of tutorials and videos on leather carving. I spent a little bit of time watching some Youtube videos and reading up on leather carving about some of the basics, basic tools, etc., that I would need.

The Tandy leather store was having a September sale, so I picked up a few things that I didn't have just so I could play with leather carving:
After I got everything in place, I just started practicing with some simple basic designs. Here are two examples:


    Here are a couple of the resources I looked at on the web. There are a lot, so I suggest doing a Google search on leather carving.

    Sample resources:

    Monday, September 8, 2014

    Han Solo Costume: Making the Vest (2)

    Once I finished the mock-up, I started working with the fashion fabric. It was very easy to start piecing everything together, especially after making the mock-up as it gave me a template to follow.

    However, I had forgotten that I had wanted to add magnetic closures to the pockets so that they wouldn't flap open. They are slightly more expensive than other closure types (such as snaps), but the ease of use of the magnets, especially when you're in full costume, outweighs the cost.


    When I drafted out the pockets initially I hadn't taken into consideration adding the one inch closure into the pocket and pocket flap. Consequently, I had to increasing the size of the flap and the pocket slightly to allow for the size of the closure.  It was a minor, but annoying modification.

    I made each panel (front left, front right, and back) and added each pocket to each panel. (It was much easier to sew the pockets onto each panel individually.) First, I marked out all of the seam allowances, then using my mock-up as a guide, I pinned all of the pockets into place.


    Once I pinned all of the pockets into place, I eyeballed the two panels together to make that all of the pockets lined up horizontally. I used a lot of pins. Then I did the same for the backpiece.


    After I put together the fashion fabric together, I made the lining using a black cotton/polyester blend, then seamed the whole thing together.


    As a side note, black denim attracts lint & fur like a magnet, and my kittens love to sit on it! By the time I was done, it looks like a Wookie had shed all over the vest. (I must remember to bring a lint roller to the convention!)


    Once the whole thing was together, I did a bit more finishing work, including top-stitching the neckline, armholes, and bottom. Then there was minor tailor stitching for all of the pocket flaps to ensure that they won't stick out .

    Here's the semi-final costume, sans the holster. We're still working on the blaster.

    (Vest with shirt and pants)

    Back of the vest.

    Overall, I'm pretty happy with how the vest turned out. There were some fiddly bits (primarily pockets and their placement), but it was an easy pattern to draft out. 

    With this completion of the vest, it's just a matter of the rest of the accouterments.

    Tuesday, September 2, 2014

    Han Solo Costume: Making the Vest (1)

    After I finished the pants, I started working on the Han Solo vest. But, with my schedule, I couldn't work on it for a few days. So, over the holiday weekend, I finished up the mockup that was languishing on my dress dummy.

    Many cosplayers have made this item. Some are using the Falcon jacket pattern and it looks like you can purchase one from Magnoli for a not-cheap sum. However, as I had made a 'cargo' vest previously (my Melinda May vest), I just decided to use this pattern as base (as the two vests are "close enough").

    There are some differences -- the Han Solo vest has a yoke for the front & back and no collar. (Actually, the Melinda May vest also has a back yoke -- I saw screencaps of the back AFTER I made the vest...go figure.)

    So, I redrafted the vest to include the yokes and appropriate seam allowances. Then I took a pencil to sketch out where all of the pockets should be located (vs. actual Han Solo's vest) along with the appropriate proportions for MY body.  It took me several attempts to get the right size pocket for each section, as they are ALL different sizes!!! Then I took a black sharpie marker once I was happy with the look.


    Here's the back with a the loops and back pocket sketched out along with the comparison photo.


    Once I had the outlines I wanted, I took the measuring tape and took the relative dimensions for each pocket loops. Each of the pockets are "accordion pockets", which means that they expand outwards. (In some screenshots from "A New Hope", you see that some of the pockets are slightly expanded, due to either the way Han Solo is standing or he has something in the pocket.)

    Also, Aimee Major was kind enough to create a zip file with photos of the Han Solo vest with a write-up from an archived thread of the Rebel Legion forums. It was extremely helpful while making my vest, and I referred to it constantly. 


    I started experimenting with different pocket "depths" for the accordion pocket to see what would work best for me in different places. Unlike Harrison Ford, I have boobs and a very deep accordion pocket wouldn't work for the topmost pockets.

    For the top pockets, I used a 1/2" (1.587 cm) depth, but for the bottom and back pocket, I opted for a 3/4 inch (1.9cm) deep pocket. (Here's a decent tutorial on how to make accordion pockets.)

    Here's the pockets with various sized pockets
    so I could get a feel for what would be a good depth.

    Using a similar technique for the loops, I played around with different depths for how "deep" I wanted the loops.

    I'm fairly happy with how the mockup looks, so I can start working with the black twill fashion fabric. Also, with this new "base" pattern, I'll probably re-work the Melinda May vest to be more fitted after I finish up Han Solo using THIS as the base pattern. :-)