Wednesday, September 30, 2015

Cosplaying Hawkingbird: Making Arrows

It's a couple day before Convolution 2016, and this is probably the 2nd to last project entries for this cosplay. I'll get photos of myself and my partner together.


Bow Props

As Hawkingbird is an archer -- something that I am proud to also call myself -- I figured it was going to be relatively easy to put together her archery weaponry.  I was proved wrong. I should really learn that things that appear easy, tend to not be THAT easy.

I didn't need to make any bow, because I already have a bow -- a simple Samick Sage.


The bow is pretty light, but I wanted to make a bow sling --- in purple -- for me to hold it with little effort, so I learned how to make one from paracord, using various tutorials on the web (like this Indestructible tut and others).

My prototype of the sling was made out of black & red. I made a 4-strand braid first, then added a cobra braid.

4-strand braid & cobra braid

I added some "bling" to my cobra braid by stringing the green cord and adding some large beads I found at the store.


I made a purple & black version, which I forgot to take photos of, but you get the gist. Then, it was a matter of making the leather piece for the braid. I made a quick template, based on some photos I saw online, then cut out the piece from some scrap leather that I had.


It came out a little bigger than I anticipated. However, luckily, I found a seller on ebay that sold them for about $3.00 a piece, which is a lot less than I can make it, so I ordered one.

But I still needed arrows for the costume. The arrows were easier to make than the mask or belt, but some work had to be put into it.  First, I couldn't use my REAL arrows, because they are weapons with sharp point tips and can be potentially dangerous, so I didn't want to use them. Plus, I wanted to be larger than life. (Real arrows are tiny things that you don't realize are arrows because they're small in order for them to fly very far at very fast speeds.)

Building Arrowheads

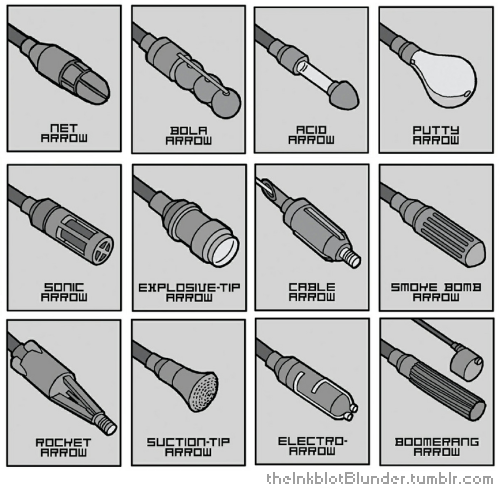
I started making arrow heads using my 3D printer at work. The "real Hawkeye" (aka Clint Barton) had his own set of special arrows.


Luckily, I found a 3D print file that let me print out some of them.


You might recall me discussing printing out cosplay props in a previous post. I printed several different types, which came out looking great.

Building Arrow Shafts

What's an arrow head without shafts?  I know that some cosplayers use wooden dowels to build their arrows. However, I had a easier source of arrows. My archery club has old unused arrows that are discarded by other archers. They told me I could use them for any purpose, as long as it wasn't for shooting.  So, I picked up a few very fat arrow shafts.

I primed and spray painted a deep dark purple, as all of Hawkingbird's outfit is a deep dark purple. Then I finished them off with a gloss coating


Fletching Arrows

All arrows need fletches, which act as stabilizers when they fly through the air. I was going to get some large feather fletchings from the archery store, but then found out that they were super expensive for what is simply a costume prop. (If I was putting them on REAL arrows, sure...but, they were $5.00 a piece and I needed about 9 of them, so no.) 

I thought, "Okay, how hard can it be to actually make my own fletchings?" The answer is....not as easy as I thought. An entire profession was once based on being able to fletch arrows. However, I did manage to make passable fletchings. They aren't suitable for real arrows, but look good enough for cosplay.

I got some turkey feathers from my local craft store for about $3.00.

I split the feather in half, cutting down the spine using an exacto knife. This is harder than it sounds. 
TIP: Start at the top of the feather instead of the bottom quill. Make a very short cut towards the top of the feather, then continue making small cuts until you reach the "quill" part of the feather.

Then I shaved down the uneven bits of the feather so that it would attach easier to the arrows.

Afterwards, I cut them into appropriate sizes for my arrows. In my case, as the arrows are really fat, I made four inch vanes.

Luckily, as an archer myself, I have a fletching jig, which helps me correctly place the feathers into place. If you don't have one, put a very thin line of super glue onto your feather and place the first one onto your arrow. Then equally space 3-4 feathers around the shaft.


I opted for three fletches because it's my preference for my real arrows. And I didn't have that many feather vanes. However, the finished arrow looks pretty darn good! 

Here's an entire quiver of arrows.


And here are my prop arrows versus my real arrows for comparison.
(left-to-right: Fake, Aluminum, Carbon Fiber)

Insofar as props, these were easier than the others, although the battle staves only required minimal effort on my part, but I really liked how they came out.

A little effort went a long way.


For those following at home:

The Making of....


Tuesday, September 29, 2015

Cosplaying Hawkingbird: Mockingbird's Mask

I started working on Kate's mask quite a while ago, and it's proving a little bit more difficult than anticipated, only because of the materials that I decided to use. I've made masks before, usually out of fabric. So my first attempt was to make this out of the same fabric as the dress.

However, I realized that masks I make out of fabric are often very much embellished with trim, which can hid a lot of the sewing seams. This did not work with the very simple Mockingbird mask. So, I had to try a different type of material instead.

Making the template is easy enough. I had my Viking take measurements of my face --
  • the distance between my eyes
  • the distance from my eye to my ear.
  • the length of my nose as well as my eyes
I measured out the distances on paper, and then sketched out an approximate look for my mask. It looks strange because the mask wraps around the face and appears elongated on a 2D surface. Because my face was relatively symmetrical, I completed the pattern on one side only.


Then traced out half of the pattern on drafting paper, because they are symmetrical and I was going to be cutting out fabric.

I cut out my first attempt on millinery fabric called buckram.

I took a look at Kate's mask on the comic book again, as well various renditions of Mockingbird's Mask, and noticed that there was a notch at the edge that isn't apparent in some frames of the comic book.


So I re-did my mask template. And started cutting out the fabric, which I attached to fusible interfacing so that it would be stiffer.

First, I tried to glue the fabric onto the buckram, which didn't look great, so I opted to sew instead, which is a pain to do, especially around the eyes. Sewing proved to be tedious and completely time consuming.


I made several prototypes trying different techniques, and most of them proved to be failures...or not quite the look I wanted. The finished masks were too fiddly to create and didn't have the stiffness that I wanted.

I abandoned the idea of using fabric, and went back to use the worbla instead. I traced out my paper template onto the worbla and cut it out. I shaped the mask to my face.

I cut out a bit more worbla for the top edge using another template


I had learned my lesson with worbla making the belt buckle, and researched techniques that other cosplayers used. I opted to use a heavy duty gesso. I taped off sections and started working on it.

The "V" portion of the mask got 5 layers of gesso, interspersed with sprayable shellac. Then the main body of the mask got 3 layers of gesso, interspersed with sprayable shellac. There was much sanding in-between layers. I also used a lot of blue painters tape.

Then it was a matter of painting the body of the mask using purple spray paint after covering the V part with the blue tape.
(Sam looking to see if he could steal Q-tips...)


Then I painted the "V" with a heavy duty acrylic paint. Then used a darker purple and black to paint the edges of the eyeholes as well as a shadow-effect between the V and main body of the mask.


After I was satisfied with my work, it was just a matter of final coat of a glossy finish. I still need to attach elastic bands to the mask...and maybe a piece of fabric (felt) to the underside), but that's fairly simple to do. Overall, the mask is done....


Overall, the mask took probably the longest time to make, just because I was trying to figure out how best to attack the problem, as you can make a mask in many different ways. Each way had its own advantages / disadvantages, and both ways (sewing vs. worbla) took a lot of time and effort to do well. 

In making the mask, I learned a great deal about what would be the best material for what type of application. For super hero masks that require more rigidity and sharp angles, I will stick with the worbla or paper maiche. For masks with softer contours, I'll probably stick with fabric.
The Making of....

Monday, September 28, 2015

Cosplaying Hawkingbird: Black Widow's Belt


Preface:  Convolution 2015 is about a week away, and I'm pretty much done with my outfit, save for a few minor bits & bobs. I've also finished writing up most of the project notes for this cosplay, which I'll be releasing over the next few days leading up to Convolution.

For those following at home:

The Making of....

The next part of Hawkingbird's outfit was Black Widow's belt that she nabbed from a locker in the Avenger's Mansion. Well, according to the Marvel Wikipedia entry, the belt belongs to Black Widow although after doing some cross-references, it doesn't even appear to resemble her belt at all.

Example of Black widow with belt


Kate's belt.

Okay, I'm not going to sweat the details, but they don't look anything alike. I just went with the Kate Bishop version.

I didn't want to make the belt from scratch, but did notice that it had a passing resemblance to a few "stretch plate" belts from the 80s. I scoured my local thrift store and found this one for a few dollars. It didn't quite match, but it was close, and with a few modifications, it would work.


First, I had to paint the whole thing silver. I used Testor's paint and painted each "scale" individually.

Next up, I had to re-do the belt buckle to be more of a larger dome shaped. Worbla to the rescue. Using a compass, I made a couple of paper cut-outs of what would be an appropriate size dome. Then, I cut the worbla. It ended up being about 4 inches in diameter. I cut out two pieces. One for the dome and one for the backside of the dome where I could attach the rest of the belt.


Then using a heat gun and a ceramic bowl, I molded it into a "dome" like shape.

Because I needed to attach a flat piece of worbla to the back, I put in support structures on the inside so that the worbla wouldn't collapse onto itself. (As a note, do not put warm worbla on a paper towel. It will stick....)


Here's the finished worbla piece. I smooshed the two pieces together then used a leather edging wheel to smoothen out the edges of the dome.

I forgot to take more "in-progress" photos, but basically, my Viking helped me add bondo to worbla to smooth-en it, then we sanded, then sanded some more....then added bondo...then sanded some more, before adding primer and a gold metallic paint and a glossy finish.

It's not perfect, but it ain't bad. With the belt stretched out, it's nearly the perfect size. I might have to remake this at a later date.

Friday, September 11, 2015

Cosplaying Hawkingbird: 3D Printing Battle staves

While I was working on Hawkingbird's dress, I started working on her weapons. First, I started with Mockingbird's battlestaves that she finds in the Avenger's Mansion.


I looked at reference photos of Mockingbird's battle staves for clarification. They are segmented pieces of a steel-alloy that can extend up to 4 feet. In addition, they can be screwed together to form a longer staff of about 8 feet.


Using some online software, I fashioned cylindrical pieces that could be made pieced together individually, then used the 3D printer at work to bring those pieces into reality. I made multiple "middle" pieces so I could make the staves as long as I needed to fit me.

The individual pieces. 

Although Mockingbird's staves are pretty long, they don't appear that long for Kate. Also as Kate wears them on her thigh (with a single elastic strap), mine needed to actually fit my body regardless of how long they are actually "supposed" to be in the comic book.


When assembled complete, each staves were about 13 inches long. I even made a connector piece that would allow me to connect the two staves into a larger staff.


I had some one inch elastic & velcro, and made a thigh holster. In the comic book, she is shown with one holster (as shown above), as well as dual holster in some frames. As more frames show the one holster, I opted to go with the one holster setup.


Mockingbird's battle staves are supposed to be a steel-alloy, and appear to be a white silvery color. I kinda liked the 3D material I used, so I am not going to paint them just yet and might keep them this color.

The Making of....

Wednesday, September 9, 2015

Cosplaying Hawkingbird: Kate Bishop's Purple Dress

As I mentioned in a previous post, I am cosplaying Kate Bishop from the Young Avengers.  Kate Bishop's main outfit for her "Hawkingbird" is an outfit that she wore to a wedding as one of the maid of honors when she encounters the Young Evengers.


Because I was going to be "ripping" the dress for this cosplay, I opted to make my own dress instead of buying a used one and making modifications. Joann's Fabric has wedding type fabric, and I found the correct color purple satin.  In addition, I had Simplicity 5561 in my pattern Stash


I made a couple of mockups and finally got one that fit well.

The fabric was pretty nice

Even Sammy thought the fabric was nice and helped me cut out fabric.

My dress dummy, Esme, was a nice stand-in for me and helped me fit the dress, especially since this is a strapless dress -- no malfunctions can occur.
(The skirt isn't hemmed, so is still pretty long in the photo.) 

With the belt added, it's a pretty close approximation.  Instead of "ripping" the dress, I opted to make a very long side slit instead so I could control how much it went up the leg.

With the dress completed, I could finish up the rest of her outfit.

The Making of....