In terms of knitting/spinning, things have been really laid back.
Knitting
Currently, I'm knitting the Travelling Woman (Ravelry) because it's an easy pattern to memorize, it's easy lace, and I have two skeins of some Knit Picks sock yarn that's just been sitting in my stash.
I'm working on this pattern in order to get my mojo back from the Fail of the Torreyana shawl with my handspun. Currently, I'm almost done with the second repeat of Chart A, and shall soon go onto Chart B.
This shawl project, dubbed Travelling Mojo, is a perfect weight for wearing around work, and is small enough to stuff into my purse. I'm hoping to finish it before the Winery Event so I can wear it there.
Spinning
Spinning-wise, I'm currently slogging my way through the last 2oz of dyed black merino so I can start plying and knitting for the Musica gloves that I want. I have no idea how people manage to actually spin enough for a sweater's worth of yarn.
It's taken me forever to spin up the yarn needed for this project. I finished spinning & plying the white merino. However, as mentioned in an earlier blog post......spinning dyed black fiber is BORING!
It's a solid black, so there's not even a slight variegation to keep my interest peaked. I'm currently DYING to spin something with COLOR just to offset the miles and miles of mind-numbing black merino.
(Although, in all fairness, I did spin & ply about 200 yards of white merino for this project, and the pattern only calls for 220 yards total. I could have dyed some of the white merino *black* just to make it easier on myself, but I didn't think about that until later.
Ugh. I know I will have left over singles on the bobbins of both black & white merino. I'm considering plying the white merino with the black merino for a zebra-striped 2-ply.
Thursday, May 27, 2010
Wednesday, May 26, 2010
Knitting for Work
Work is an icebox -- even the GUYS have sweaters/coats, etc, to wear when it gets too cold for them. Our group Admin tells me that it's been a problem for a long time, and there have been many attempts to fix the problem, but alas, to no avail. The cold persists no matter if it's 50 or 80 deg. F outside.
The guys have put up posters/t-shirts around the ventilation ducts that sit above their cubes. Our Admin has a few fleece-y shawls that she wears.
I started bringing in a few of my lighter scarves so I can wear them around the office. And, I'm finally making use of the full-size cashmere/silk wrap (made in Pakistan) I found at the thrift store for a few dollars.
I've also taken to wearing fingerless mitts on occasion. I need to knit more small shawls/cowls/neck wraps of varying colors to match my outfits because, it's FREEZING in here.
Luckily, I have the Travelling Woman on the needles right now, using Knit Picks stroll fingering weight yarn. It's a nice small and easy project, PLUS it won't matter when I finish it, because I don't think the temperature control will be fixed anytime soon!
Monday, May 24, 2010
For the Record
....spinning dyed black merino wool....is BORING***...
And, I have to put a light colored fabric over my lap in order to see the actual fibers.
Luckily, I have to only do one more ounce of black merino before I can start plying.
I can't wait to finish the spinning for the Musica Gloves, and start spinning something with a bit more colour.
*** Spinning actual natural black merino probably wouldn't be boring
Thursday, May 20, 2010
One Turkish Spindle
I've had a hankering to actually *use* the Jenkins Turkish Spindle that I got over at Stitches West -- nevermind I have 3 spinning projects already going (1 on the wheel, 2 on spindles).
I had 2oz of corriedale roving from Spunky Eclectic that was sitting there waiting for me to use. So, last night, I grabbed the Turkish Spindle, opened up Respect the Spindle to the Turkish Spindle section, read up on how to wind onto the arms, how to do a half-hitch...and away I went.
Eventually, I ended up with a bit of yarn.
Differences
I have to say that it was a lot easier than I had expected -- probably because I already have the basics done. But, having a bottom weight spindle was very different from my other top whorl ones. It's not better or worse, but just *different*.
* the whorl doesn't spin as fast as a top whorl spindle, but it does spin for a lot longer duration -- this takes some getting used to. As a result, the yarn is more loosely spun as woolen, versus worseted. Of course, I've also "dropped" the spindle several times because there wasn't enough twist (versus when I learned the top-whorl, where I had too must twist....)
* I have to make sure the bottom whorl doesn't actually bump into anything, like chair legs. The spacial requirements are slightly different.
* there's no hook, so I have to use a half-hitch at the top of the spindle, which is going to take a bit of practice.
* stopping & winding on the yarn isn't as 'easy' as a top whorl spindle, because I have to unhitch the half-hitch, then carefully wind onto the arms of the whorl.
Of course, I'm sure much of these differences are easily solvable by more practice and getting used to the differences. But other than that, I do like it. I think I might prefer my top whorl a teeny bit better, but again, it's just a different tool for the job.
Wednesday, May 19, 2010
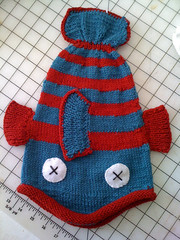
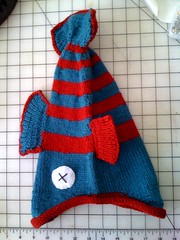
One Fish, Two Fish, Three Fish...Dead Fish.
Sometimes, you just have to make something "fun"....like knitting a dead fish. And, this was particularly fun to do. I enjoyed adding the white felt 'dead' eyes to the fish afterwards. AND, it ended up using the remainders of yarn I had left over from the octopus and cat-in-the bag.
However, watching that last bit of yarn slowly get shorter when you're *almost* done can be quite disconcerting. When I finally finished binding off, I had 4 inches left of blue.
I so can't wait to give it to the Youngest Nephew for his birthday.
Details on Ravelry
Yarn: Cascade 220 Red & Teal
Needles: US 7
Monday, May 17, 2010
Knitting Mojo
In an effort to get my knitting mojo back from the disastrous and EPIC fail project using my lace-fingerweight handspun on the Torreyana pattern (Ravelry link), I've been working on very small and easy projects.
Last night I started working on another simple project -- this time a shawl -- with a simple lace pattern using some commercial fingerweight yarn just to assuage my fear that I can't do a lace shawl. And, so far, so good. The pattern is relatively easy to memorize and I haven't had problems with the fingering weight yarn.
Afterwards, I'll try swatching the Torreyana with commercial fingerweight and see if things go well. If it does, then it just might be this project is not right for my handspun or I have trouble with something thinner than fingerweight (4-ply) yarn (as the handspun is heavylace-fingering weight, but more lace)
If it doesn't go well, then this lace pattern might be too complicated for me to tackle readily...just yet.
Wednesday, May 12, 2010
Octopus Anyone?
In the attempt to get my knitting mojo back, I took to making an octopus as a quick and easy knit from the book, Amigurumi Knits.
Here's my octopus wrapped around the hacksaw used to help make my Lazy Kate.
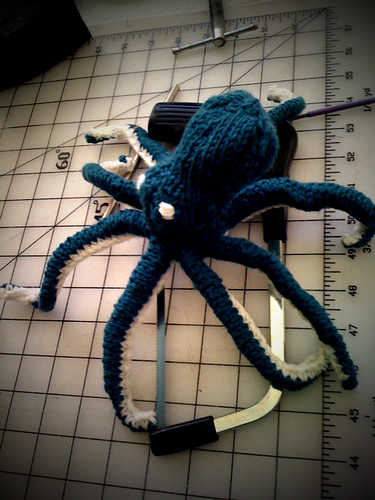
BTW, love, love, love this book. It's not exactly amigurumi (as technically, amis are crocheted, not knitted), but I love the patterns as they are quite unusual!
Here's my octopus wrapped around the hacksaw used to help make my Lazy Kate.

BTW, love, love, love this book. It's not exactly amigurumi (as technically, amis are crocheted, not knitted), but I love the patterns as they are quite unusual!
Tuesday, May 11, 2010
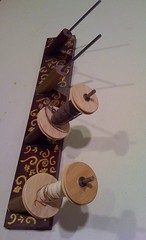
DIY Lazy Kate
Presently, I had been using the lazy kate that came with my Ashford Kiwi. It's a small little kate with two pegs for bobbins, which has been fine with just doing two-plys. However, it's problematic if I wanted to do more than two ply yarn. And, there's some issues with ensuring that there's appropriate tension being applied. Usually, I tilt the lazy kate at a 45 degree angle, or put long rubber bands around the bobbin grooves.
The lazy kate that I wanted (the Will Taylor 45 degree angle Lazy Kate), which was been recommended by several websites as well as a friend, that I got a chance to play. And I definitely did like it. The problem is having it in stock at Carolina Homespun. Not to mention, it's a bit pricey and we're trying to save a bit of money.
As DH & I do quite a bit of DIY, and really, what is a lazy kate but bits of wood and metal?!? So I decided that trip to Home Depot was in order and that I was going to fashion myself a lazy kate.
I outlined what I wanted, plus showed DH a few photos other 45 degree angle kates; he agreed it was totally do-able. I originally wanted a 3-ply kate, but DH suggested that 4 might be better. Who am I to argue?
Summary: This is a really easy project if you've got a bit of time and have done some DIY stuff before.
WARNING: If you don't know how to use a saw, then DO NOT DO THIS.
PLEASE TAKE ALL PRECAUTIONARY MEASURES WHEN USING THESE TOOLS. SAFETY IS FIRST AND FOREMOST!!!!
Materials
1) hardwood dowel about 2" in diameter ($3.00)
2) a birch wooden board 2 feet in length ($2.00)
3) 3/16" metal rod (4 feet long) ($4.00)
4) plastic miter board ($5.00) ****
5) Saw teeth for cutting metal. ($3.00)
Other items that we already had (with approximate costs)
* Wood Glue ($2.00)
* 1.5 - 2" flat head screws (or an appropriate size for your dowels). (~$2.00)
* miter handsaw (~$10.00)
* hacksaw (~$10.00)
* C-clamps and other assorted clamps (~$1.00 - $5.00)
* A drill of some sort. You need to be able to make holes in wood. We have a cordless Makita power drill driver that's we got when we rebuilt our fence. You can also use a hand drill of some sort , or get a drill bit for a Dremel. The hand-drill is the least expensive at about $20 - $30.00. (Or cheaper yet, borrow a friend's drill)
Step 1:Cutting & Glue-ing.
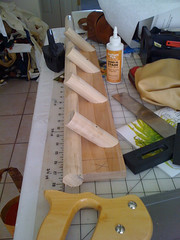
1. Cut out the number of dowels you need to 45 degree angle using the miter board.
2. Measure out how wide your bobbins are, and approximately how much room you need between bobbins and mark your wood board for where the center of each dowel should be.
(For example: The Xs mark the center of where each dowel should be. They are spaced evenly as possible to allow the bobbins to rotate freely.)
You should also mark the OTHER side of the board with the same placements. (If necessary, cut off any extra board length you don't need)
3. Glue the dowels in place. This was allowed to dry completely.***
Time: 15 minutes (at most)
Drying time: 1 full day.***
Step 2: Adding Screws
After the glue has dried, drill holes into the underside of the board *INTO* the dowels in question using the markings you made in Step 1. These screws will help anchor the dowels in place.
Make sure you get the appropriate size screws that will go through the board AND into the dowel itself. Make sure to get flat-head screws as in order to sink *into* the wood so that it's flush with the edge.
Step 3:Sanding & Staining
Next, the whole thing was sanded down, stained, then varnished. I used the left over stain and varnish from Nona.
Time to sand down: 10 minutes
Staining: 10 minutes per staining session (3 staining sessions to get the color to match)
Drying time: 1 hour on a very hot day between staining sessions
Step 4:Adding Rods
1. The rods were clamped down then cut down to the appropriate size to hold a bobbin
2. Holes for the rods were drilled in the dowels. You don't need to drill down very far.
(The rods are removable.)
Time: 5-15 minutes
Step 5: Painting
I wanted to make sure that the Kate matched my lovely Nona. So I got out the stencils & paint I used for Nona and went to town.
Time: 30 minutes.
Overall
* Total cost for materials (not including the drill): $17.00 - $35.00 (depending on what materials you already have)
* Total labor (not including drying time): ~ 1.5 - 2 hours spread out over 2 days.
* Drying time: ~1.5 days***
* Total number of days: 2 days
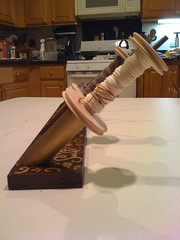
(Here's how far the bobbin is from the bottom. I probably could have cut the dowels shorter.)
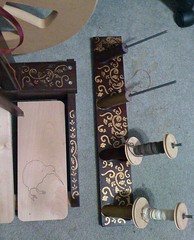
(Here's the Lazy Kate next to Nona)
-------------------
*** Note: Some of our dry times were a bit long because we started this when it we had wet & rainy weather; plus I wanted to ensure everything dried well. Your dry times may vary.
**** EDITED to add (2013): Home Depot allows you to cut down your wood, and they now have a mitered board that you can use. Consequently, you don't necessarily need to buy this part, if you are buying lumber from Home Depot. Your local lumber store might also cut this for you, so check with them as well.
The lazy kate that I wanted (the Will Taylor 45 degree angle Lazy Kate), which was been recommended by several websites as well as a friend, that I got a chance to play. And I definitely did like it. The problem is having it in stock at Carolina Homespun. Not to mention, it's a bit pricey and we're trying to save a bit of money.
As DH & I do quite a bit of DIY, and really, what is a lazy kate but bits of wood and metal?!? So I decided that trip to Home Depot was in order and that I was going to fashion myself a lazy kate.
I outlined what I wanted, plus showed DH a few photos other 45 degree angle kates; he agreed it was totally do-able. I originally wanted a 3-ply kate, but DH suggested that 4 might be better. Who am I to argue?
Summary: This is a really easy project if you've got a bit of time and have done some DIY stuff before.
WARNING: If you don't know how to use a saw, then DO NOT DO THIS.
PLEASE TAKE ALL PRECAUTIONARY MEASURES WHEN USING THESE TOOLS. SAFETY IS FIRST AND FOREMOST!!!!
Materials
1) hardwood dowel about 2" in diameter ($3.00)
2) a birch wooden board 2 feet in length ($2.00)
3) 3/16" metal rod (4 feet long) ($4.00)
4) plastic miter board ($5.00) ****
5) Saw teeth for cutting metal. ($3.00)
Other items that we already had (with approximate costs)
* Wood Glue ($2.00)
* 1.5 - 2" flat head screws (or an appropriate size for your dowels). (~$2.00)
* miter handsaw (~$10.00)
* hacksaw (~$10.00)
* C-clamps and other assorted clamps (~$1.00 - $5.00)
* A drill of some sort. You need to be able to make holes in wood. We have a cordless Makita power drill driver that's we got when we rebuilt our fence. You can also use a hand drill of some sort
Step 1:Cutting & Glue-ing.
1. Cut out the number of dowels you need to 45 degree angle using the miter board.
2. Measure out how wide your bobbins are, and approximately how much room you need between bobbins and mark your wood board for where the center of each dowel should be.
(For example: The Xs mark the center of where each dowel should be. They are spaced evenly as possible to allow the bobbins to rotate freely.)
--------------------------
| X X X |
--------------------------
You should also mark the OTHER side of the board with the same placements. (If necessary, cut off any extra board length you don't need)
3. Glue the dowels in place. This was allowed to dry completely.***
Time: 15 minutes (at most)
Drying time: 1 full day.***
Step 2: Adding Screws
After the glue has dried, drill holes into the underside of the board *INTO* the dowels in question using the markings you made in Step 1. These screws will help anchor the dowels in place.
Make sure you get the appropriate size screws that will go through the board AND into the dowel itself. Make sure to get flat-head screws as in order to sink *into* the wood so that it's flush with the edge.
Step 3:Sanding & Staining
Next, the whole thing was sanded down, stained, then varnished. I used the left over stain and varnish from Nona.
Time to sand down: 10 minutes
Staining: 10 minutes per staining session (3 staining sessions to get the color to match)
Drying time: 1 hour on a very hot day between staining sessions
Step 4:Adding Rods
1. The rods were clamped down then cut down to the appropriate size to hold a bobbin
2. Holes for the rods were drilled in the dowels. You don't need to drill down very far.
(The rods are removable.)
Time: 5-15 minutes
Step 5: Painting
I wanted to make sure that the Kate matched my lovely Nona. So I got out the stencils & paint I used for Nona and went to town.
Time: 30 minutes.
Overall
* Total cost for materials (not including the drill): $17.00 - $35.00 (depending on what materials you already have)
* Total labor (not including drying time): ~ 1.5 - 2 hours spread out over 2 days.
* Drying time: ~1.5 days***
* Total number of days: 2 days

(Here's how far the bobbin is from the bottom. I probably could have cut the dowels shorter.)

(Here's the Lazy Kate next to Nona)
-------------------
*** Note: Some of our dry times were a bit long because we started this when it we had wet & rainy weather; plus I wanted to ensure everything dried well. Your dry times may vary.
**** EDITED to add (2013): Home Depot allows you to cut down your wood, and they now have a mitered board that you can use. Consequently, you don't necessarily need to buy this part, if you are buying lumber from Home Depot. Your local lumber store might also cut this for you, so check with them as well.
Monday, May 10, 2010
Bits & Pieces
Normally, I'm a very project-oriented knitter and a process-oriented spinner. In that, when I knit, it's for a specific project and when I spin, I just like to spin. However, I'm currently, I'm spinning up for a certain project -- black merino & white merino for a the Musica fingerless gloves (Ravelry Link)
And I've discovered that spinning black wool is rather monotonous, and that I have to wear either light colored pants or have a light colored lap cloth in order to see what I'm doing. I've managed to get through 3 bobbins of white merino and am now currently working through my 2nd bobbin of black merino.
Since failing at my last lace project, I've been at a loss for what to do knitting-wise....despite having a rather long-ish queue on Ravelry. So, I'm keeping myself busy with small projects until I get my bearings again. I started (and finished) an octopus; I think I'm more partial to actually crocheting toys (ala amigurumi) instead.
Also, I started a dead-fish hat for my nephew's birthday (which is at the end of next month), but I figure I'll get it out of the way.
Plus, it allows me to use up most of the yarn that I used for my Cat-in-the-Bag Ravelympics project.
Friday, May 7, 2010
The Difference of a Few Microns
A bit ago, a friend was helping me to get better at spinning. I had some really good soft and wonderful merino, which I had spun a little bit previously without issue, but I was having trouble spinning "thinner" in order to spin for the project I want. She gave me some faboo superwash merino from Crown Mountain Farms to try.
And, the difference was amazing. I could really tell the difference between the different fibers. The CM Merino was so much softer than the other merino and I was able to draft much easier. Consequently, I was able to spin thinner. She told me that it was going to be easier to spin thinner on very good fiber.
It's not to say that the other merino was bad. It's good merino, but the Crown Mountain was *excellent* merino. Much like the difference between decent wine and EXCELLENT wine.
After finishing about 2 oz of the CM merino, I went back to spin some of the other merino fiber, and it didn't draft as smoothly as the Crown Mountain version, nor was it as soft. But, I was now able to draft it a lot thinner than previously.
And she was absolutely right, it DOES help to learn how to spin *thinner* on very very good fiber. It's made working with the decent merino easier than before.
And, I think I shall have to buy more of the Crown Mountain merino.
Thursday, May 6, 2010
When Learning Lace...
When doing your first actual "lace" shawl project, it's probably best to start off simple and *not* do something so complicated.
Last night, I started the chart on Torreyana pattern from Knitty with my Japanese Maple homespun.
And, it's NOT reading the pattern that is complicated or hard, but the combination of:
1) really really having to pay attention
2) never really having done *lace* before
3) homespun that's slightly still active....
Ergh. Not a good combination. I ended up with knots, wrong # of stitches, dropped stitches, etc. I had to rip out & start over multiple last night before I gave up after two hours. I thought to just get through the swatch, but I can't seem to get 6 rows into it without *something* going wrong.
And, can I say that working with such thin yarn? I ended up fighting with it more than enjoyed the whole process. It was a nail biting experience and that's JUST with the swatch. I'm not wholly sure I would enjoy knitting this pattern with my oh-so-lovely-homespun.
If I used a worseted weight yarn, I might be able to get through the swatch without problems. I just don't think it's going to happen with my homespun. *sigh*
Subscribe to:
Comments (Atom)

