The lazy kate that I wanted (the Will Taylor 45 degree angle Lazy Kate), which was been recommended by several websites as well as a friend, that I got a chance to play. And I definitely did like it. The problem is having it in stock at Carolina Homespun. Not to mention, it's a bit pricey and we're trying to save a bit of money.
As DH & I do quite a bit of DIY, and really, what is a lazy kate but bits of wood and metal?!? So I decided that trip to Home Depot was in order and that I was going to fashion myself a lazy kate.
I outlined what I wanted, plus showed DH a few photos other 45 degree angle kates; he agreed it was totally do-able. I originally wanted a 3-ply kate, but DH suggested that 4 might be better. Who am I to argue?
Summary: This is a really easy project if you've got a bit of time and have done some DIY stuff before.
WARNING: If you don't know how to use a saw, then DO NOT DO THIS.
PLEASE TAKE ALL PRECAUTIONARY MEASURES WHEN USING THESE TOOLS. SAFETY IS FIRST AND FOREMOST!!!!
Materials
1) hardwood dowel about 2" in diameter ($3.00)
2) a birch wooden board 2 feet in length ($2.00)
3) 3/16" metal rod (4 feet long) ($4.00)
4) plastic miter board ($5.00) ****
5) Saw teeth for cutting metal. ($3.00)
Other items that we already had (with approximate costs)
* Wood Glue ($2.00)
* 1.5 - 2" flat head screws (or an appropriate size for your dowels). (~$2.00)
* miter handsaw (~$10.00)
* hacksaw (~$10.00)
* C-clamps and other assorted clamps (~$1.00 - $5.00)
* A drill of some sort. You need to be able to make holes in wood. We have a cordless Makita power drill driver that's we got when we rebuilt our fence. You can also use a hand drill of some sort
Step 1:Cutting & Glue-ing.
1. Cut out the number of dowels you need to 45 degree angle using the miter board.
2. Measure out how wide your bobbins are, and approximately how much room you need between bobbins and mark your wood board for where the center of each dowel should be.
(For example: The Xs mark the center of where each dowel should be. They are spaced evenly as possible to allow the bobbins to rotate freely.)
--------------------------
| X X X |
--------------------------
You should also mark the OTHER side of the board with the same placements. (If necessary, cut off any extra board length you don't need)
3. Glue the dowels in place. This was allowed to dry completely.***
Time: 15 minutes (at most)
Drying time: 1 full day.***
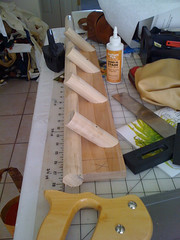
(The large dowel is acting as support for the glued dowels.)
Step 2: Adding Screws
After the glue has dried, drill holes into the underside of the board *INTO* the dowels in question using the markings you made in Step 1. These screws will help anchor the dowels in place.
Make sure you get the appropriate size screws that will go through the board AND into the dowel itself. Make sure to get flat-head screws as in order to sink *into* the wood so that it's flush with the edge.

Step 3:Sanding & Staining
Next, the whole thing was sanded down, stained, then varnished. I used the left over stain and varnish from Nona.
Time to sand down: 10 minutes
Staining: 10 minutes per staining session (3 staining sessions to get the color to match)
Drying time: 1 hour on a very hot day between staining sessions
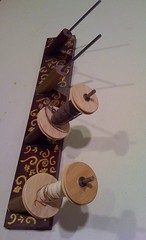
Step 4:Adding Rods
1. The rods were clamped down then cut down to the appropriate size to hold a bobbin
2. Holes for the rods were drilled in the dowels. You don't need to drill down very far.
(The rods are removable.)
Time: 5-15 minutes
Step 5: Painting
I wanted to make sure that the Kate matched my lovely Nona. So I got out the stencils & paint I used for Nona and went to town.
Time: 30 minutes.
Overall
* Total cost for materials (not including the drill): $17.00 - $35.00 (depending on what materials you already have)
* Total labor (not including drying time): ~ 1.5 - 2 hours spread out over 2 days.
* Drying time: ~1.5 days***
* Total number of days: 2 days
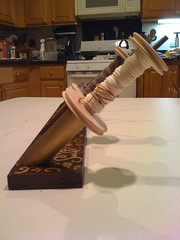
(Here's how far the bobbin is from the bottom. I probably could have cut the dowels shorter.)
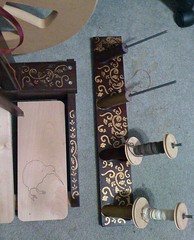
(Here's the Lazy Kate next to Nona)
-------------------
*** Note: Some of our dry times were a bit long because we started this when it we had wet & rainy weather; plus I wanted to ensure everything dried well. Your dry times may vary.
**** EDITED to add (2013): Home Depot allows you to cut down your wood, and they now have a mitered board that you can use. Consequently, you don't necessarily need to buy this part, if you are buying lumber from Home Depot. Your local lumber store might also cut this for you, so check with them as well.
Love your new Lazy Kate. Printing out the instructions for DH and his friends to make me one for my Kiwi bobbins.
ReplyDeleteFYI you will never regret going for a 4 bobbin Lazy Kate. I have one for my Jensen and it is wonderful for storing bobbins not in use.
Thanks! Let me know how it turns out.
ReplyDeleteOh, that is so clever! I will need to add something similar to my woodworking queue. Thanks for sharing the instructions.
ReplyDeleteHi! I followed a Ravelry link to this post. What a great Kate, and simpler than having to build in a tensioner device. I wonder if I can get this moved to the top of DH's list of projects? :-)
ReplyDeleteGreat blog, Jade. I'll be following!
Tess
That's a lovely Kate! Thanks for posting the link from Rav.
ReplyDelete