There are three tools that I find useful and have made my spinning so much better.
- a WPI tool
- a Spinner's Control Card
- a Twist card
(For ease of use, there are various smartphone apps out there that provide you some of these tools.)
The WPI Tool:
The Wraps-Per-Inch (WPI) tool basically tells you how much yarn wraps around an inch. The following is an image of a WPI tool from Nancy's Knick Knacks. The picture shows greater than an inch, but you get the idea. This comes with a handy-dandy reference card that tells you how your WPI corresponds to yarn weights. For example: laceweight = 35+ WPI; worsted = 9-11 WPI; bulky = 6 or less WPI.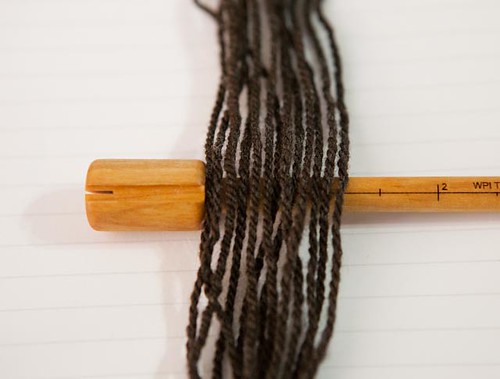
Generally, I tend to use it determine the final WPI for my handspun yarn. But, you can also use the following tool....
Spinner's Control Card
The Spinner's Control Card
You can use either the Spinner's Control Card or the WPI Tool to determine the WPI of any yarn (and thus the yarn weight), whether it is handspun or some unknown commercial yarn. I tend to use the Spinner's Control Card while I'm spinning.
Twist Angle
This handy tool can easily be made with the aid of a protractor. It tells you how much twist you have in your single. The greater the twist, the more tightly spun your yarn. The smaller the twist, then the more lightly spun your yarn.To use it, you do a ply-back test as you are spinning, and then measure the angle of your bumps against this card. (You can only do this test when the yarn is "fresh" (i.e. within milliseconds of being put on your bobbin. If you wait 5+ minutes to measure, then the plyback test isn't as accurate.)

If you want a tight twist (like for socks), you want a something greater than 30% twist. For something long wearing, like rugs, you probably want something greater than 60% twist.
Using these Tools & Why You Use Them
So, how does all these work together? Well, these tools allow you to spin the yarn you want without having to second-guess what you're doing.The WPI tool and Spinner's Control Card helps you determine the weight of your yarn. I usually use the WPI tool with the finished plied yarn. And I use the Spinner's Control Card to measure my singles while I'm spinning. But this is not a hard and fast rule.
With a little bit of math along with these tools, you can easily determine the weight of your finished and/or plied handspun. For example, if you know that you always create frog-hair singles (i.e. 40 WPI or more), then you're going to need a lot of singles to make a bigger yarn.
For example: You regularly spin 40 WPI singles (this is your comfort zone), and you want:
- a fingering weight yarn (19-22 WPI), then 2 plies will give you a fingering weight.
- 40 WPI single ply / 2 plies = 20 WPI
- a worsted weight yarn (9-11 WPI), then you'll need about 4 singles.
- 40 WPI ply / 4 plies = 10 WPI
- a bulky weight yarn (6 or lower WPI), then, you need about 7 singles
- 40 WPI ply / 7 plies = 5.7 WPI
OR, you can change your singles instead, by changing the ratio on your wheel to a lower ratio and using the Spinner's Control Card to check your WPI gauge to something thicker. You can continue to tweak your ratio until you get the WPI gauge you want to achieve. (Of course, you'll still need to spin up a sample of your yarn and knit a test swatch to see if that works for you.).
By changing the WPI of your singles, you change what type of yarn you can produce, and more accurately reproduce the yarn you want instead of second-guessing what you're doing. For example:
- If you wanted a 3-ply worsted weight yarn (9-11 WPI), then in order to get a 3ply, you need
- 10 WPI x 3 plies = 30 WPI singles
- If you wanted a 4-ply bulky yarn (6 or lower WPI), then you need:
- 6 WPI x 4 plies = 24 WPI
The Spinner's Control Card can help you spin consistent singles of various WPI. It allows you to measure the singles while you're spinning so that you can ensure that you're spinning the correct weight. It takes a little bit of practice to get bigger singles if you normally spin super fine frog-hair yarn, but the end result is worth it.
So, where does twist come into play? Well, as mentioned before, if you want hard-wearing yarn, like for socks, then you need a higher twist. If you measure your yarn twist while you're spinning, you won't be surprised if the finished product doesn't have enough twist for socks. You'll know WHILE you're spinning it.
(I highly suggest that you refer to the The Knitter's Book of Yarn: The Ultimate Guide to Choosing, Using, and Enjoying Yarn
Using these tools does require a bit of practice, but practice makes perfect (as the saying goes), and by practicing spinning, we get better at it.
So, in conclusion, using these tools allows you to:
- Spin the type of yarn you want to spin without guesswork
- Reproduce the type of yarn you want at any time.
- And by knowing how to spin the yarn YOU want, you can deconstruct commercial yarn that you like and replicate it on your wheel!
I think that's reason enough to try out these simple tools to make your spinning better.
Real World Example
One of the things that I'm spinning for is an Old Shale Stole. It's a lovely pattern that lets you use sport or DK weight yarn. The pattern calls for the following yardage:- 1675 = sport weight
- 1200-1400 = DK weight
Step 1: I did a some math: Now, I know that a DK weight yarn is about 12-14 WPI. So, this means that I need my singles to be about 24-28 WPI ---> 12 WPI * 2 plies = 24 WPI
Step 2: I started spinning a sample and adjusted the ratio on my Kiwi until I got about what I needed (using the 7.25:1 whorl). And I check periodically using the Spinner's Control Card to ensure that I'm on the right track.
Step 3: My yarn twist is about 20 degrees. This number is fine since I don't want to make too hard of yarn with a lot of twist. I want something close to balance (err'ing on the side of slightly too much twist).
Here's the sample skein (1/2 oz) that I spun up as well as 2 quills of singles that I spun later after finishing my sample skein.

After I spun up my sample skein, I was pretty much exact in the type of yarn I wanted to create. I'm not sure if you can tell, but the resulting yarn is 12 WPI. This is EXACTLY the yarn I wanted.

And I made it without second guessing what my WPI or how many singles I need to make the yarn that I want to make. The math worked out, and the tools helped me get the exact yarn I wanted.
But, you might say, If you KNEW how to that you were going to get the yarn you wanted, why even bother with a sample skein? The math worked out!
You are correct. The math worked out and I created the yarn I wanted, but now, I need to determine how much fiber I need to actually get the yardage I want. And I can't do that without making a sample skein.
But, that's the topic of another post. :-)
Fascinating! I don't spin, though I'd love to learn.
ReplyDeleteWhen I started reading your post, it was very confusing. By the time I finished, it all made sense and seemed very simple to calculate. Very nicely written.
Thanks. I'm glad you found it useful. I wanted to share what I've learned and hoped that folks would be able to use the information. :-)
ReplyDelete