....spinning dyed black merino wool....is BORING***...
And, I have to put a light colored fabric over my lap in order to see the actual fibers.
Luckily, I have to only do one more ounce of black merino before I can start plying.
I can't wait to finish the spinning for the Musica Gloves, and start spinning something with a bit more colour.
*** Spinning actual natural black merino probably wouldn't be boring
Monday, May 24, 2010


Thursday, May 20, 2010
One Turkish Spindle
I've had a hankering to actually *use* the Jenkins Turkish Spindle that I got over at Stitches West -- nevermind I have 3 spinning projects already going (1 on the wheel, 2 on spindles).
I had 2oz of corriedale roving from Spunky Eclectic that was sitting there waiting for me to use. So, last night, I grabbed the Turkish Spindle, opened up Respect the Spindle to the Turkish Spindle section, read up on how to wind onto the arms, how to do a half-hitch...and away I went.
Eventually, I ended up with a bit of yarn.

Differences
I have to say that it was a lot easier than I had expected -- probably because I already have the basics done. But, having a bottom weight spindle was very different from my other top whorl ones. It's not better or worse, but just *different*.
* the whorl doesn't spin as fast as a top whorl spindle, but it does spin for a lot longer duration -- this takes some getting used to. As a result, the yarn is more loosely spun as woolen, versus worseted. Of course, I've also "dropped" the spindle several times because there wasn't enough twist (versus when I learned the top-whorl, where I had too must twist....)
* I have to make sure the bottom whorl doesn't actually bump into anything, like chair legs. The spacial requirements are slightly different.
* there's no hook, so I have to use a half-hitch at the top of the spindle, which is going to take a bit of practice.
* stopping & winding on the yarn isn't as 'easy' as a top whorl spindle, because I have to unhitch the half-hitch, then carefully wind onto the arms of the whorl.
Of course, I'm sure much of these differences are easily solvable by more practice and getting used to the differences. But other than that, I do like it. I think I might prefer my top whorl a teeny bit better, but again, it's just a different tool for the job.
I had 2oz of corriedale roving from Spunky Eclectic that was sitting there waiting for me to use. So, last night, I grabbed the Turkish Spindle, opened up Respect the Spindle to the Turkish Spindle section, read up on how to wind onto the arms, how to do a half-hitch...and away I went.
Eventually, I ended up with a bit of yarn.
Differences
I have to say that it was a lot easier than I had expected -- probably because I already have the basics done. But, having a bottom weight spindle was very different from my other top whorl ones. It's not better or worse, but just *different*.
* the whorl doesn't spin as fast as a top whorl spindle, but it does spin for a lot longer duration -- this takes some getting used to. As a result, the yarn is more loosely spun as woolen, versus worseted. Of course, I've also "dropped" the spindle several times because there wasn't enough twist (versus when I learned the top-whorl, where I had too must twist....)
* I have to make sure the bottom whorl doesn't actually bump into anything, like chair legs. The spacial requirements are slightly different.
* there's no hook, so I have to use a half-hitch at the top of the spindle, which is going to take a bit of practice.
* stopping & winding on the yarn isn't as 'easy' as a top whorl spindle, because I have to unhitch the half-hitch, then carefully wind onto the arms of the whorl.
Of course, I'm sure much of these differences are easily solvable by more practice and getting used to the differences. But other than that, I do like it. I think I might prefer my top whorl a teeny bit better, but again, it's just a different tool for the job.
Wednesday, May 19, 2010
One Fish, Two Fish, Three Fish...Dead Fish.
Sometimes, you just have to make something "fun"....like knitting a dead fish. And, this was particularly fun to do. I enjoyed adding the white felt 'dead' eyes to the fish afterwards. AND, it ended up using the remainders of yarn I had left over from the octopus and cat-in-the bag.
However, watching that last bit of yarn slowly get shorter when you're *almost* done can be quite disconcerting. When I finally finished binding off, I had 4 inches left of blue.
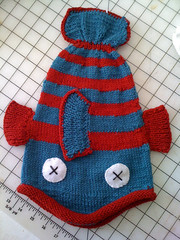
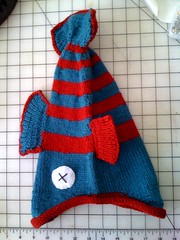
I so can't wait to give it to the Youngest Nephew for his birthday.
Details on Ravelry
Yarn: Cascade 220 Red & Teal
Needles: US 7
However, watching that last bit of yarn slowly get shorter when you're *almost* done can be quite disconcerting. When I finally finished binding off, I had 4 inches left of blue.
I so can't wait to give it to the Youngest Nephew for his birthday.
Details on Ravelry
Yarn: Cascade 220 Red & Teal
Needles: US 7
Monday, May 17, 2010
Knitting Mojo
In an effort to get my knitting mojo back from the disastrous and EPIC fail project using my lace-fingerweight handspun on the Torreyana pattern (Ravelry link), I've been working on very small and easy projects.
Last night I started working on another simple project -- this time a shawl -- with a simple lace pattern using some commercial fingerweight yarn just to assuage my fear that I can't do a lace shawl. And, so far, so good. The pattern is relatively easy to memorize and I haven't had problems with the fingering weight yarn.
Afterwards, I'll try swatching the Torreyana with commercial fingerweight and see if things go well. If it does, then it just might be this project is not right for my handspun or I have trouble with something thinner than fingerweight (4-ply) yarn (as the handspun is heavylace-fingering weight, but more lace)
If it doesn't go well, then this lace pattern might be too complicated for me to tackle readily...just yet.
Last night I started working on another simple project -- this time a shawl -- with a simple lace pattern using some commercial fingerweight yarn just to assuage my fear that I can't do a lace shawl. And, so far, so good. The pattern is relatively easy to memorize and I haven't had problems with the fingering weight yarn.
Afterwards, I'll try swatching the Torreyana with commercial fingerweight and see if things go well. If it does, then it just might be this project is not right for my handspun or I have trouble with something thinner than fingerweight (4-ply) yarn (as the handspun is heavylace-fingering weight, but more lace)
If it doesn't go well, then this lace pattern might be too complicated for me to tackle readily...just yet.
Wednesday, May 12, 2010
Octopus Anyone?
In the attempt to get my knitting mojo back, I took to making an octopus as a quick and easy knit from the book, Amigurumi Knits.


Here's my octopus wrapped around the hacksaw used to help make my Lazy Kate.
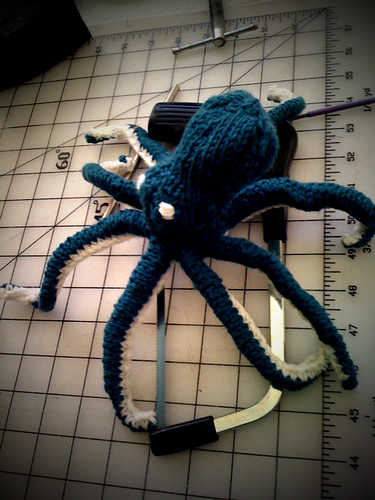
BTW, love, love, love this book. It's not exactly amigurumi (as technically, amis are crocheted, not knitted), but I love the patterns as they are quite unusual!
Here's my octopus wrapped around the hacksaw used to help make my Lazy Kate.
BTW, love, love, love this book. It's not exactly amigurumi (as technically, amis are crocheted, not knitted), but I love the patterns as they are quite unusual!
Tuesday, May 11, 2010
DIY Lazy Kate
Presently, I had been using the lazy kate that came with my Ashford Kiwi. It's a small little kate with two pegs for bobbins, which has been fine with just doing two-plys. However, it's problematic if I wanted to do more than two ply yarn. And, there's some issues with ensuring that there's appropriate tension being applied. Usually, I tilt the lazy kate at a 45 degree angle, or put long rubber bands around the bobbin grooves.
The lazy kate that I wanted (the Will Taylor 45 degree angle Lazy Kate), which was been recommended by several websites as well as a friend, that I got a chance to play. And I definitely did like it. The problem is having it in stock at Carolina Homespun. Not to mention, it's a bit pricey and we're trying to save a bit of money.
As DH & I do quite a bit of DIY, and really, what is a lazy kate but bits of wood and metal?!? So I decided that trip to Home Depot was in order and that I was going to fashion myself a lazy kate.
I outlined what I wanted, plus showed DH a few photos other 45 degree angle kates; he agreed it was totally do-able. I originally wanted a 3-ply kate, but DH suggested that 4 might be better. Who am I to argue?
Summary: This is a really easy project if you've got a bit of time and have done some DIY stuff before.
WARNING: If you don't know how to use a saw, then DO NOT DO THIS.
PLEASE TAKE ALL PRECAUTIONARY MEASURES WHEN USING THESE TOOLS. SAFETY IS FIRST AND FOREMOST!!!!
Materials
1) hardwood dowel about 2" in diameter ($3.00)
2) a birch wooden board 2 feet in length ($2.00)
3) 3/16" metal rod (4 feet long) ($4.00)
4) plastic miter board ($5.00) ****
5) Saw teeth for cutting metal. ($3.00)
Other items that we already had (with approximate costs)
* Wood Glue ($2.00)
* 1.5 - 2" flat head screws (or an appropriate size for your dowels). (~$2.00)
* miter handsaw (~$10.00)
* hacksaw (~$10.00)
* C-clamps and other assorted clamps (~$1.00 - $5.00)
* A drill of some sort. You need to be able to make holes in wood. We have a cordless Makita power drill driver that's we got when we rebuilt our fence. You can also use a hand drill of some sort , or get a drill bit for a Dremel. The hand-drill is the least expensive at about $20 - $30.00. (Or cheaper yet, borrow a friend's drill)
Step 1:Cutting & Glue-ing.
1. Cut out the number of dowels you need to 45 degree angle using the miter board.
2. Measure out how wide your bobbins are, and approximately how much room you need between bobbins and mark your wood board for where the center of each dowel should be.
(For example: The Xs mark the center of where each dowel should be. They are spaced evenly as possible to allow the bobbins to rotate freely.)
You should also mark the OTHER side of the board with the same placements. (If necessary, cut off any extra board length you don't need)
3. Glue the dowels in place. This was allowed to dry completely.***
Time: 15 minutes (at most)
Drying time: 1 full day.***
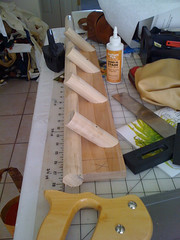
(The large dowel is acting as support for the glued dowels.)
Step 2: Adding Screws
After the glue has dried, drill holes into the underside of the board *INTO* the dowels in question using the markings you made in Step 1. These screws will help anchor the dowels in place.
Make sure you get the appropriate size screws that will go through the board AND into the dowel itself. Make sure to get flat-head screws as in order to sink *into* the wood so that it's flush with the edge.

Step 3:Sanding & Staining
Next, the whole thing was sanded down, stained, then varnished. I used the left over stain and varnish from Nona.
Time to sand down: 10 minutes
Staining: 10 minutes per staining session (3 staining sessions to get the color to match)
Drying time: 1 hour on a very hot day between staining sessions
Step 4:Adding Rods
1. The rods were clamped down then cut down to the appropriate size to hold a bobbin
2. Holes for the rods were drilled in the dowels. You don't need to drill down very far.
(The rods are removable.)
Time: 5-15 minutes
Step 5: Painting
I wanted to make sure that the Kate matched my lovely Nona. So I got out the stencils & paint I used for Nona and went to town.
Time: 30 minutes.
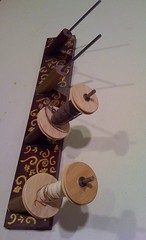
Overall
* Total cost for materials (not including the drill): $17.00 - $35.00 (depending on what materials you already have)
* Total labor (not including drying time): ~ 1.5 - 2 hours spread out over 2 days.
* Drying time: ~1.5 days***
* Total number of days: 2 days
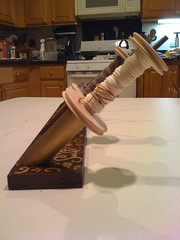
(Here's how far the bobbin is from the bottom. I probably could have cut the dowels shorter.)
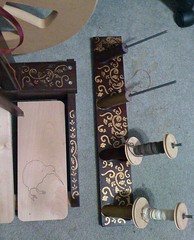
(Here's the Lazy Kate next to Nona)
-------------------
*** Note: Some of our dry times were a bit long because we started this when it we had wet & rainy weather; plus I wanted to ensure everything dried well. Your dry times may vary.
**** EDITED to add (2013): Home Depot allows you to cut down your wood, and they now have a mitered board that you can use. Consequently, you don't necessarily need to buy this part, if you are buying lumber from Home Depot. Your local lumber store might also cut this for you, so check with them as well.
The lazy kate that I wanted (the Will Taylor 45 degree angle Lazy Kate), which was been recommended by several websites as well as a friend, that I got a chance to play. And I definitely did like it. The problem is having it in stock at Carolina Homespun. Not to mention, it's a bit pricey and we're trying to save a bit of money.
As DH & I do quite a bit of DIY, and really, what is a lazy kate but bits of wood and metal?!? So I decided that trip to Home Depot was in order and that I was going to fashion myself a lazy kate.
I outlined what I wanted, plus showed DH a few photos other 45 degree angle kates; he agreed it was totally do-able. I originally wanted a 3-ply kate, but DH suggested that 4 might be better. Who am I to argue?
Summary: This is a really easy project if you've got a bit of time and have done some DIY stuff before.
WARNING: If you don't know how to use a saw, then DO NOT DO THIS.
PLEASE TAKE ALL PRECAUTIONARY MEASURES WHEN USING THESE TOOLS. SAFETY IS FIRST AND FOREMOST!!!!
Materials
1) hardwood dowel about 2" in diameter ($3.00)
2) a birch wooden board 2 feet in length ($2.00)
3) 3/16" metal rod (4 feet long) ($4.00)
4) plastic miter board ($5.00) ****
5) Saw teeth for cutting metal. ($3.00)
Other items that we already had (with approximate costs)
* Wood Glue ($2.00)
* 1.5 - 2" flat head screws (or an appropriate size for your dowels). (~$2.00)
* miter handsaw (~$10.00)
* hacksaw (~$10.00)
* C-clamps and other assorted clamps (~$1.00 - $5.00)
* A drill of some sort. You need to be able to make holes in wood. We have a cordless Makita power drill driver that's we got when we rebuilt our fence. You can also use a hand drill of some sort
, or get a drill bit for a Dremel. The hand-drill is the least expensive at about $20 - $30.00. (Or cheaper yet, borrow a friend's drill)Step 1:Cutting & Glue-ing.
1. Cut out the number of dowels you need to 45 degree angle using the miter board.
2. Measure out how wide your bobbins are, and approximately how much room you need between bobbins and mark your wood board for where the center of each dowel should be.
(For example: The Xs mark the center of where each dowel should be. They are spaced evenly as possible to allow the bobbins to rotate freely.)
--------------------------
| X X X |
--------------------------
You should also mark the OTHER side of the board with the same placements. (If necessary, cut off any extra board length you don't need)
3. Glue the dowels in place. This was allowed to dry completely.***
Time: 15 minutes (at most)
Drying time: 1 full day.***
(The large dowel is acting as support for the glued dowels.)
Step 2: Adding Screws
After the glue has dried, drill holes into the underside of the board *INTO* the dowels in question using the markings you made in Step 1. These screws will help anchor the dowels in place.
Make sure you get the appropriate size screws that will go through the board AND into the dowel itself. Make sure to get flat-head screws as in order to sink *into* the wood so that it's flush with the edge.

Step 3:Sanding & Staining
Next, the whole thing was sanded down, stained, then varnished. I used the left over stain and varnish from Nona.
Time to sand down: 10 minutes
Staining: 10 minutes per staining session (3 staining sessions to get the color to match)
Drying time: 1 hour on a very hot day between staining sessions
Step 4:Adding Rods
1. The rods were clamped down then cut down to the appropriate size to hold a bobbin
2. Holes for the rods were drilled in the dowels. You don't need to drill down very far.
(The rods are removable.)
Time: 5-15 minutes
Step 5: Painting
I wanted to make sure that the Kate matched my lovely Nona. So I got out the stencils & paint I used for Nona and went to town.
Time: 30 minutes.
Overall
* Total cost for materials (not including the drill): $17.00 - $35.00 (depending on what materials you already have)
* Total labor (not including drying time): ~ 1.5 - 2 hours spread out over 2 days.
* Drying time: ~1.5 days***
* Total number of days: 2 days
(Here's how far the bobbin is from the bottom. I probably could have cut the dowels shorter.)
(Here's the Lazy Kate next to Nona)
-------------------
*** Note: Some of our dry times were a bit long because we started this when it we had wet & rainy weather; plus I wanted to ensure everything dried well. Your dry times may vary.
**** EDITED to add (2013): Home Depot allows you to cut down your wood, and they now have a mitered board that you can use. Consequently, you don't necessarily need to buy this part, if you are buying lumber from Home Depot. Your local lumber store might also cut this for you, so check with them as well.
Monday, May 10, 2010
Bits & Pieces
Normally, I'm a very project-oriented knitter and a process-oriented spinner. In that, when I knit, it's for a specific project and when I spin, I just like to spin. However, I'm currently, I'm spinning up for a certain project -- black merino & white merino for a the Musica fingerless gloves (Ravelry Link)
And I've discovered that spinning black wool is rather monotonous, and that I have to wear either light colored pants or have a light colored lap cloth in order to see what I'm doing. I've managed to get through 3 bobbins of white merino and am now currently working through my 2nd bobbin of black merino.
Since failing at my last lace project, I've been at a loss for what to do knitting-wise....despite having a rather long-ish queue on Ravelry. So, I'm keeping myself busy with small projects until I get my bearings again. I started (and finished) an octopus; I think I'm more partial to actually crocheting toys (ala amigurumi) instead.
Also, I started a dead-fish hat for my nephew's birthday (which is at the end of next month), but I figure I'll get it out of the way.
Plus, it allows me to use up most of the yarn that I used for my Cat-in-the-Bag Ravelympics project.
And I've discovered that spinning black wool is rather monotonous, and that I have to wear either light colored pants or have a light colored lap cloth in order to see what I'm doing. I've managed to get through 3 bobbins of white merino and am now currently working through my 2nd bobbin of black merino.
Since failing at my last lace project, I've been at a loss for what to do knitting-wise....despite having a rather long-ish queue on Ravelry. So, I'm keeping myself busy with small projects until I get my bearings again. I started (and finished) an octopus; I think I'm more partial to actually crocheting toys (ala amigurumi) instead.
Also, I started a dead-fish hat for my nephew's birthday (which is at the end of next month), but I figure I'll get it out of the way.
Plus, it allows me to use up most of the yarn that I used for my Cat-in-the-Bag Ravelympics project.
Friday, May 7, 2010
The Difference of a Few Microns
A bit ago, a friend was helping me to get better at spinning. I had some really good soft and wonderful merino, which I had spun a little bit previously without issue, but I was having trouble spinning "thinner" in order to spin for the project I want. She gave me some faboo superwash merino from Crown Mountain Farms to try.
And, the difference was amazing. I could really tell the difference between the different fibers. The CM Merino was so much softer than the other merino and I was able to draft much easier. Consequently, I was able to spin thinner. She told me that it was going to be easier to spin thinner on very good fiber.
It's not to say that the other merino was bad. It's good merino, but the Crown Mountain was *excellent* merino. Much like the difference between decent wine and EXCELLENT wine.
After finishing about 2 oz of the CM merino, I went back to spin some of the other merino fiber, and it didn't draft as smoothly as the Crown Mountain version, nor was it as soft. But, I was now able to draft it a lot thinner than previously.
And she was absolutely right, it DOES help to learn how to spin *thinner* on very very good fiber. It's made working with the decent merino easier than before.
And, I think I shall have to buy more of the Crown Mountain merino.
And, the difference was amazing. I could really tell the difference between the different fibers. The CM Merino was so much softer than the other merino and I was able to draft much easier. Consequently, I was able to spin thinner. She told me that it was going to be easier to spin thinner on very good fiber.
It's not to say that the other merino was bad. It's good merino, but the Crown Mountain was *excellent* merino. Much like the difference between decent wine and EXCELLENT wine.
After finishing about 2 oz of the CM merino, I went back to spin some of the other merino fiber, and it didn't draft as smoothly as the Crown Mountain version, nor was it as soft. But, I was now able to draft it a lot thinner than previously.
And she was absolutely right, it DOES help to learn how to spin *thinner* on very very good fiber. It's made working with the decent merino easier than before.
And, I think I shall have to buy more of the Crown Mountain merino.
Thursday, May 6, 2010
When Learning Lace...
When doing your first actual "lace" shawl project, it's probably best to start off simple and *not* do something so complicated.
Last night, I started the chart on Torreyana pattern from Knitty with my Japanese Maple homespun.
And, it's NOT reading the pattern that is complicated or hard, but the combination of:
1) really really having to pay attention
2) never really having done *lace* before
3) homespun that's slightly still active....
Ergh. Not a good combination. I ended up with knots, wrong # of stitches, dropped stitches, etc. I had to rip out & start over multiple last night before I gave up after two hours. I thought to just get through the swatch, but I can't seem to get 6 rows into it without *something* going wrong.
And, can I say that working with such thin yarn? I ended up fighting with it more than enjoyed the whole process. It was a nail biting experience and that's JUST with the swatch. I'm not wholly sure I would enjoy knitting this pattern with my oh-so-lovely-homespun.
If I used a worseted weight yarn, I might be able to get through the swatch without problems. I just don't think it's going to happen with my homespun. *sigh*
Last night, I started the chart on Torreyana pattern from Knitty with my Japanese Maple homespun.
And, it's NOT reading the pattern that is complicated or hard, but the combination of:
1) really really having to pay attention
2) never really having done *lace* before
3) homespun that's slightly still active....
Ergh. Not a good combination. I ended up with knots, wrong # of stitches, dropped stitches, etc. I had to rip out & start over multiple last night before I gave up after two hours. I thought to just get through the swatch, but I can't seem to get 6 rows into it without *something* going wrong.
And, can I say that working with such thin yarn? I ended up fighting with it more than enjoyed the whole process. It was a nail biting experience and that's JUST with the swatch. I'm not wholly sure I would enjoy knitting this pattern with my oh-so-lovely-homespun.
If I used a worseted weight yarn, I might be able to get through the swatch without problems. I just don't think it's going to happen with my homespun. *sigh*
Wednesday, April 28, 2010
Tuesday, April 27, 2010
Cakes versus Balls
I wonder if this classifies as an age-old question that knitters might have? Which is better? Cakes or Balls? Honestly, I'm a big fan of cakes, myself. I can make two-things-at once (like socks) with a large enough cake, plus there's no rolling balls of yarn to wrangle with a bowl or whatnought. AND, winding a cake with a ball winder + swift is a lot faster than making a ball with a swift & hand-winding said ball.
However, I do like my yarn balls as well for certain types of yarn. There are some yarns, I have found, that like to grip itself, so when you pull from the center of the cake, you end up with a snarled blob of yarn that's managed to wrap itself around and you have to sit there and unpick that snarled mess out of its tangled state.
Also, as I've started spinning, some of my more energetic handspun is much happier with a bit more tension. Those curly-qs would really wreck havoc by looping around each other in the middle of the cake.
So, for my Japanese Maple, I rolled them up into yarn balls. I popped in an anime CD and spent about 30 minutes just winding 3 skeins into balls.
However, I do like my yarn balls as well for certain types of yarn. There are some yarns, I have found, that like to grip itself, so when you pull from the center of the cake, you end up with a snarled blob of yarn that's managed to wrap itself around and you have to sit there and unpick that snarled mess out of its tangled state.
Also, as I've started spinning, some of my more energetic handspun is much happier with a bit more tension. Those curly-qs would really wreck havoc by looping around each other in the middle of the cake.
So, for my Japanese Maple, I rolled them up into yarn balls. I popped in an anime CD and spent about 30 minutes just winding 3 skeins into balls.
Monday, April 26, 2010
Ditty Bag Sewing
I have a fondness for bags, because they're useful and I can put things in them, like knitting & spinning projects. I also use them to store a variety of things. Plus, I can churn out a ditty bag, small reticule/purse, etc in a very short amount of time.
Bags are great for first-time sewers because they are simple; you can make something functional; and you can make something that matches your outfit. PLUS, it doesn't take a lot of fabric, so you can easily use fabric scraps from bigger projects to make your bag.
On Saturday, I went over to JoAnn’s crafts to pick up a few things, and I passed by their clearance aisle, and decided to take a look. They had a whole slew of their swatch samples on sale for $0.97 - $2.99. These are about 24 x 24 inches of some nice fabric -- everything from silk to brocades to jacquards to cotton to wool.
So, I went through their bin to grab some, because I thought these would be perfect for little project bags or small accessories where I didn’t need a lot of fabric (and the price was right). And I thought I’d let the fabric dictate what it would look like in the end. (I had no plan, really, as of yet)
When I got home, two pieces of fabric, a sea green in a poly-rayon and a dark forest green in a loose weave jumped out at me. Two different fabrics with two different textures. PLUS, as I remembered I had some sea foam ribbon from a previous project (teaching ribbon flowers)
My first plan? Make a circular bottom out of the dark green. Use the light green as the body of the bag, and then maybe use the dark green as trim. It didn’t work, because I mis-measured and cut the light green yardage too short to fit around the circular bottom. So, instead,
1. Made strips of the dark green & light green,
2. Alternated them to make a single piece of fabric
3. Treated that as a single piece of fabric for the body and cut out what I needed
4. Seamed up the sides, and attached it to the circular bottom.
5. Got some left over fabric from a previous project, and lined it.
6. Added a ‘casing’ to the top of the bag so it’ll cinch close
7. Used the green ribbon and pleated it for a decorated top…which also hides the casing
8. Used leftover of the alternating fabric to make a “strap” to add to the side of the bag (which also hides the string for the closure.
Shopping time: 30 minutes
Sewing time: 20 minutes -- mostly to reconfigure the original bag and having to seam rip 2x!
Uses: knitting-on-the-go, drop spindling, or basically anything where you need a ditty bag…..

Bags are great for first-time sewers because they are simple; you can make something functional; and you can make something that matches your outfit. PLUS, it doesn't take a lot of fabric, so you can easily use fabric scraps from bigger projects to make your bag.
On Saturday, I went over to JoAnn’s crafts to pick up a few things, and I passed by their clearance aisle, and decided to take a look. They had a whole slew of their swatch samples on sale for $0.97 - $2.99. These are about 24 x 24 inches of some nice fabric -- everything from silk to brocades to jacquards to cotton to wool.
So, I went through their bin to grab some, because I thought these would be perfect for little project bags or small accessories where I didn’t need a lot of fabric (and the price was right). And I thought I’d let the fabric dictate what it would look like in the end. (I had no plan, really, as of yet)
When I got home, two pieces of fabric, a sea green in a poly-rayon and a dark forest green in a loose weave jumped out at me. Two different fabrics with two different textures. PLUS, as I remembered I had some sea foam ribbon from a previous project (teaching ribbon flowers)
My first plan? Make a circular bottom out of the dark green. Use the light green as the body of the bag, and then maybe use the dark green as trim. It didn’t work, because I mis-measured and cut the light green yardage too short to fit around the circular bottom. So, instead,
1. Made strips of the dark green & light green,
2. Alternated them to make a single piece of fabric
3. Treated that as a single piece of fabric for the body and cut out what I needed
4. Seamed up the sides, and attached it to the circular bottom.
5. Got some left over fabric from a previous project, and lined it.
6. Added a ‘casing’ to the top of the bag so it’ll cinch close
7. Used the green ribbon and pleated it for a decorated top…which also hides the casing
8. Used leftover of the alternating fabric to make a “strap” to add to the side of the bag (which also hides the string for the closure.
Shopping time: 30 minutes
Sewing time: 20 minutes -- mostly to reconfigure the original bag and having to seam rip 2x!
Uses: knitting-on-the-go, drop spindling, or basically anything where you need a ditty bag…..
Friday, April 23, 2010
Sheep Pigs
The problem with the Internets is that once you follow a really interesting link, you kinda want to do more research, which leads to more interesting links, etc...ad naseum...until you've found that you've wasted several hours doing "research".
Luckily, this only wasted about 15 minutes of my time, but it IS fiber related:
A friend posts this link about sheep-pigs. They really do look like sheep.
So, I google the sheep name, "Mangalitsa" & "spinning". Why? Because if pig looks like a sheep, then SOMEONE has got to at least tried and spin this fiber, right?
Which leads me to this page, along with the following comment
So, of course, I have to go look at that particular URL, and they have only a little bit of information, but I found this one fascinating.
And, this is where I hit a dead end, because the website has not much more and googling Lincolnshire pigs leads me to nothing except pages about the extinct breed.
Now, this only makes me curioser on whether or not the fiber can be spun from the new breed of Lincoln-Mangalitizas woolly pig. I think I shall have to email the Rectory Reserve.
Luckily, this only wasted about 15 minutes of my time, but it IS fiber related:
A friend posts this link about sheep-pigs. They really do look like sheep.
So, I google the sheep name, "Mangalitsa" & "spinning". Why? Because if pig looks like a sheep, then SOMEONE has got to at least tried and spin this fiber, right?
Which leads me to this page, along with the following comment
Here in Lincolnshire, England the wool of the Lincolnshire Curly pig was used in the 19th Century for spinning and then knitting into waistcoats for workers in the fields. The wool is not only warm but hydrophobic and we can speculate that,after getting caught in an English rain shower, all one needed to do was shake the waistcoat vigourously to get it dry. When carding the wool the bristles should be discarded. To make the wool easier to knit, by decreasing the risk of breaking, some longer fibres were often mixed in from e.g Lincolnshire long wool sheep. The Lincolnshire Curly Coat went extinct in 1972 but earlier in the 20th century they had been crosss bred with Mangalitzas which were very similar. Today we have reintroduced Curly Coated pigs, ie Mangalitzas, to Lincolnshire and have experimented with knitting up their wool. The small quantities available have necessitated small scale demonstrative pieces so far but we hope to do more in 2010. For those interested, we will post more details of our activities during the summer on our Blog at www.rectoryreserve.co.uk
So, of course, I have to go look at that particular URL, and they have only a little bit of information, but I found this one fascinating.
Records for the Lincoln Show of 1911 show that 123 Curly Coat pigs were entered with Class 25 having five entries for “three clean washed Lincolnshire Curly Coat
And, this is where I hit a dead end, because the website has not much more and googling Lincolnshire pigs leads me to nothing except pages about the extinct breed.
Now, this only makes me curioser on whether or not the fiber can be spun from the new breed of Lincoln-Mangalitizas woolly pig. I think I shall have to email the Rectory Reserve.
Thursday, April 22, 2010
Perfection is the Enemy of the Done (or The Best Camera)
As a very wise and accomplished costume designer once told me, "Perfection is the Enemy of the Done."
These words were said to me during one of her corsetry classes as she watched me painstakingly work on some fiddly-bit on the project. Her words shocked me, as it was probably one of the best pieces of advice that I had ever heard. She was right, of course. If I continued trying to get this one teensy thing right, I wouldn't be done by the end of the class -- and as the purpose of the class was to understand the basics of creating this particular corset, I could worry about the fiddly bits later and ensure that I get help & feedback on the big parts.
I've taken her advice (and dispensed it, as well) on my sewing projects. Yes, I should do a very good job on ensuring that everything fits, is well tailored, and that there are no loose thread ends to be seen. HOWEVER, if it's going to take me 4 hours to *perfect* one small part of a costume and I only have 6 hours to finish? Well, why would I spend 4 hours to perfect something when spending one (1) hour can get me "good" enough until I can make it better later? Besides, who is going to care that the inside lining stitches under the arm aren't 100% straight? Who's going to see it?
So, I've become somewhat of an "organic" costumer, in that sense. I've also carried that philosophy over to my knitting & crocheting. Dropped stitch? Easily fixed without tearing my hair out. Did I end up with 1-2 extra stitch in a row? Not a problem. I'll just K2TOG or P2TOG it out of existence (as long as it doesn't completely mess up the pattern)
I'll use lifelines, stitch markers, and all other manner of tricks just to save myself time and frustration *when* I make a mistake. (I'm not vain enough to think that my knitting is "perfect" and that I won't make a mistake.)
However, I've seemed to *not* taken that advice to heart when it comes to photography. (And you may ask yourself what this has to do with costuming or knitting or crocheting, but I'm getting to that....)
Specifically, I won't mark a knitting/crochet project as 'finished' (on Ravelry) until I can get a photo of it up onto the project page. HOWEVER, sometimes it takes me a while to get the photo because I'm too busy or the outside light isn't good enough or I just do not want to take out the lights and setup a whole photoshoot because I'm lazy.
Consequently, I'm missing photos of various projects I have finished because I haven't gotten around to taking those photos. Dragging out all of the professional gear can be sometimes a hassle and not to mention heavy/bulky to carry around ALL THE TIME.
Chase Jarvis, who is a very successful photographer whose work I do admire, said that the *BEST camera* is the one you have with you. And, nowadays, most people actually have their camera phone with them at all times. Chase even has a whole website dedicated to iPhone & mobile camera photography.
Sure, mobile or smartphone cameras don't have the bells & whistles of those fancy professional cameras (like my other ones) but it IS a camera. And if you HAVE a camera on you, you'll be more likely to use it.
So, this morning, before rushing off to work, I snapped several photos of myself wearing the sweater in the mirror using my iPhone, did some *minor* post processing on my special photo iPhone app, and now, I have a decent photo of my finished project.
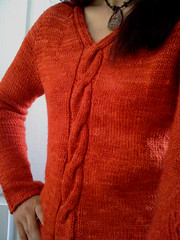
Eventually, I'll get around to taking a better photo with my camera gear, but now I can consider this *DONE*. After all, perfection is the enemy of the done.
These words were said to me during one of her corsetry classes as she watched me painstakingly work on some fiddly-bit on the project. Her words shocked me, as it was probably one of the best pieces of advice that I had ever heard. She was right, of course. If I continued trying to get this one teensy thing right, I wouldn't be done by the end of the class -- and as the purpose of the class was to understand the basics of creating this particular corset, I could worry about the fiddly bits later and ensure that I get help & feedback on the big parts.
I've taken her advice (and dispensed it, as well) on my sewing projects. Yes, I should do a very good job on ensuring that everything fits, is well tailored, and that there are no loose thread ends to be seen. HOWEVER, if it's going to take me 4 hours to *perfect* one small part of a costume and I only have 6 hours to finish? Well, why would I spend 4 hours to perfect something when spending one (1) hour can get me "good" enough until I can make it better later? Besides, who is going to care that the inside lining stitches under the arm aren't 100% straight? Who's going to see it?
So, I've become somewhat of an "organic" costumer, in that sense. I've also carried that philosophy over to my knitting & crocheting. Dropped stitch? Easily fixed without tearing my hair out. Did I end up with 1-2 extra stitch in a row? Not a problem. I'll just K2TOG or P2TOG it out of existence (as long as it doesn't completely mess up the pattern)
I'll use lifelines, stitch markers, and all other manner of tricks just to save myself time and frustration *when* I make a mistake. (I'm not vain enough to think that my knitting is "perfect" and that I won't make a mistake.)
However, I've seemed to *not* taken that advice to heart when it comes to photography. (And you may ask yourself what this has to do with costuming or knitting or crocheting, but I'm getting to that....)
Specifically, I won't mark a knitting/crochet project as 'finished' (on Ravelry) until I can get a photo of it up onto the project page. HOWEVER, sometimes it takes me a while to get the photo because I'm too busy or the outside light isn't good enough or I just do not want to take out the lights and setup a whole photoshoot because I'm lazy.
Consequently, I'm missing photos of various projects I have finished because I haven't gotten around to taking those photos. Dragging out all of the professional gear can be sometimes a hassle and not to mention heavy/bulky to carry around ALL THE TIME.
Chase Jarvis, who is a very successful photographer whose work I do admire, said that the *BEST camera* is the one you have with you. And, nowadays, most people actually have their camera phone with them at all times. Chase even has a whole website dedicated to iPhone & mobile camera photography.
Sure, mobile or smartphone cameras don't have the bells & whistles of those fancy professional cameras (like my other ones) but it IS a camera. And if you HAVE a camera on you, you'll be more likely to use it.
So, this morning, before rushing off to work, I snapped several photos of myself wearing the sweater in the mirror using my iPhone, did some *minor* post processing on my special photo iPhone app, and now, I have a decent photo of my finished project.
Eventually, I'll get around to taking a better photo with my camera gear, but now I can consider this *DONE*. After all, perfection is the enemy of the done.
Wednesday, April 21, 2010
Casting On!
I love starting a new project; it's like sitting down to a new dessert that you know will be absolutely fabulous!
I had been pretty monogamous with my Mondo Cable Pullover, but have been jones-ing for a pair of socks for the past month, but I knew that if I put down the sweater, I wouldn't get back to it in a timely manner.
The day after finishing the pullover, I cast on for my 'vanilla' pair of socks (Cat Bordhi's Coralis sock pattern) with some Blue Moon medium weight sock yarn I had.
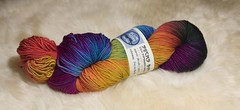
When I put the skein onto the swift, it looked like a veritable rainbow of colors. I loved looking at it. The resulting cake wasn't too attractive, but I'm keeping in mind the colors I saw on the swift. These will end up being a rainbow or "clown" socks, but I like having the motley of colors, especially after having only a few thousand stitches only in shades of red --- not that I don't like red; I love red, however, I do like variety!
I'm already 1" up on the toe.
I had been pretty monogamous with my Mondo Cable Pullover, but have been jones-ing for a pair of socks for the past month, but I knew that if I put down the sweater, I wouldn't get back to it in a timely manner.
The day after finishing the pullover, I cast on for my 'vanilla' pair of socks (Cat Bordhi's Coralis sock pattern) with some Blue Moon medium weight sock yarn I had.
When I put the skein onto the swift, it looked like a veritable rainbow of colors. I loved looking at it. The resulting cake wasn't too attractive, but I'm keeping in mind the colors I saw on the swift. These will end up being a rainbow or "clown" socks, but I like having the motley of colors, especially after having only a few thousand stitches only in shades of red --- not that I don't like red; I love red, however, I do like variety!
I'm already 1" up on the toe.
Tuesday, April 20, 2010
Mondo Cable KAL
I *finally* finished the Mondo Cable pullover late, late, late last night. I had a heckuva time with the neck band following her instructions. It just wouldn't come out correctly on one side. So I had to frog it at least twice.
(This is probably me not understanding her instructions because everyone else seems to grok it well enough). However, on the left hand neck edge, everything worked out well, and I could see what Bonne Marie wanted to do.
So, I just replicated that affect (which reminded me a lot of entrelac -- something I am wholly familiar) on the right hand neck edge.
And it worked beautifully. I tried it on last night and it fit perfectly, which pleases me to absolutely no end.
This morning, I wove in most of the ends, washed the sweater (which needed it after being dragged around for the past month), and set it out to dry. It really didn't need blocking -- I had steam blocked the body ribbing and it no longer curled.
AND NOW, since I had been so darn monogamous with this project, I get to work on a pair of socks! I wound a skein into a cake and cast on my favorite vanilla pair of socks with some very colorful Blue Moon medium weight.
(This is probably me not understanding her instructions because everyone else seems to grok it well enough). However, on the left hand neck edge, everything worked out well, and I could see what Bonne Marie wanted to do.
So, I just replicated that affect (which reminded me a lot of entrelac -- something I am wholly familiar) on the right hand neck edge.
And it worked beautifully. I tried it on last night and it fit perfectly, which pleases me to absolutely no end.
This morning, I wove in most of the ends, washed the sweater (which needed it after being dragged around for the past month), and set it out to dry. It really didn't need blocking -- I had steam blocked the body ribbing and it no longer curled.
AND NOW, since I had been so darn monogamous with this project, I get to work on a pair of socks! I wound a skein into a cake and cast on my favorite vanilla pair of socks with some very colorful Blue Moon medium weight.
Monday, April 12, 2010
Mondo Cable Pulli: KAL
Last night, I had my very first set-back on the Mondo Cable Pullover. I had modified the sleeve pattern slightly to include extra stitches for the left sleeve, and thought those modifications would suffice for the right sleeve.
However, I did not remember that my right bicep is ever-so-slightly bigger than my left bicep, which can make a huge difference when doing a somewhat closely fitted garment. When I sew, I always have to accommodate for a difference in sleeve sizes for both arms; I don't know why I thought knitting would be any different?
So, when I tried it on when the sleeve was mid-forearm, the bicep was a bit too snug for comfort. I thought that maybe blocking would "fix" the problem, but I opted to just rip back as while blocking fixes some things, it would be better if I just corrected the problem.
Luckily, I had put lifelines in at various places, so I ripped back to mid-bicep (about 4-5 inches) on the sleeves and just added about 2 more inches from the previous increase. After trying it on, the bicep area felt much more comfortable when wearing it.
While 4-5 inches might not seem like a lot, it's taking me FOREVER to get through this project, so it represents about 2-3 days worth of progress. Oh well.
Currently, I'm at elbow-length and doing normal decreases at this point.
So note to self: lengthen out the number of rounds before each decrease on the right sleeve.
However, I did not remember that my right bicep is ever-so-slightly bigger than my left bicep, which can make a huge difference when doing a somewhat closely fitted garment. When I sew, I always have to accommodate for a difference in sleeve sizes for both arms; I don't know why I thought knitting would be any different?
So, when I tried it on when the sleeve was mid-forearm, the bicep was a bit too snug for comfort. I thought that maybe blocking would "fix" the problem, but I opted to just rip back as while blocking fixes some things, it would be better if I just corrected the problem.
Luckily, I had put lifelines in at various places, so I ripped back to mid-bicep (about 4-5 inches) on the sleeves and just added about 2 more inches from the previous increase. After trying it on, the bicep area felt much more comfortable when wearing it.
While 4-5 inches might not seem like a lot, it's taking me FOREVER to get through this project, so it represents about 2-3 days worth of progress. Oh well.
Currently, I'm at elbow-length and doing normal decreases at this point.
So note to self: lengthen out the number of rounds before each decrease on the right sleeve.
Thursday, April 8, 2010
Spinner's Study: Finn
I often fluctuate between trying to get finished objects documented on my blog...or finishing up objects so I can update my blog. It's a whole chicken and egg thing. :-)
But, here's a recent finished spinning project with Finn that I spun up on my Kiwi. I wanted to spin things a little thicker than I had been lately, so I experimented with about 2 oz of Finn top.
First, a bit about Finn:
-----------------------------------------------------
Finn, Finnsheep, or Finnish Landrace Sheep, are among the Nordic breeds from which the Shetland, Icelandic, Romanov and Norwegian Spaelsau originate. All are believed to have descended from the wild mouflon sheep. Finn came from Finland to Canada in 1966 then into the US in 1968. In the U.S, their primary use has been in cross-breeding programs to increase lambing percentage of commercial flocks (as they mature early and breed often)
Finns come in a variety of natural colors with white or black being the most common, but they also come in gray, brown, or fawn. While the fleece is lightweight (5-6 lb.) it is highly praised by hand spinners as it blends easily with other fibers, has a long staple (3-6"), and a wool spinning count in the 50's (24 to 31 microns). Finnsheep fleeces are low-lanolin and high-yeilding fleeces -- averging 70% yield after cleaning.
The American Wool Council ranks Finn wool in the fine end of the medium-wool catagory with a micron range of 23.5 to 31and a staple length of 3 to 6 inches. The wool has a well-defined crimp, a very soft hand (feel) and beautiful luster. Finn wool is extremely popular with handspinnners and is one of the world's most requested wools for felting. It is the most lustrous in its class and is quite different than Shetland and Icelandic wool. Most wools of luster similar to Finn wool are from much coarser-coated breeds. (Finn Breeder's Association)
-----------------------------------------------------
Now, onto my spinning:
I had about 2oz of white Finn top that I purchased from Spunky Eclectic (I had purchased a slew of 2oz of various fibers to try out).

Since I had just finished spinning merino before Finn, this wool felt a bit 'scratchier' (but then again, anything after merino is scratchy). But when I began spinning it, I found it to be quite enjoyable.
Currently, I'm spinning this on my Ashford Kiwi with my largest whorl at 5:5 ratio. As a result, I'm spinning a bit thicker than I have been spinning other wools thus far. I'm spinning it at about a DK-sport weight as a single.
The staple length is about 4-5" long, so I'm experimenting with a "backdraw" worsted drafting instead of a front-draw worseted drafting (since I'd like to learn how to do a long draw later and I want to get used to doing a backdraw). I'm pulling the fiber hand back, while my passive (hand closest to the orifice) slowly lets the twist go into the fiber (and I'm careful never to have twist in the drafting triangle).
I spun up two bobbins of 1 oz of Finn, and created a 2-ply.
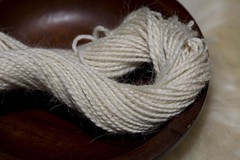
But, here's a recent finished spinning project with Finn that I spun up on my Kiwi. I wanted to spin things a little thicker than I had been lately, so I experimented with about 2 oz of Finn top.
First, a bit about Finn:
-----------------------------------------------------
Finn, Finnsheep, or Finnish Landrace Sheep, are among the Nordic breeds from which the Shetland, Icelandic, Romanov and Norwegian Spaelsau originate. All are believed to have descended from the wild mouflon sheep. Finn came from Finland to Canada in 1966 then into the US in 1968. In the U.S, their primary use has been in cross-breeding programs to increase lambing percentage of commercial flocks (as they mature early and breed often)
Finns come in a variety of natural colors with white or black being the most common, but they also come in gray, brown, or fawn. While the fleece is lightweight (5-6 lb.) it is highly praised by hand spinners as it blends easily with other fibers, has a long staple (3-6"), and a wool spinning count in the 50's (24 to 31 microns). Finnsheep fleeces are low-lanolin and high-yeilding fleeces -- averging 70% yield after cleaning.
The American Wool Council ranks Finn wool in the fine end of the medium-wool catagory with a micron range of 23.5 to 31and a staple length of 3 to 6 inches. The wool has a well-defined crimp, a very soft hand (feel) and beautiful luster. Finn wool is extremely popular with handspinnners and is one of the world's most requested wools for felting. It is the most lustrous in its class and is quite different than Shetland and Icelandic wool. Most wools of luster similar to Finn wool are from much coarser-coated breeds. (Finn Breeder's Association)
-----------------------------------------------------
Now, onto my spinning:
I had about 2oz of white Finn top that I purchased from Spunky Eclectic (I had purchased a slew of 2oz of various fibers to try out).

Since I had just finished spinning merino before Finn, this wool felt a bit 'scratchier' (but then again, anything after merino is scratchy). But when I began spinning it, I found it to be quite enjoyable.
Currently, I'm spinning this on my Ashford Kiwi with my largest whorl at 5:5 ratio. As a result, I'm spinning a bit thicker than I have been spinning other wools thus far. I'm spinning it at about a DK-sport weight as a single.
The staple length is about 4-5" long, so I'm experimenting with a "backdraw" worsted drafting instead of a front-draw worseted drafting (since I'd like to learn how to do a long draw later and I want to get used to doing a backdraw). I'm pulling the fiber hand back, while my passive (hand closest to the orifice) slowly lets the twist go into the fiber (and I'm careful never to have twist in the drafting triangle).
I spun up two bobbins of 1 oz of Finn, and created a 2-ply.
Wednesday, April 7, 2010
Mondo Cable Pulli
Currently, I'm still plugging along the Mondo Cable Pullover (KAL).

(The Mondo Cable 2nd Sleeve)
March 28th -- I finished the body on March 28, and used the prescribed 5/1 ribbing on smaller needles. I've also picked up the sleeves and worked on a few rounds. I increased the initial stitch count by 2 on the sleeves because I work out and my biceps are…well, large for my size. (Whenever I sew, I always have to modify the armscye & sleeves.)
March 29th -- Well, the sleeves are going a lot faster than the body. I tried on the sweater just before the 1st Decrease, and realized that if I followed the rest of the pattern, the sleeves would have almost no ease and maybe even negative ease..
So, I added another 4”, before started the 1st Decrease. And I’ve mapped out where to put the other decreases (approximately every 10 rounds with my modifications) so that it comes to the right length with approximate finished stitch count. I added a whole bunch of lifelines at various places just in case I need to frog back.
April 4th -- I finished the first sleeve. I shortened the sleeve just a tad and used a 4-2 ribbing (on same size needles) instead of the 5-1 ribbing (on smaller needles), and after trying it on, it’s only a tad bit longer than perfect, which is okay by me.
I’ve picked up the stitches on the second sleeve and am into the first few rounds. I’m still loving the pattern and will definitely make more. (It’s just a matter of having time to knit nowadays!)

(The Mondo Cable 2nd Sleeve)
March 28th -- I finished the body on March 28, and used the prescribed 5/1 ribbing on smaller needles. I've also picked up the sleeves and worked on a few rounds. I increased the initial stitch count by 2 on the sleeves because I work out and my biceps are…well, large for my size. (Whenever I sew, I always have to modify the armscye & sleeves.)
March 29th -- Well, the sleeves are going a lot faster than the body. I tried on the sweater just before the 1st Decrease, and realized that if I followed the rest of the pattern, the sleeves would have almost no ease and maybe even negative ease..
So, I added another 4”, before started the 1st Decrease. And I’ve mapped out where to put the other decreases (approximately every 10 rounds with my modifications) so that it comes to the right length with approximate finished stitch count. I added a whole bunch of lifelines at various places just in case I need to frog back.
April 4th -- I finished the first sleeve. I shortened the sleeve just a tad and used a 4-2 ribbing (on same size needles) instead of the 5-1 ribbing (on smaller needles), and after trying it on, it’s only a tad bit longer than perfect, which is okay by me.
I’ve picked up the stitches on the second sleeve and am into the first few rounds. I’m still loving the pattern and will definitely make more. (It’s just a matter of having time to knit nowadays!)
Tuesday, April 6, 2010
Spinning a Japanese Maple
So, a while ago, I received this fiber & spindle from Butterfly Girl Designs:

Japanese Maple - 70% merino, 20% bamboo, 10% nylon firestar
It reminded me of a Japanese Maple in the fall. Much like this:

(BTW, I love Japanese Maple Trees)
I used the pictured drop spindle to turn it into this:

And then, the poor fiber sat resting all this time, because I wasn't sure what to do with it! I wasn't 100% happy with how it turned out, because the colors (at least to me) seemed muddy, even though I loved the fiber colorway. I wanted more of the gold to pop.
However, I know that sometimes how the fiber looks prepared is a bit different from how it might spin up...or even how it might knit up. So, I wasn't ready to trash the project.
I debated plying it against itself or maybe spinning something to match or maybe a commercial yarn. In perusing through my stash, I remembered that I had this:

Jagger 100% Wool Cone -- 5000 yards
Certainly, I could spare a few hundred yards for this project? LOL. The coloration was close enough to the gold bamboo in the batt, so I opted to give it a go. So, I prepped up the Kiwi wheel for plying.
And at first, I wasn't too happy with how it looked, except for certain spots. But I opted to keep trying. I *knew* that the gold would bring out the colors and to trust myself on my knowledge of color theory. My plying wasn't the greatest, but a little help from Jasmin and I got this....


I am definitely in love. The gold really made all of the colors pop and tied everything together. I currently have 495 yards of laceweight/fingering weight yarn. Plus, I still have some of the batt left over. I think I might be able to squeeze another 50-60 yards out.
And think I've found the *perfect pattern* to go with the yarn. I'm not wholly sure how well this yarn will look in this pattern. So I will try a pattern swatch. Now, I just have to figure out how to knit up this pattern (coz after reading it, my head is spinning!)
Japanese Maple - 70% merino, 20% bamboo, 10% nylon firestar
It reminded me of a Japanese Maple in the fall. Much like this:
(BTW, I love Japanese Maple Trees)
I used the pictured drop spindle to turn it into this:
And then, the poor fiber sat resting all this time, because I wasn't sure what to do with it! I wasn't 100% happy with how it turned out, because the colors (at least to me) seemed muddy, even though I loved the fiber colorway. I wanted more of the gold to pop.
However, I know that sometimes how the fiber looks prepared is a bit different from how it might spin up...or even how it might knit up. So, I wasn't ready to trash the project.
I debated plying it against itself or maybe spinning something to match or maybe a commercial yarn. In perusing through my stash, I remembered that I had this:
Jagger 100% Wool Cone -- 5000 yards
Certainly, I could spare a few hundred yards for this project? LOL. The coloration was close enough to the gold bamboo in the batt, so I opted to give it a go. So, I prepped up the Kiwi wheel for plying.
And at first, I wasn't too happy with how it looked, except for certain spots. But I opted to keep trying. I *knew* that the gold would bring out the colors and to trust myself on my knowledge of color theory. My plying wasn't the greatest, but a little help from Jasmin and I got this....

I am definitely in love. The gold really made all of the colors pop and tied everything together. I currently have 495 yards of laceweight/fingering weight yarn. Plus, I still have some of the batt left over. I think I might be able to squeeze another 50-60 yards out.
And think I've found the *perfect pattern* to go with the yarn. I'm not wholly sure how well this yarn will look in this pattern. So I will try a pattern swatch. Now, I just have to figure out how to knit up this pattern (coz after reading it, my head is spinning!)
Subscribe to:
Posts (Atom)